Flint Knapping 101 (With How-To Videos)
What would you find if you were to empty your pockets right now?
If you’re like me, you’ll pull out several useful survival tools; at least one being a small knife or blade.
And I’d imagine your survival pack includes several larger survival blades, right? Plus, gear to maintain them (i.e., a knife sharpener).
Because we all know how insanely useful a sharp tactical knife is in an emergency.
And it’s not just knives; survival hatchets, axes, and multitools are all bladed tools worth owning.
The bottom line is this:
If you’re into survival, bushcraft, and preparedness, owning an arsenal of bladed survival tools makes sense.
And if you want to be able to make your own blades from nature, you need to learn the art of flint knapping.
So today, we’re going to go over the following flint-knapping topics in detail:
-
Brief Flint Knapping History
-
Best Stones And Materials For Knapping
-
Basics On How Knapping Works
-
The Different Stone Tools You Can Make
-
Different Flint Knapping Techniques
-
Tools You Need To Start Flint Knapping
-
Flint Knapping Safety Tips
-
Flint Knapping Instruction Options
-
Stone Knapping For Survivalists

Are You Ready For The Tough Times Ahead? Take My 60 Sec Quiz To See If You’re Part Of ‘The Fragile Masses’ Or Not… Start Quiz Now!
Brief Flint Knapping History
Thousands of years ago, ancient humans discovered the usefulness of sharp blades.
Prehistoric everyday carry kits all contained knife blades, spares, and the tools to craft them.
But these blades would have looked entirely different!
Before man mastered metal, these tools were made from stone via a process we call knapping.
Are you picturing an Indian arrowhead right about now? Exactly!
Knapping stones into sharp, useful blades is an art. An art perfected by our ancestors.
Throughout the ages, you can see small refinements in the process. New knapping techniques were developed; some thrived, while others were forgotten.
Most of what we know today has been discovered through years of research. Investigating the stone tools left behind at archeological sites around the world.
These artifacts have given researchers insight into how early men shaped, crafted, and shaped their own tools.
↓ Learn How To Flint Knap ↓
Best Flint Knapping Stones
Not all stones are created equal when it comes to knapping.
Soft Stones
Soft stones such as sandstone, limestone, and shale are too fragile to hold an edge.
Creating a fine point or cutting edge from these “rocks” quickly dulls or breaks off entirely.
Hard Coarse Stones
On the other hand, more durable, coarse-grained stones (like granite) are too hard for knapping.
The sizeable crystalline structure of these rocks makes them fracture in unpredictable ways.
This leads to many broken or poorly formed stone tools with no good way to refine them.
Best Knapping Stones
Hard, fine-grained rocks such as flint, chert, agate, and Jasper are the best stones for knapping.
These knapping stones land somewhere between the fragile rocks and extremely hard rocks.
These stones fracture in clean flakes along predictable paths. This allows more precision and control of the size and shape of the pieces you remove.
This makes the shaping process far easier, and the end results are better suited to create your desired end product.
Besides better shaping, these knapping stones are durable enough to hold a sharp edge for a considerable length of time.
Rock and stones come in all different shapes and varieties, enough to write an entire book about them.
So here’s an overview video to get a sense of all the different knapping rocks you can find in nature.
↓ Flintknapping Rock Descriptions Overview ↓
And here’s a video showing you an example of hunting for chert (knapping rocks) in nature.
Note: different regions will have different amounts of knapping rocks in the wilderness.
However, even if your region doesn’t have natural chert, you might find some imported for river banks, gravel roads, or railroad tracks.
↓ Finding Chert Easily ↓
Obsidian
Another suitable material for flintknapping is obsidian (a natural volcanic glass). Obsidian is a fantastic material for knapping. But, it requires more experience and is less forgiving for a novice knapper.
You’ll break A LOT of prototypes and probably cut up your hands more so than with the other materials.
Once you’ve got the hang of knapping, obsidian can produce edges sharper than some surgical scalpels!
However, these sharp blades are very brittle. So they work best when they don’t come into direct impact with harder materials such as bone or wood.
It’s best to use a sharp obsidian edge like a razor blade. It’s not strong enough to act as a traditional knife, but it’s excellent at precision cuts.
Here’s a video showing spalling of huge obsidian boulders into smaller chunks – perfect for knapping into sharp tools.
↓ Spalling Huge Obsidian Boulders For Flintknapping ↓
Glass and Porcelain
Finally, we now have manmade materials that work well for knapping.
Thick shards of glass and broken chunks of porcelain are easy to find.
These readily available chunks (i.e., an old porcelain toilet) can provide a lot of practice material for shaping. Helping hone your craft before trying it on harder-to-find knapping rocks.
Here’s a video on how to recycle the flat bottom of glass bottles for knapping tools.
↓ Flint Knapping #1 Breaking Bottles ↓
This video shows you how to use an old toilet tank and turn a broken chunk of it into a sharp arrowhead.
↓ Toilet Porcelain Spearhead ↓
As A Way To Introduce You To Skilled Survival, We’re Giving Away Our
Ultimate Survival Gear Checklist. Click Here To Get Your FREE Copy Of It.Basics Of Flint Knapping
Knapping is called “lithic reduction” if you’re an archeologist.
This process takes advantage of fracture patterns found in fine-grained stones.
These types of stones do not have natural fracture planes, which define how they break.
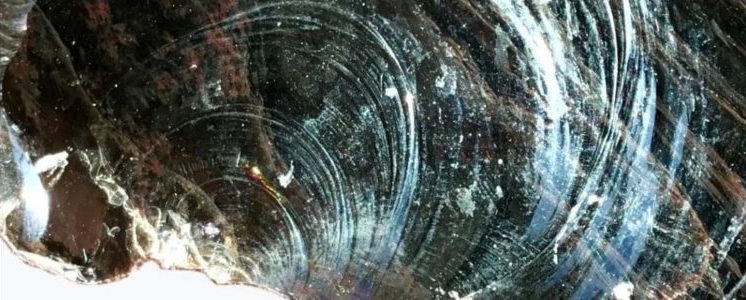
This means they fracture in what’s called a “conchoidal” pattern.
Basically, how you impact the stone controls how it breaks apart instead of the natural grains.
A smooth, curved, concave pattern spreads away from the impact site when a rock is hit with enough force.
Small ripples show the progression of shock waves at the time of the separation (see photo below).

Obsidian Conchoidal Fracture Example
Knappers use this fracture pattern to break away small pieces from the front and back faces of the stone. Gradually shaping the stone and thinning the edges until the two faces meet.
Varying the angle and force of the impact help determine the path the fracture will follow. This allows you to control the shape of the removed flakes.
Skilled knappers can fine-tune these variables to achieve clean and consistent results.
To get a better understanding of what a conchoidal fracture looks like – watch this short slow-motion video.
↓ Knapping Slow Motion ↓
Different Stone Tools You CAN Make
Paleolithic toolmakers could fashion just about any bladed tool from stone.
When most people hear the term knapping they think of arrowheads and spearpoints. But many examples of stone knives and axes have been discovered.
Stone scrapers were used to:
- prepare hides for tanning
- remove bark from branches
- shape wood for arrow shafts and bows
For example, here’s an overview video on how to make a simple arrowhead by flint knapping.
↓ How To Flint Knap An Obsidian Arrowhead ↓
Sometimes, making larger tools from a series of small blades was more efficient.
This allowed toolmakers to conserve rare stones and replace blade sections as they wore out.
This was often better (and easier) than replacing the entire blade – (see image below).

Sectioned Knapped Blade Example
Even more impressive, ancient toolmakers created drills with stone points.
Drills capable of making holes through wood, bone, and even stone!
It’s incredible to think of such a brittle material being able to function as a drill point!
↓ How To Make A Pump Drill ↓
As A Way To Introduce You To Skilled Survival, We’re Giving Away Our
Ultimate Survival Gear Checklist. Click Here To Get Your FREE Copy Of It.Flint Knapping Techniques
There are two main methods of knapping stone; 1) Percussion flaking and 2) Pressure flaking.
1. Percussion Flaking
Percussion flaking is all about how you strike a stone to break off chunks.
You can either hit it directly or indirectly with tools such as a hammerstone or a billet.
This method applies significant forces to the stone and removes large flakes.
Most knappers start with percussion flaking to rough out the shape of their stone.
Then they move on to pressuring flaking for the more delicate work.
If you’ve watched some of the previous videos, you’ve seen several examples of direct percussion flaking.
However, here’s an interesting video showing you the method of indirect percussion flaking for more control.
↓ Front View Of My Indirect Percussion Flintknapping ↓
2. Pressure Flaking
Pressure flaking is a more delicate operation.
Pressuring flaking is applying a fine-point tool in direct contact with the stone.
Then slowly adding more leverage in a controlled fashion.
Once enough pressure is applied, the stone will fracture.
This method doesn’t produce extremely large flakes and will work more slowly through the stone.
Yet, it’s ideal for detailed work along edges and when making little notches and points in a tool.
Here’s a video showing how pressure flaking works.
↓ Flint Knapping 101 Basics – Pressure Flaking Indian Style ↓
Must-Have Flint Knapping Tools
First off, you don’t have to buy expensive tools!
Remember, this was an art practiced thousands of years ago.
So all the tools needed were found or created from natural materials.
With that said, some people prefer to invest in modern knapping tools, so we’ll provide some examples of both.
A hammer stone and copper billet or antler are the general tools for percussion flaking.
Most knappers rely on heavy rounded river rocks for hammerstones. Some of these river rocks have much of the initial shaping done by the river.
A billet is a long cylinder of a durable material such as copper, antler, or stone. Some hardwoods will also work, but they’re not as long-lasting as other materials.
Here’s a video that provides some hammer stone selection tips for knapping.
↓ Hammerstone Selection Tips ↓

You can also use a deer antler as your “go-to” percussion flaking instrument.
If you hunt or can find them in nature, awesome; if not, you can also buy them online.
Here’s an example of percussion flaking using a deer antler.
↓ Knapping A Bitface Using A Moose Antler Billet ↓
Once you move on to pressure flaking, you’ll need to make a few more tools.
Traditionally a finely-pointed section of deer antler is used.
But many modern knappers opt for wooden or plastic rods with interchangeable copper points.
This more modern setup provides a precise tip and maximum control.
Here’s a video showing you how to make your own pressure-flaking tools with copper and wood.
↓ Making Flint Knapping Tools For Pressure Flaking ↓
This video provides details on making pressure flaking tools with antlers.
↓ Make Your Own Antler Flintknapping Tools ↓
As A Way To Introduce You To Skilled Survival, We’re Giving Away Our #78 Item Complete Prepper Checklist. Click Here To Get Your FREE Copy Of It.
Flint Knapping Safety Tips
Of course, any activity that involves 1) smashing rocks together and 2) breaking off scalpel-sharp flakes of stone has some safety considerations.
First, you’ll want to use a leather pad to cover your thighs.
A thick, durable leather pad will protect your pants (and your leg) from being sliced up with every strike.
Use a cowhide leather welding blanket if you can’t find one made specifically for knapping.
Also, you’ll need some safety glasses to stop flying chips from damaging your eyes.
Leather work gloves, long pants, and closed-toe shoes are also a good idea as well.
Flakes can fly in any direction, and you’ll begin building a pile of sharp scrap material around your feet.
A good canvas tarp might be helpful since it allows you to contain the scraps easily.
Enabling you to bundle them quickly once you’re done knapping and ready to clean up.
You should also work in an area with proper ventilation (preferably outside), or you can get a durable fan and point it so it takes all dust and debris away from your face.
This is because you’ll create a ton of fine rock dust when fracturing stone.
These micro-shards can be hard on your lungs.
Silicosis is a form of lung disease caused by inhaling microscopic stone particles.
Silicosis has long been associated with miners and others working with stone.
Here’s a good overview video on knapping safety from a pro.
↓ Flintknapping Safety ↓
Flint Knapping Instruction Options
Flintknapping is one skill where hands-on instruction is valuable.
Sure, there’s a ton of material online for the basics, but it’s worth finding someone to teach you how to get started.
This goes double if you’re serious about mastering this ancient technique.
Becoming a self-taught flintknapper is a long, slow, and often frustrating process.
As with any fine motor skill, minor position, and technique changes can significantly impact results.
Spotting these minor differences in a video is extremely difficult.
Instead, proper instruction can often make learning more fruitful and enjoyable.
You can be proud of turning an afternoon of frustration into a sharp tool.
Check with your local rock clubs – many of them have local contacts for all kinds of rock-related crafts.
If possible, go to a “knap-In.”
These are workshops where people experiment with different flint knapping techniques.
I’ve found that the organizers of these events want to share their passion for knapping stones.
They love to teach others these old skills, so they are not lost, especially those who show a passion for it.
You can also invest in some quality flint knapping books.
These books are a good idea to help build your flintknapping knowledge and understanding fast.
Note: click on any of the book images to learn more (all these books are worth an investment).
Stone Knapping For Survival
Serious survivalists should always strive to become more self-reliant.
That’s because self-reliance equates to more independence.
Becoming less dependent on others in a real-world disaster or emergency.
There’s not much that’s more self-reliant than being able to create durable tools from nature.
I won’t be throwing out my new survival knives; thanks! But I also cherish the confidence I get from fashioning my own tools from nature.
Making flintknapping a significant survival advantage.
Plus, it worked for our ancestors – otherwise, we wouldn’t be here!
↓ 10-Minute Challenge! Flint-Knapping Chert From Start To Finish ↓
Jason K.
P.s. Are you ready for the tough times ahead?
Find out now by taking my short Readiness Score Quiz – it’s absolutely free.
Once complete, you’ll know exactly where you stand on the “fragile” vs.” resilient” spectrum.
So click here to start the Quiz….And don’t worry; the questions are so easy a 3rd grader could answer them.
Click on the image to begin the Quiz and find out once and for all if you’re part of “The Fragile Masses” or “The Resilient Few.”
The post Mastering The Ancient Art Of Flint Knapping appeared first on Skilled Survival.


