Among ancient weapons, the spear might well be the king of the battlefield. Compared to swords, axes, clubs, and other melee weapons, spears have major advantages both logistically and operationally.
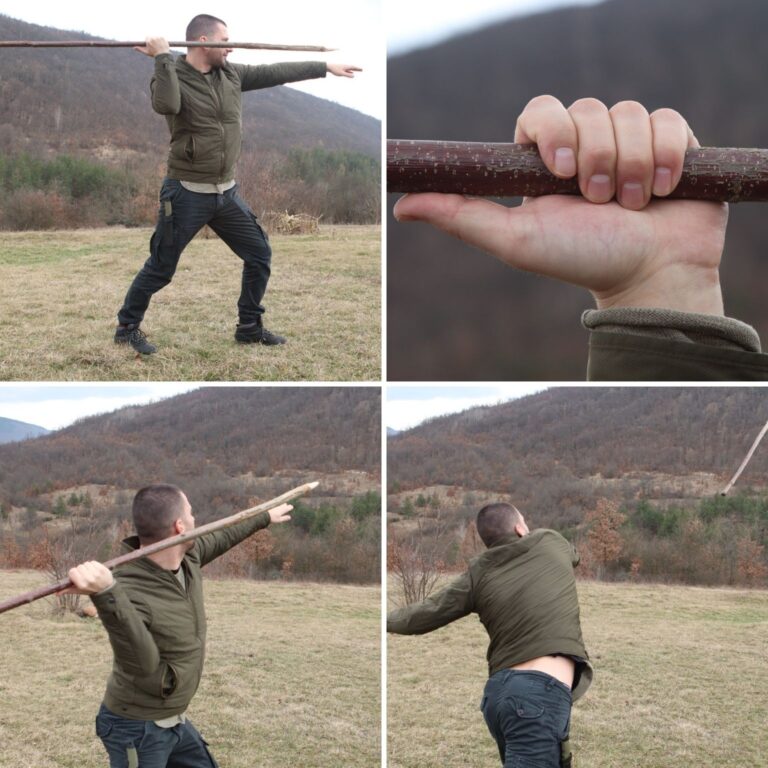
Spears provide reach, and reach equals safety. Spears used as part of a group act as a force multiplier compared to other weapons and spears can still inflict lethal injuries easily despite their smaller blades. Spears are also the picture of simplicity and resource-light to craft.
Most importantly, spears are also highly versatile, and work well as throwing weapons that can be recovered and thrown again.
Unlike many other throwing weapons, spears are capable of bringing down a target with one good shot, and durable enough to be used multiple times with little damage to the spearhead.
But if you want to get the most out of your spear as a throwing weapon you’ll need to learn and practice the proper technique.
This isn’t quite as intuitive as you might think, but you need not worry about that since we are bringing you a step-by-step guide to throwing a spear the right way.
Why Should Preppers Consider Spears?
Spears may not be the first thing that comes to mind when preppers consider their armory, but they should!
Spears have a lot of advantages over other close-combat weapons. They are simple to make or fashion from found materials, and can be used equally well for both hunting and self-defense.
As mentioned above, spears are also one of the precious few melee weapons that work just as well when thrown as when they’re wielded in the hand.
But like all weapons, spears have some drawbacks. They require a certain level of skill to use effectively, and if you don’t have the skill you can easily injure yourself.
That being said, it does not get much easier to use than a literal blade on a stick! Spears also require more space to use than many other weapons, so they might not be ideal for fighting in cramped quarters.
But overall, spears are an excellent choice for anyone preparing for a disaster scenario, especially one where guns or their ammunition is scarce or totally forbidden.
Considered as a throwing weapon, the range and efficacy of the spear is largely influenced by its weight and shape. Still, pretty much all of them are inherently aerodynamic and lend themselves to being thrown with accuracy and impact.
Smaller, purpose designed throwing spears can be thrown farther and easier, but even if one decided to throw a broadhead hunting spear the technique is the same! This affords a level of flexibility that few other ancient weapons can match.
That being said, it is always the thrower and not the spear that determines whether or not it will hit home. Read on to learn all the steps needed to throw a spear with power, grace, and accuracy!
How to Throw a Spear the Right Way
Now that you know all the reasons why spears make such great throwing weapons, it’s time to learn how to use one effectively! The steps below will take you through the process of throwing a spear step-by-step.
Step #1. Assess the Spear.
Not all spears are created equal, and some are better suited for throwing than others. A hunting spear with a broadhead is ideal for taking down large game at but its weight makes it harder to throw accurately at long distances.
A smaller, thinner throwing spear like a pilum or javelin is much easier to throw farther, and throw it well, but might not inflict a terrible wound without a good shot.
Take the time to get acquainted with your spear and its properties before you move on to throwing practice.
Step #2. Determine Balance Point.
The balance point is the point on the spear where it will sit level or nearly so in the hand. This is the ideal place to hold it. You want to find this spot, and establish your grip here to ensure you can attain maximum range, power and accuracy when throwing.
And this is not an operation you need to leave to feeling or guesswork. If you hold your hand out in front of you parallel with the floor and place the shaft of the spear in your palm you should notice it leaning or teeter-tottering to one side or the other.
That’s what you don’t want! Move the spear in your palm opposite the direction it is leaning until you find it perfectly balanced and then you’ll have established the balance point.
Note that sometimes experimentation is worthwhile, and Spears with particularly large or heavy spearheads or counterweights on the opposite end of the shaft might need to be gripped just ahead of or behind this balance point for best effect and control.
Step #3. Establish Master Grip.
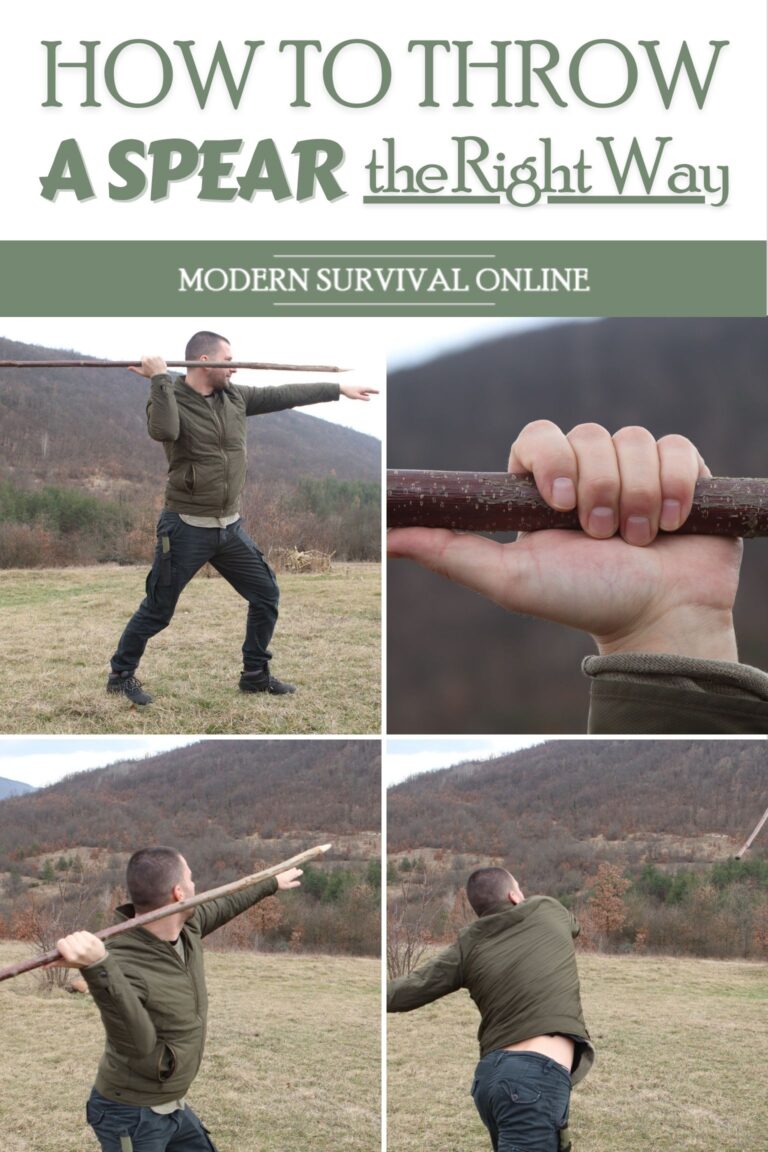
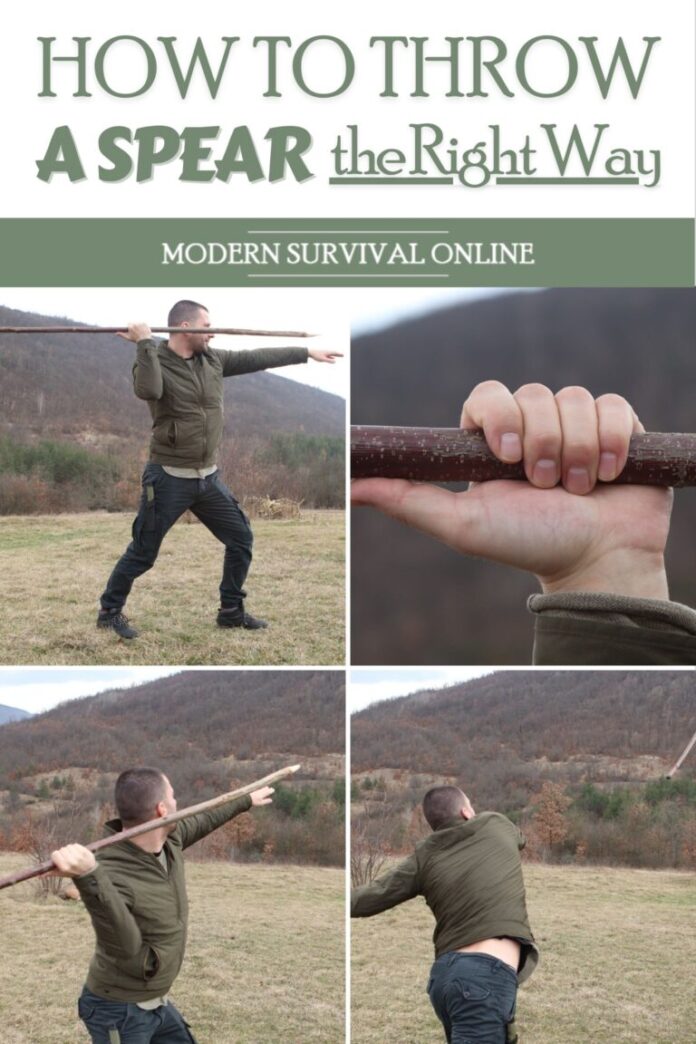
There are many different grips you can use when throwing a spear, but the master grip is the most common and most effective. To establish the master grip, hold the spear with the four fingers of the gripping hand curled around in a normal grip but the thumb held on the opposite side straight and in line with the shaft.
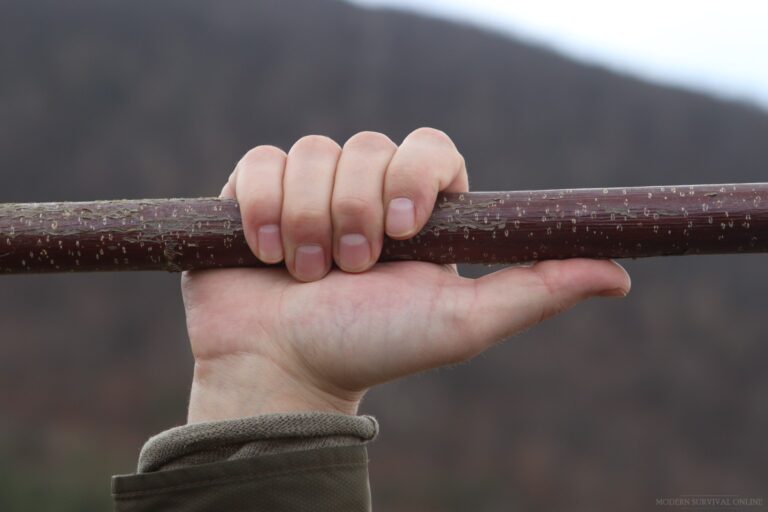
This will give you maximum control over the spear when you throw it, and also allow it to be held for a length of time with minimal fatigue.
Note that you do not need to death grip the spear to effectively control it or generate momentum. A firm grip that will provide control without wearing you out or inducing any jitters or glitches through the throwing process is ideal.
Step #4. Hold at Eye-Level, Point Forward.
When you are ready to throw, hold the spear at eye-level and point it directly in front of you. Your hand gripping the spear should be in line with your ear or nearly so.
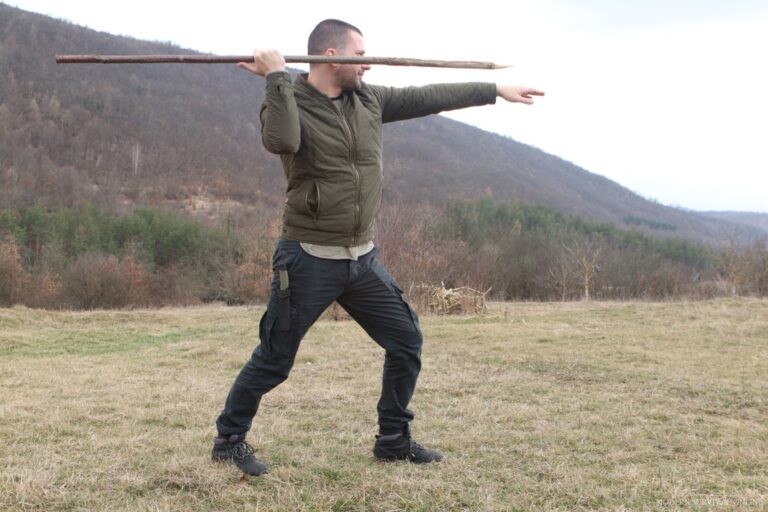
The basic position looks very much like you are reaching up to blow the air horn on a big rig truck, or block an incoming punch. This will help you line up your shot and increase your chances of hitting your target.
You should not allow your arm to sag so much that you are fully flexing your biceps, nor raise the spear so much that it is above the line of your eyes. This basic position will inform the rest of our throw.
Step #5. Stance.
There are many different stances you can use when throwing a spear, but the most important thing is to be comfortable and stable while enabling the necessary movement to generate momentum and facilitate the rotation that is vital to provide power and accuracy.
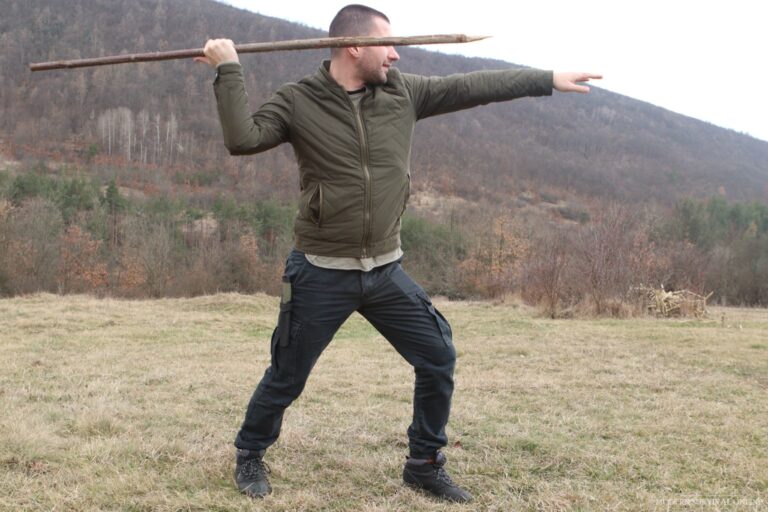
A proper spear-throwing stance looks somewhat like a modified boxing or fighting stance. If you are right-handed, your left leg is still the lead leg and should have your toes pointing directly towards your target. Meanwhile, your dominant side leg is trailing, almost directly beneath the throwing arm.
The toes of the dominant leg should be pointed 90° perpendicular from the leading toes. This provides the foundation to push off quickly and forcefully with even a single step to generate momentum for the spear.
Step #6. Aim.
Like with any other weapon, you want to aim for the target’s center of mass to ensure a good hit. The non-throwing arm should be raised with the hand flat, and the fingers extended up to eye level. The spear thrower will sight along these fingers to the target.
The arm and hand used for aiming may be kept extended while stepping or moving forward to generate momentum for the throw. They may also be raised and aiming accomplished immediately prior to the release of the spear.
Step #7. Step and Draw Back.
Ideally, you don’t want to throw a spear while remaining stationary, although you can. Maximum power and range is generated by getting your body moving forward first. This momentum will be transferred into the spear upon release.
To throw the spear from a standstill, draw the spear back from the resting position as you push off of your trailing foot while you take a step forward with your leading foot. Be sure to keep your grip firm and maintain control of the weapon at all times.
To throw the spear from a short run, simply jog forward while drawing the spear back immediately prior to release.
Step #8. Rotate Shoulders and Torso.
Once you have drawn the spear back fully, it’s time to start the throwing motion. The objective is to throw the spear very much like one would throw a baseball, emphasizing the sequential rotation of the hips, torso, shoulder and then arm immediately prior to release to maximize the accumulation of momentum.
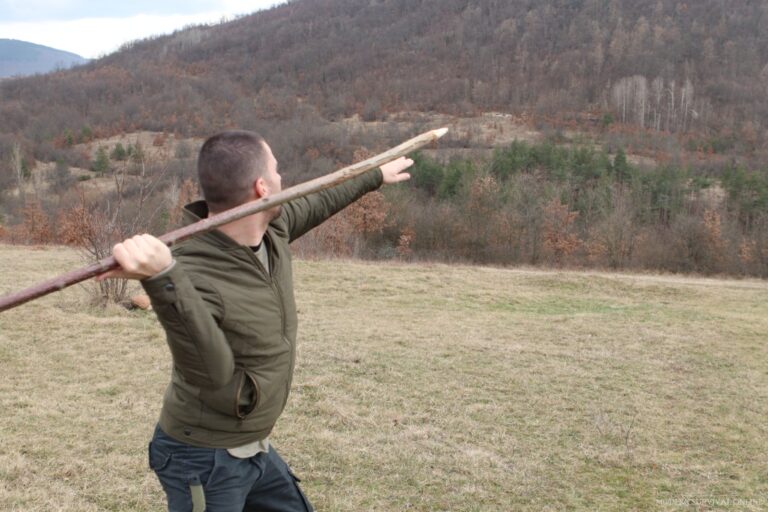
When you put all of these movements together you’ll throw a spear with something resembling a whipping motion of the arm.
This should be done while directing the spear in a straight line towards the target without allowing it to bobble, dip or otherwise deviate from the intended point of impact.
This can be explained at length, but practice will quickly show you any errors in your technique. This is one of those things that are much easier to demonstrate than to talk about!
Step #9. Release and Follow Through.
At the apex of the throw, the fingers of the gripping hand release the spear as the hand is snapped forward with the thumb being the last digit in contact.
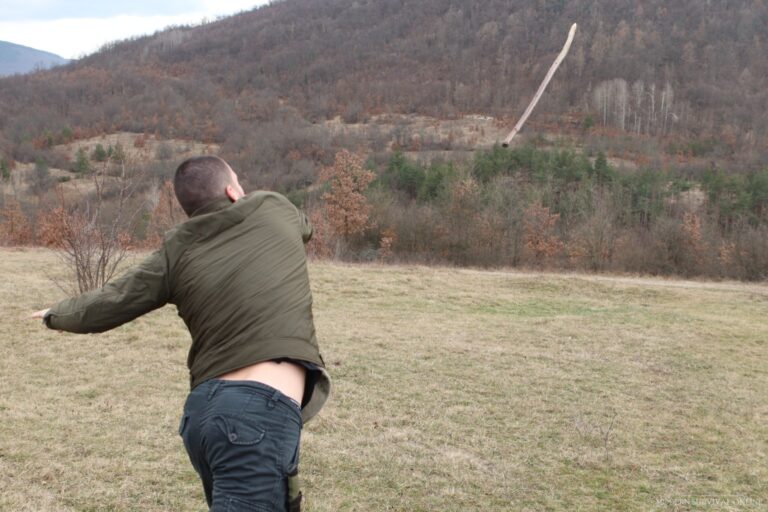
When you release the spear, you want to do so with a smooth, fluid motion. Don’t just let go of it, but rather continue to move your arm in the direction you are throwing. This will help increase accuracy and distance. Visualize yourself projecting the spear two and through the target.
Step #10. Follow Through!
After you release the spear, follow through with your throw. This means keeping your arm and torso moving along the prescribed path determined by the thrower. Don’t collapse or otherwise fall apart as soon as you release.

A good throw will see you following through all the way and nearly a full 180° rotation while the throwing arm continues through its arc of movement moving back downward towards the waist.
Follow through is one of those components of spear throwing, or any kind of throwing for that matter, that is easy to minimize, forget about or become lazy on concerning implementation.
Don’t do it! Spear throwers who make it a point to follow through with authority will always throw further and more powerfully than those who just sort of stop as soon as the spear leaves their hand.
And that’s it! With a little practice, you’ll be throwing spears like a pro in no time!
Always Use Safe Procedure When Practicing or Hunting
Spear throwing is a great way to take down game or potentially protect yourself from an attacker but it’s important to always use safe procedures when practicing or hunting.
It is a funny thing, I see a great many people who would be very cautious when shooting a bow or a firearm sort of relax and throw caution to the wind when they practice throwing a spear.
Perhaps this is because a spirit lacks the attendant velocity that arrows or bullets do and this lulls people into a false sense of security. Maybe they just don’t think a thrown spear is going to go that far or is that dangerous.
Believe me, they definitely are. You should always make it a point to ensure you have a clear line of sight and that there are no obstacles in the way that could potentially cause harm.
This means taking pains to verify that no person or animal could come between your spear and the target, or suddenly pop up near the target.
Speaking of targets, resist the temptation to throw your spear into a hard target like a plank of boards or a tree, at least until you are ready to start testing your power and accuracy.
Hard targets introduce the possibility of deflection or ricochet, and are definitely hard on your spearhead. Soft targets such as hay bales, commercial archery targets, and bundles of pool noodles make for good, cheap targets that are easy on your spear and will greatly reduce the chance of deflection.
Use your head, implement some simple precautions, and take care of your spear and your target area and your practice will be safe, productive, and ongoing!
You’ll be a Spearman in No Time!
The spear is an ancient weapon, and one that rarely gets any time in the spotlight today, but they remain as useful and as deadly now as in the past.
Spears are easy to use and powerful in close-quarters combat, affording reach that other melee weapons simply cannot match, but they also work wonderfully as a powerful and accurate projectile over short distances.
Learning how to throw a spear can greatly increase your own capabilities with one, and they are adorable enough to be thrown several times without breaking. Learn how to throw a spear properly and you’ll be ready to hunt or defend yourself at a moment’s notice!
What do you think about the idea of spears in a long-term survival context? Do you prefer lighter throwing spears or heavier spears intended to be kept in the hand? Let us know down in the comments!
 Like what you read?
Then you’re gonna love my free PDF, 20 common survival items, 20 uncommon survival uses for each. That’s 400 total uses for these dirt-cheap little items!
Just enter your primary e-mail below to get your link:
We will not spam you.


 Watch this video on YouTube