A Kentucky man won a $450,000 settlement after suing his employer, Gravity Diagnostics, over an unwanted office birthday party that led to his firing.
According to court documents, the employee has an anxiety disorder that can trigger panic attacks in highly stressful situations such as “being the center of attention,” so he asked his employer not to throw him a birthday party, the Lexington Herald-Leader reported.
Gravity Diagnostics threw the man an office lunchtime birthday party against his wishes triggering a panic attack.
The traumatized employee ran out of the building and spent his lunchbreak in his car.
He was fired four days later after management confronted him about his reaction to the birthday party, the paper reported.
A jury awarded the employee $450,000 in damages this week – $120,000 in lost wages and $300,000 for “past, present and future mental pain and suffering, mental anguish, embarrassment, humiliation, mortification and loss of self-esteem,” according to court documents, the paper reported.
The lawsuit was filed on grounds of disability discrimination and retaliation. the paper reported.
It wasn’t the fear of getting older, but rather an anxiety disorder that can spur “panic attacks in stressful situations,” according to court documents. The employee, who was hired in October 2018 by Gravity Diagnostics, did not want a celebration because “being the center of attention” can trigger his disorder, the documents state.
He eventually sued Gravity Diagnostics, and this week, a jury awarded the man $450,000 in damages for his lost wages and emotional distress.
“My employees de-escalated the situation to get the plaintiff out of the building as quickly as possible while removing his access to the building, alerting me and sending out security reminders to ensure he could not access the building, which is exactly what they were supposed to do,” Brazil told Link NKY. “As an employer who puts our employee safety first, we have a zero-tolerance policy and we stand by our decision to terminate the plaintiff for his violation of our workplace violence policy.
When the employee left the office on Aug. 7 to spend the remainder of his birthday lunch in his car, he texted his office manager asking why she failed “to accommodate his request (to) … forego the standard birthday celebration,” his attorney states.
A day later after he arrived for work, he was called into a meeting with two superiors, who “confronted and criticized” him for how he reacted to the birthday party he did not want, according to the lawsuit. This caused him to have another panic attack.
He was sent home from work for the next two days and later apologized for having the panic attack. On Aug. 11 he received an email stating “he was being terminated because of the events of the previous week,” the lawsuit states.
Gravity Diagnostics is expected to appeal the verdict.
The Columbia Police Department has confirmed that a mass shooting incident has taken place inside the Columbiana Centre Mall in South Carolina.
An evacuation of those inside the building is currently underway and it is not currently known whether the shooter has been apprehended, is still active, or had fled the scene. Videos on social media have displayed a massive police mobilization and various agencies have reported they are on scene assisting with the situation. A spokesman for the Richland County Sheriff’s Department confirmed to The State newspaper that they are also on the scene.
Local Fox Carolina reporter Cody Alcorn said that he heard from sources that there are “multiple victims” of the shooting. And unconfirmed reports on social media from those in the region suggest that as many as 13 have been injured.
In a statement regarding the shooting, the local police informed the public that shots had been fired and officers were in the process of assessing the scene.
“We have confirmed that people have been injured during the incident—they are receiving medical attention,” Columbia PDSC later added. “The extent of the injuries unknown at this time. Columbia PDSC officers have been evacuating the mall and getting people to safety.”
A number of people have been injured but the extent of those injuries has not been determined.
This is a developing story and updates will follow as they arrive.
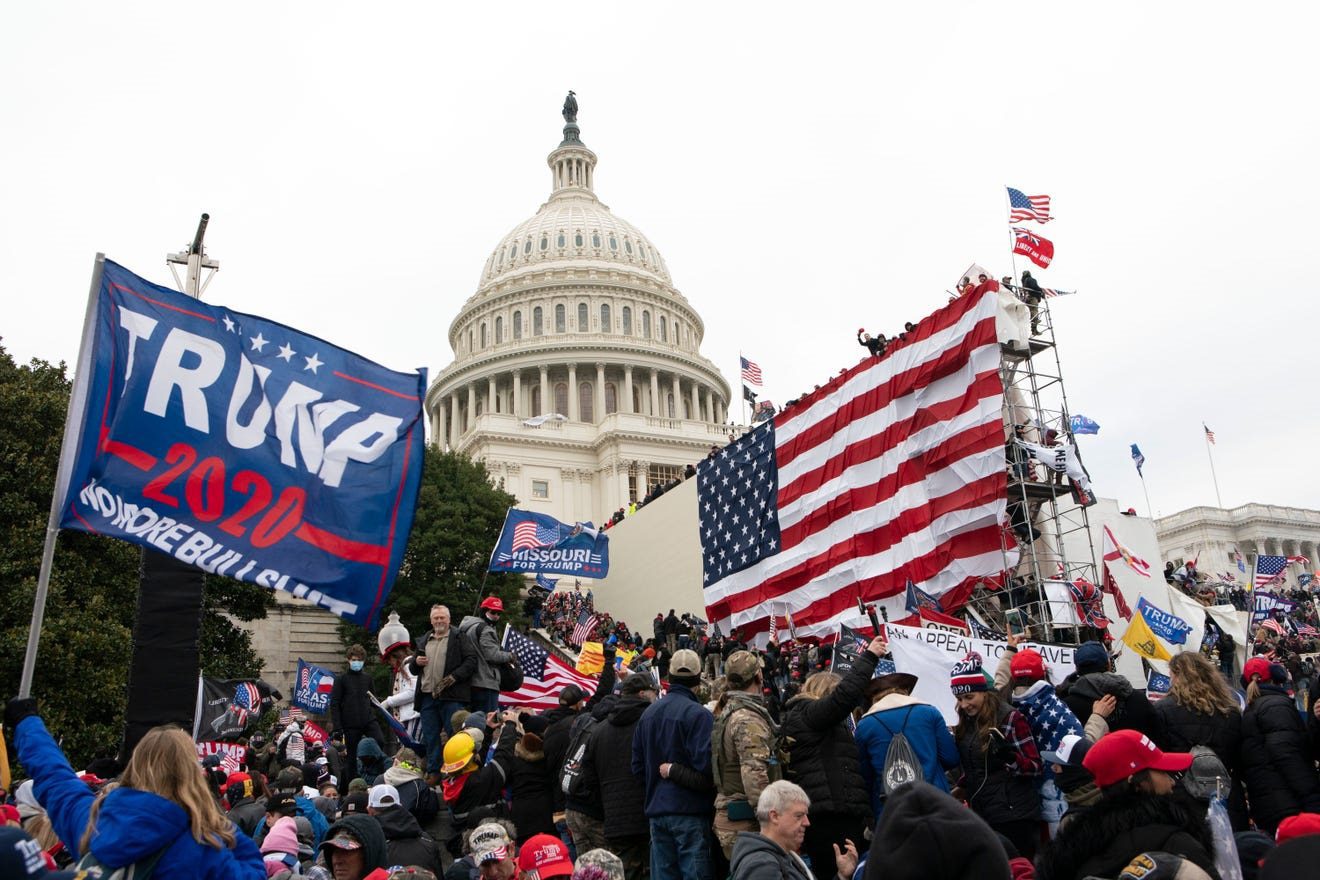
The majority of Republicans believe that the protest at the Capitol on January 6 was an act of patriotism, not an “insurrection.”
A new poll by The New Republic asked, “Thinking about the people who forced their way into the U.S. Capitol on January 6, 2021, would you say that was more of an insurrection against the United States or more of an act of patriotism?”
A 57 percent majority of Republicans believe that the protesters were behaving patriotically.
When looking at all respondents, across the political spectrum, 66 percent replied “Insurrection” and 34 percent said “Act of patriotism.”
The pollsters also found that 44 percent of Republicans agree with 48 percent of Democrats that our political system is in such trouble that it needs no less than major changes or even “a complete overhaul.”
“Only a quarter of Republicans and 36 percent of Democrats feel confident about how democracy will look in 10 or 20 years,” New Republic reported.
“Dig a little deeper into the data, however, and it becomes clear that the two groups have ‘very different problems in mind,’” said Guy Molyneux of Hart Research Associates, the polling firm that conducted the survey for TNR: ‘not only different, but in many cases even polar opposites.’ Perhaps the origins of the divergence can be traced to how differently members of the political parties conceive of the nature of our government,” the report explained. “When asked to describe what democracy means to them, 47 percent of Republicans named the protection of individual rights and liberties, while just 22 percent named majority rule—the textbook definition, it apparently does not go without saying, of a democratic political system. (By contrast, Democrats chose majority rule as their top answer, though they, too, hold a surprising diversity of beliefs on this question.)”
The poll found that Democrats are disturbed by the growing strength of white nationalist groups and by state legislatures’ “increasing power to determine the outcome of presidential elections.” On the other hand, Republicans are “disturbed by mandated vaccination and mask-wearing but unbothered by the filibuster and positively cheerful about Trump’s attempts to overturn the result of the 2020 election.”
“Scientists” all across the globe took to the streets to protest climate change. This is after the United Nations Intergovernmental Panel on Climate Change released its report.
The report called for “rapid and deep” cuts to greenhouse gas emissions.
More than 1,000 scientists from over 25 countries took part in the protests to highlight the findings from a United Nations Intergovernmental Panel on Climate Change report stating humanity only has three more years to cut greenhouse gas emissions.
The report states that “rapid and deep” cuts to greenhouse gas emissions are needed by 2025 to keep the planet below 1.5 degrees Celsius of global warming and avoid the most severe climate disasters.
Many were arrested.
In Madrid, 50 scientists were arrested after throwing fake blood on the steps of the Spanish Parliament’s Congress of Deputies.
In Los Angeles, four were arrested for chaining themselves to the front door of a Chase Bank building.
One group of 25 scientists glued their hands to the UK Department for Business, Energy, and Industrial Strategy.
Twenty-five scientists have pasted pages of scientific papers to the windows of the UK Department for Business, Energy and Industrial Strategy, and glued their hands to the glass to highlight the climate science they said the government was ignoring.
The scientists, affiliated with Scientists for Extinction Rebellion, arrived at the department’s building at 1 Victoria Street, Westminster, London, just after 11am. Doctors and health professionals staged a decoy action to give them space to get into position.
Meanwhile, the global elites continue to be wrong with their climate predictions.
The Biden Administration is caught covering up another Biden gaffe. This time Biden used the name prostitute in a speech at the White House.
We reported a couple of days ago how Biden used the word prostitute in a speech at the White House. The use of the word was out of place. He wasn’t referring to this son Hunter at the time.
After the gaffe, the Biden Administration attempted to cover up the bizarre misstatement in the official transcript. Unfortunately, this did not go unnoticed.
“I got texts from people in Trump orbit and DeSantis orbit. What the f*ck. This is exactly what they are talking about. Telling him to look him dead in the eye because he feels this election was stolen Let me just tell you, let me just make this clear for everybody.
So, if Trump does run again…it is not even so much the loyalty to Donald Trump, it’s the fact that he believes this election was stolen from Trump. So, if Trump wants to come and take it back it’s his to take back. I understand there are a lot of loyal DeSantis people out there but I am not doing it.
Neither one of them want me to do it. They just think it’s trouble-making. So, I’m telling you he looked dead in the eye and said if he runs I will not run. He told everybody…at his damn cabinet was at that event. The lieutenant governor was at the event sitting two feet away and everybody heard it. He will not run if Donald Trump runs. End of story.“
DeSantis has previously called the rivalry something manufactured by the media.
The Florida Republican governor argued the insinuation of friction between him and the former president was something of a media creation meant to distract from the struggles of President Joe Biden.
“The corporate media is trying to manufacture something where something doesn’t exist,” he said. “Look, when I ran for governor, he endorsed me when everyone said, don’t do it. And he had my back, and then when he ran for reelection, we had his back in Florida, raised a bunch of money. He had a great margin of victory in Florida. We see eye to eye on all of the big issues.”
“And so, I have zero, zero animosity or anything,” DeSantis added. “And they’re just trying to create divisions. And why are they doing that, Laura? Because they know Biden is failing. He had the worst first year of any president in the United States history since the 1800s. And they know he’s failing on all fronts. So, they’re trying to divert attention away from those failures and trying to create fissures in the Republican Party. That ain’t going to happen.”
A 56-year-old Mexican national attempted to smuggle a massive haul of narcotics totaling 415.61 pounds and worth over $2.5 million but was intercepted by U.S. Customs and Border Protection.
The incident occurred two weeks ago at the Tecate Port of Entry along the San Diego-Tijuana border but information has only just been announced by CBP. Enforcement officers described targeting a suspicious Toyota Tundra laden with toolboxes that, when inspected, revealed 94 packages stuffed with narcotics. The Mexican national was detained, turned over to ICE, and processed and booked into the Metropolitan Corrections Center in San Diego.
While the number of drugs seized during this stop might seem significant, it pales in comparison to the total amount smuggled into the United States every week. It’s self-evident that, in order for drug smuggling to be a profitable business, cartels must ensure that more heroin reaches the street than is confiscated by CBP. The latest data from CBP, which only covers the first three months of this year, logged almost 300,000 pounds worth of intercepted drugs. In other words, well over 300,000 pounds of narcotics—and likely many times that number—have successfully made it into the United States. CBP is only able to thoroughly inspect about 5% of vehicles that cross the border, leaning the odds heavily in the direction of a successful smuggling effort.
CBP released an official statement on the seizure:
U.S. Customs and Border Protection (CBP) officers working at the Tecate Port of Entry discovered more than 400 pounds of methamphetamine, cocaine and heroin concealed in toolboxes destined for the U.S.
The incident occurred on Friday, April 1, at approximately 1:30 p.m. when a 56-year-old male driver of a 2006 Toyota Tundra was waiting in line to enter the United States. CBP officers targeted the vehicle and referred it for further examination.
During the inspection, CBP officers discovered and extracted a total of 94 packages of narcotics from underneath and inside multiple toolboxes on the bed of the vehicle. The narcotics were tested and identified as cocaine, methamphetamine, and heroin with a combined weight of approximately 415.61 pounds.
“This interception is a true testament to the diligence of our frontline CBP officers,” said Rosa Hernandez, Port Director for the Otay Mesa Port of Entry. “Our officers continue to remain vigilant and prevent illicit narcotics from poisoning our local communities.”
CBP officers arrested the driver, a Mexican national with a valid legal permanent resident document, for the alleged narcotic smuggling attempt and was turned over to the custody of Immigration and Customs Enforcement, Homeland Security Investigations for further processing. The driver was later transported and booked into the Metropolitan Corrections Center in San Diego.
CBP officers seized the vehicle and the narcotics, which has an estimated street value of $2.56 million.
Criminal charges are merely allegations. Defendants are presumed innocent unless proven guilty in a court of law.
While the “Defund the Police” movement was misguided in their messaging (it was never about stripping police of their funding; rather, it was a call for greater accountability, better training, and overall reform), Biden’s push to expand funding for the police without any assurance of significant reforms in place could well encourage further police brutality.
The unfortunate reality we must come to terms with is that America is overrun with militarized cops—vigilantes with a badge—who have almost absolute discretion to decide who is a threat, what constitutes resistance, and how harshly they can deal with the citizens they were appointed to “serve and protect.”
It doesn’t matter where you live—big city or small town—it’s the same scenario being played out over and over again in which government agents, hyped up on their own authority and the power of their uniform, ride roughshod over the rights of the citizenry.
These warrior cops, who have been trained to act as judge, jury, and executioner in their interactions with the public and believe the lives (and rights) of police should be valued more than citizens, are increasingly outnumbering the good cops, who take seriously their oath of office to serve and protect their fellow citizens, uphold the Constitution, and maintain the peace.
Indeed, if you ask police and their enablers what Americans should do to stay alive during encounters with law enforcement, they will tell you to comply, cooperate, obey, not resist, not argue, not make threatening gestures or statements, avoid sudden movements, and submit to a search of their person and belongings during encounters with the police.
In other words, it doesn’t matter if you’re in the right, it doesn’t matter if a cop is in the wrong, it doesn’t matter if you’re being treated with less than the respect you deserve: if you want to emerge from a police encounter with your life and body intact, then you’d better comply, submit, obey orders, respect authority and generally do whatever a cop tells you to do.
In this way, the old police motto to “protect and serve” has become “comply or die.”
This is the unfortunate, misguided, perverse message that has been beaten, shot, tasered, and slammed into our collective consciousness over the past few decades, and it has taken root.
This is how we have gone from a nation of laws—where the least among us had just as much right to be treated with dignity and respect as the next person (in principle, at least)—to a nation of law enforcers (revenue collectors with weapons) who treat “we the people” like suspects and criminals.
As a result, Americans as young as 4 years old are being leg shackled, handcuffed, tasered, and held at gunpoint for not being quiet, not being orderly, and just being childlike—i.e., not being compliant enough.
And Americans of every age and skin color are continuing to die at the hands of a government that sees itself as judge, jury, and executioner over a populace that have been pre-judged and found guilty, stripped of their rights, and left to suffer at the hands of government agents trained to respond with the utmost degree of violence.
At a time when growing numbers of unarmed people have been shot and killed for just standing a certain way, or moving a certain way, or holding something—anything—that police could misinterpret to be a gun, or igniting some trigger-centric fear in a police officer’s mind that has nothing to do with an actual threat to their safety, even the most benign encounters with police can have fatal consequences.
If you’re black and disabled, you’re even more vulnerable.
Specifically, what we’re dealing with today is a skewed shoot-to-kill mindset in which police, trained to view themselves as warriors or soldiers in a war, whether against drugs, or terror, or crime, must “get” the bad guys—i.e., anyone who is a potential target—before the bad guys get them.
This nationwide epidemic of court-sanctioned police violence carried out with impunity against individuals posing little or no real threat has all but guaranteed that unarmed Americans will keep dying at the hands of militarized police.
Making matters worse, when these officers, who have long since ceased to be peace officers, violate their oaths by bullying, beating, tasering, shooting, and killing their employers—the taxpayers to whom they owe their allegiance—they are rarely given more than a slap on the hands before resuming their patrols.
This lawlessness on the part of law enforcement, an unmistakable characteristic of a police state, is made possible in large part by police unions which routinely oppose civilian review boards and resist the placement of names and badge numbers on officer uniforms; police agencies that abide by the Blue Code of Silence, the quiet understanding among police that they should not implicate their colleagues for their crimes and misconduct; prosecutors who treat police offenses with greater leniency than civilian offenses; courts that sanction police wrongdoing in the name of security; and legislatures that enhance the power, reach and arsenal of the police, and a citizenry that fails to hold its government accountable to the rule of law.
Indeed, not only are cops protected from most charges of wrongdoing—whether it’s shooting unarmed citizens (including children and old people), raping and abusing young women, falsifying police reports, trafficking drugs, or soliciting sex with minors—but even on the rare occasions when they are fired for misconduct, it’s only a matter of time before they get re-hired again.
This is no longer a debate over good cops and bad cops.
It’s a power struggle between police officers who rank their personal safety above everyone else’s and police officers who understand that their jobs are to serve and protect; between police trained to shoot to kill and police trained to resolve situations peacefully; most of all, it’s between police who believe the law is on their side and police who know that they will be held to account for their actions under the same law as everyone else.
Unfortunately, more and more police are being trained to view themselves as distinct from the citizenry, to view their authority as superior to the citizenry, and to view their lives as more precious than those of their citizen counterparts. Instead of being taught to see themselves as mediators and peacemakers whose lethal weapons are to be used as a last resort, they are being drilled into acting like gunmen with killer instincts who shoot to kill rather than merely incapacitate.
Even so, the answer is not to de-fund the police.
What we really need to do is de-fang the police: de-militarize, de-weaponize, and focus on de-escalation tactics, better training, and accountability.
We’ve allowed the government to create an alternate reality in which freedom is secondary to security, and the rights of the citizenry are less important than the authority of the government.
The longer we wait to burst the bubble on this false chimera, the harder it will be to return to a time when police were public servants and freedom actually meant something, and the greater the risks to both police officers and the rest of the citizenry.
The police state wants the us vs. them dichotomy. It wants us to turn each other in, distrust each other, and be at each other’s throats, while it continues amassing power. It wants police officers who act like the military and citizens who cower in fear. It wants a suspect society. It wants us to play by its rules instead of holding it accountable to the rule of law.
“But whether the Constitution really be one thing or another, this much is certain – that it has either authorized such a government as we have had or has been powerless to prevent it. In either case, it is unfit to exist.” ― Lysander Spooner,
Free your mind. A slave asks if it’s legal. A free human asks if it’s right. Is it right (moral) to steal the fruits of one’s labor (slavery) to employ the punishers/enFORCEers (police) if someone disobeys the master (government)?
The obvious solution to $5-a-gallon gas, surging prices at the grocery store and higher drug and hospital costs is to stop the multitrillions of dollars of debt-spending in Washington that is dumping cheap money into the economy.
When President Donald Trump left office 15 months ago, inflation was less than 2%. It is now somewhere between 7% and 10%, depending on the measure. And Biden-flation isn’t “transitory.” If anything, the up escalator on prices is getting worse.
Now the Biden administration complains that producers are taking advantage of product shortages and supply-chain constraints by jacking up their prices. He wants to penalize the meat packers for the high beef prices, the poultry industry for the rising expense of a chicken dinner, the drug companies for the high cost of pharmaceuticals and the oil and gas industry for recording record profits while gas prices soar.
He wants the Federal Trade Commission and other regulatory agencies to impose price ceilings to be monitored by an army of federal price-control police.
This is economic amnesia. We tried all these government manipulations in the 1960s and 1970s. The ruinous price regulations on industry made inflation worse. Back then we had Soviet-style central planners imposing price limits on everything: long-distance phone calls, oil and gas, airlines, rail service, trucking and banking services.
This was supposed to protect consumers, but by making it illegal for prices to rise, we got hit with empty shelves, shortages and gas lines.
The price ceilings became de facto price floors. Inflation shot up from 5% to 8% to 10% by 1980.
Even Democrats Jimmy Carter and Ted Kennedy realized that things were going haywire. They took the lead in ushering in an era of decontrol of prices. And when President Ronald Reagan was elected, his first executive order was to end oil and gas price controls.
One of the first things Reagan did in office was to eliminate price controls on oil. This led to lower prices and a freer economy.
Reagan removed price controls on oil via an executive order issued shortly after his inauguration, the price fell almost immediately and kept dropping so that by the first year of his second term average gas prices were below 90 cents a gallon.
Thanks to Reagan showing the way, it would be many years before rising gas prices would become a problem for Americans, with many gas stations still selling regular for well under 90 cents even in the late 1990s. Somehow the nation’s greedy oil companies were found to be uninterested in gouging consumers when they would have little noticed.
Reagan was for the American people, as was President Trump, but it appears that no one in the Biden Administration is for America. Not a single move has been for the good of the nation. Now the Biden gang is working to continue to harm the economy. There’s no stopping how bad this economy will be in a couple of years. Biden/Obama have single-handedly destroyed this nation. They aren’t going to stop now.
My late Friday night involved hitting refresh on PACER every so often, incurring the $0.10 charge for each search result as I waited on Special Counsel John Durham’s latest filing in the Michael Sussmann case. (Exciting, I know.)
The motion exceeded expectations, discussing CIA conclusions that Sussmann was providing implausible data to federal authorities, providing CIA notes regarding their meeting with Sussmann, and confirmation that they essentially spied on President-Elect Trump.
The motion can be found here. It was filed as part of the government’s efforts to convince the court that the evidence it seeks to admit in Sussmann’s trial is relevant and admissible. Let’s go through the most important parts.
Durham provided to the Court two sets of notes related to Sussmann’s representations to the CIA. The first was from Sussmann’s January 31, 2017 contacts with a CIA employee where Sussmann discussed wanting to provide to the CIA data on “the presence and activity of a unique Russian made phone around President Trump.” It was said that this secret activity started in April 2016 and continued after Trump’s “move to the White House.”
Sussmann alleged the Russian phone (YotaPhone) was always close to Trump (“only around the President’s Movements”), surfacing at his Trump Tower Network in April 2016 and being used through Wi-Fi at Trump’s Grand Central West apartment. The phone even “appeared with Trump in Michigan” when he was interviewing a Cabinet Secretary.
At a minimum, this confirms what we reported nearly two months ago: that the Trump transition data was passed to the CIA. Yet it’s also more than that. The CIA was provided with data all the way back from April 2016.
Why does April 2016 matter? Because Russia was alleged to have hacked “the Democratic Congressional Campaign Committee and DNC networks in April 2016.” Recall that “Crowdstrike was contacted on April 30, 2016 to respond to a suspected breach” of the DNC.
The CIA Notes Part 2: Sussmann’s February 9, 2017 meeting with the CIA
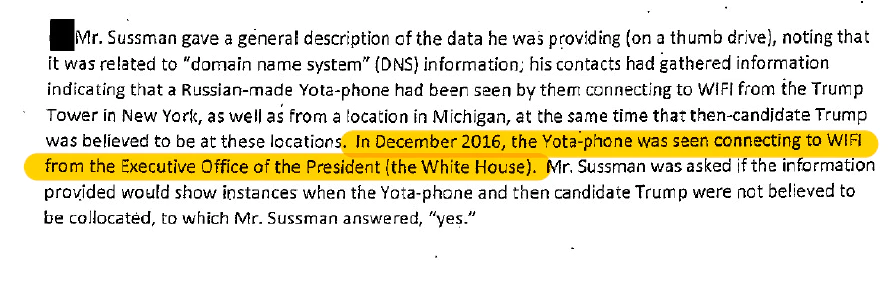
That January 31, 2017 conference was used to schedule the February 9, 2017 meeting with the CIA. At that meeting, Sussmann repeated his allegations that a “Russian-made Yota-phone” had been seen at Trump properties and had traveled with Trump to Michigan. He further alleged that “In December 2016, the Yota-phone was seen connecting to WIFI from the Executive Office of the President (the White House).”
A brief but necessary aside: The Washington Post alleged us to have fanned “the flames” on the Sussmann/Joffe spying operation, taking us to task for stating (correctly): “They spied on Trump.” I hope the Washington Post is reading this, because the CIA notes confirm what we reported and what we told them via e-mail. Techno 1, WaPo 0.
Back to the Durham Filing – and the CIA’s analysis of the Sussmann/Joffe data.
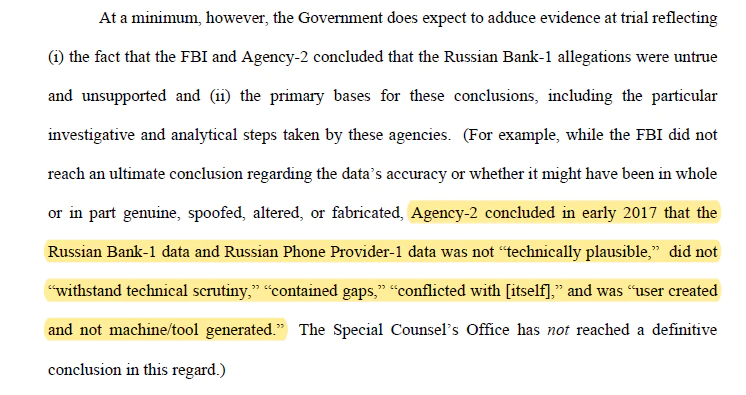
The CIA reviewed the Trump/YotaPhone data (and the Alfa Bank data) in early 2017. The fact that the CIA accepted this data on President Trump is its own scandal. In any event, the CIA’s findings are significant, as they concluded that the data was not “technically plausible” and was “user created and not machine/tool generated.”
(I’ve been asked about the last part of that paragraph, which says the “Special Counsel’s Office has not reached a definitive conclusion in this regard.” The term “definitive conclusion” stands out, making me suspect he has “initial” conclusions on the data. Durham’s filings in this case suggest he agrees with the CIA.)
Anyway, what a finding by the CIA. Of course, this only leads to more questions:
Which “user” created the data?
Does it go back to the Joffe conspiracy?
And who else is part of that conspiracy?
For that last question, consider this revelation from a previous Durham filing:


")