
Ray Mears – The Magpie Goose Dance, Ray Mears Goes Walkabout

Ray Mears – Playing a Yidaki, Ray Mears Goes Walkabout

Ray Mears – How to Light a Fire, Bushcraft Survival

Ray Mears – Ray and Les on working together

Ray Mears – Making a Wap, Ray Mears Goes Walkabout

TFB Armorer’s Bench: Closer Look – Wheeler AR Receiver Lapping Tool

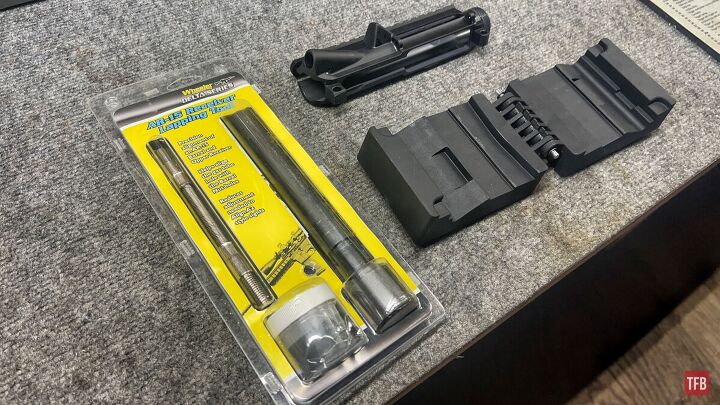 Welcome everyone to the TFB Armorer’s Bench! As mentioned in the little blurb, this series will focus on a lot of home armorer and gunsmith activities. In this article sponsored by Wheeler, Tipton, Caldwell, and Frankford Arsenal, I decided to take a look at the Wheeler AR Receiver Lapping Tool. I have little experience lapping receivers beyond a handful of bolt action rifles […]
The post TFB Armorer’s Bench: Closer Look – Wheeler AR Receiver Lapping Tool appeared first on The Firearm Blog.
‘You’re Not Welcome Here!’ Massive ‘Super Protest’ Planned For Bill Gates, Elon Musk, Al Gore’s Arrival At TED TALK


A massive “super protest” is slated to greet billionaire eugenicist Bill Gates when he arrives at the upcoming TED Talks conference in Vancouver, Canada next week.
According to the TED Talk 2022 website, Gates will give a presentation outlining his book “How to Prevent the Next Pandemic” during his appearance at the conference on April 10.
The Microsoft co-founder and depopulation globalist will also discuss “what it’s been like to become the subject of conspiracy theories.”

Gates, the event’s keynote speaker, will be joined by Elon Musk and Al Gore at the sold-out event which will be held at the Vancouver Convention Center.

Musk, a new majority Twitter shareholder who has emerged as the richest person in the history of the world with an estimated $256bn fortune, is glorified by the mainstream as “The Most Badass CEO In America” and a pop-cultural icon.
But like Gates, the SpaceX CEO is endeavoring to spearhead a transhumanism evolution.
Musk’s brain chip firm, Neuralink, is currently recruiting for a “clinical trial director” to run tests in humans with brain chips or “brain hacking” technology.
Neurolink has already implanted artificial intelligence microchips in the brains of monkeys and pigs.
“Musk has previously claimed that Neuralink’s technology could eventually be used to augment humans, potentially enabling people to store and replay their memories like watching videos on computers,” Fortune reports.
Neurolink’s human clinical trials of its brain chip technology are slated to begin later this year.

Multiple convoys and freedom activists are reportedly traveling across Canada to Vancouver to protest Gates, Musk and Gore during the Ted Talk conference including Chris Sky, who has been arrested multiple times while protesting vaccine mandates in Canada.
“What do you think Bill Gates is coming there for, this is what Chris Sky is going to tell you all. He’s coming to tell you all about a brand-new vaccine,” Sky announced in a video published on Telegram, the only social media platform he has not been banned from.

Canada Unity, a Facebook group with over 40,000 members, is also promoting the demonstration dubbed “Super Protest.”

While mainstream media and fact-checkers insist claims that Gates is a eugenicist are premised on conspiracy theories, the 66-year-old business magnate has openly advocated for reducing population growth.
In 2010 during a TED Talk presentation that has been widely circulated during the manufactured COVID-19 pandemic, Gates outlined plans to use vaccines would be instrumental in reducing the rate of global population growth and lowering carbon emissions.
“The world today has 6.8 billion people,” Gates said during the talk. “That’s headed up to about 9 billion. Now, if we do a really great job on new vaccines, health care, reproductive health services, we lower that by perhaps 10 or 15%.”

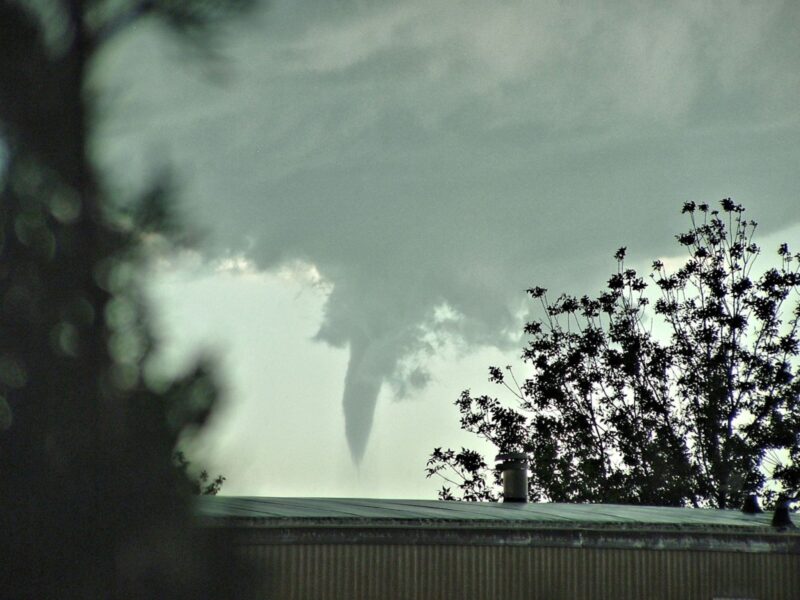
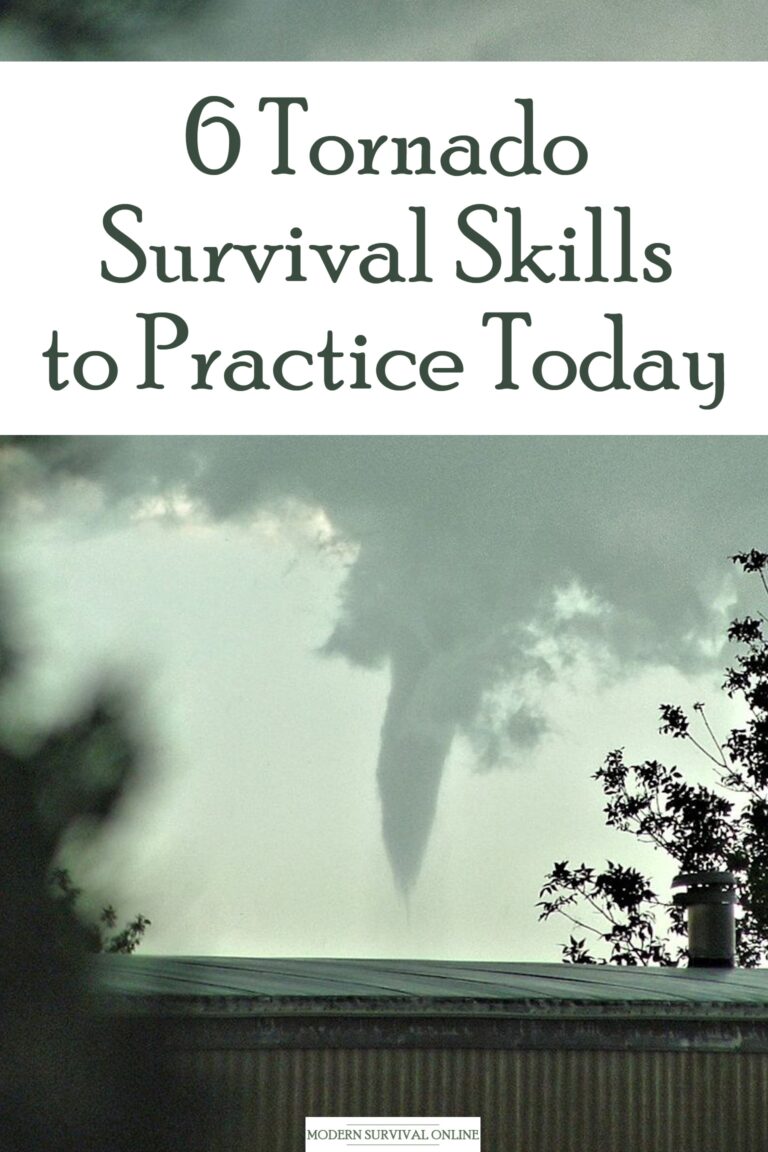
6 Tornado Survival Skills to Practice Today

Tornadoes are one of those natural disasters that seem so potent and so random there is nothing you can do except hope to survive their passage.
While they are incredibly destructive and can spawn from any storm system when conditions are right, there is always something you can do to improve your chances of surviving with a good outcome.
Knowing what steps to take and what skills to develop when getting ready for tornado season, or when traveling to any place where tornadoes are common can it make the difference between life and death.
You might have a few minutes to react to an oncoming tornado, or you might have only seconds, but seconds can count for a lot if you take the correct action.
To help you get ready for twister season we are bringing you a list of six tornado survival skills that you can practice today.
The Most Powerful Wind Events on Earth
When it comes to sheer power, tornadoes take the crown among all the many varied storms that occur on planet Earth.
The most powerful tornadoes can produce sustained wind speeds in excess of 200 mph and are truly cataclysmic for anything that gets caught in their path.
Even lower level tornadoes produce frighteningly potent sustained winds more than capable of damaging and destroying homes and other smaller buildings.
As a tornado grows stronger, the hazards you are facing get ever more dangerous.

You’ll go from toppling trees and missing roof panels to lethal flying debris and even entire automobiles and train cars being carried through the air as if they were made out of styrofoam.
To say the passage of a powerful tornado is a surreal experience, assuming you survive it, is an understatement.
Before the storm, you’ll be facing a foreboding and heavy atmosphere descending on your area.
But, in the aftermath, emerging from your shelter, you will likely be confronted with a landscape that is nothing but a tangled and twisted ruin with hardly one brick left standing upon another.
It is bad enough facing such a situation and having to cope with it, but it is far worse for you and your loved ones to be killed during the event.
There’s not much you can do to combat a tornado, but there is a lot you can do to improve your chances of being alive when the roaring finally stops.
The following section contains six proven tornado survival skills that will help you weather even a deadly twister.
6 Tornado Survival Skills to Practice Today
ID’ing Shelters
One of the single best things you can do to improve your chances of surviving a tornado is learning how to identify worthwhile shelters that will give you protection, or at least a degree of protection, from wind and airborne debris.
This is not always easy, and some traditional shelters prove to be less than adequate against the most powerful storms, but with a little bit of information and some quick thinking you’ll always be able to improve your position wherever you are and whatever the circumstances.
Tornadoes have a way of making a mockery of even the strongest structures built by man.
Storms only halfway up the Enhanced Fujita scale of tornado strength usually prove more than capable of leveling most residential structures and typical businesses, and stronger ones can even carry buildings away right off their foundations.
This means that residing inside something like a modular home, a mobile home or any other lightweight structure is virtually a death sentence.
What you want to do is head for the strongest interior room of any given building that lacks windows, and always give preference to underground rooms or ones that are partially subterranean in a hillside.
The very best shelters are dedicated, purpose designed and built tornado shelters. Most businesses have such a room somewhere in them, and many societies found in tornado prone regions have them scattered all over town.
You can even install your very own in your basement or accessible via outside somewhere on your property.
It is in your best interest to always keep in mind where the closest, best shelter is during tornado season, and have one picked out when a tornado watch is issued.
Make it a point to locate the best tornado shelter wherever you happen to be when you are traveling.
Taking Cover in a Hurry
Thanks to advances in meteorology and weather detection technology, including radar and satellites, we fortunately often have advanced warning of conditions that are likely to form tornadoes and of tornado touchdowns themselves.
However, not all of these complex systems are accurately predicted, or detected in time, and even when likely conditions are announced tornadoes can form with frightening speed and move just as quickly.
Accordingly, when you detect the likely presence of a tornado or hear a tornado warning from any source it is time to take cover immediately.
You might have a few minutes or even just a few seconds before the tornado is upon you. There is no time to delay.
Grab your loved ones, and anyone else that you can help immediately and get into cover before battening down the hatches for the tornado’s arrival.
Depending on the circumstances you might have time to gather some useful survival supplies or you might not, but in any case you can set yourself up for success by stocking your own dedicated shelter with those supplies ahead of time, or at the very least keeping a tornado readiness bag set handily about for instant action.
Speed is of the essence in tornado survival, and there are many, many tragic stories of people being overtaken and killed while seeking better shelter. Sadly, these unfortunate souls were overtaken by the storm before they were in cover.
Don’t let this happen to you and yours. Move with haste towards shelter whenever you suspect a tornado could form or know that a tornado warning has been announced.
Vehicle Bailout
One of the worst things that can happen to you is being caught in a tornado while in any motor vehicle.
First, most motor vehicles provide no meaningful protection from airborne debris that is the number one hazard to life and limb associated with tornadoes.
Second, stronger tornadoes may carry away vehicles by the dozen should they be caught in their path.
If this happens to you, your vehicle will be tumbled, battered, lifted high into the air and invariably slammed back down or left to fall to its uttermost ruin with you inside.
Your chances of surviving such an event are almost zero, and though there are some survivor stories of this exact occurrence happening they are of miraculous portent.
Instinctively you might think you are better off with even the meager protection of an automobile body when the winds of change start blowing, but this is misguided.
If a tornado is in the area chances are good you will not be able to outrun it in your car or truck, so you must abandon it and take cover outside of it.
If there’s a nearby building that is suitable or, even better, a designated tornado shelter head for it at best speed.
But, if there isn’t, you are better off leaving your vehicle and taking cover in a ditch or other lowest lying area around.
Lie on the ground face down and cover your head with your arms and then wait for the tornado to pass.
Of note, you should never, ever take cover under an overpass as has sometimes been suggested in the past.
Overpasses do not provide meaningful protection from wind or airborne debris, and studies suggest that they in essence serve to funnel both through the space, increasing the likelihood you’ll become a casualty.
Extrication
Surviving the tornado is only one part of the endeavor you’ll be facing. The other part is extricating yourself from the likely rubble of your home or other shelter once it has gone by.
Since tornadoes can inflict terrible devastation, it is highly likely you’re going to need to employ creative techniques to free yourself and your family.
Homes can collapse on top of the basements they are built over. Debris of all kinds could come to rest over the hatch of a shelter.
A structure could be shifted just enough to wedge a door shut or otherwise render it immovable. There is just no telling what might trap you inside your safe space, creating another nightmare you’ll have to sort out.
It is beneficial, then, to learn how to extricate yourself and others from such a situation without making things worse.
Damaged structures are notorious for collapsing when people start messing and tinkering with them, and you definitely don’t want to further imperil your life or anyone else’s while trying to help.
The right tools are a major asset here, with wrecker bars, pry bars and even various power tools or heavy equipment if you can get your hands on it highly worthwhile.
Remember that the most powerful of the simple machines you can make use of in pretty much any circumstances is the lever, and a strong length of wood or metal pipe could prove to be enough to shift a weight that is trapping you and your family.
Physical Fitness
Physical fitness is not so much a discrete skill as it is an essential characteristic for tornado survival.
The rigors of surviving the storm and the necessary tasks that you will have to attend to after it is over means you’ll need every ounce of strength and endurance your body can muster if you want to make it through.
For that reason, it pays to keep yourself in good shape at all times.
Stronger people are more useful and harder to kill in all circumstances, and the longer you can keep going the greater an asset you will be both for yourself and for your loved ones.
Any physical fitness plan that is emphasizing survival, particularly tornado survival, should be focused on cardiovascular endurance and sheer strength since the only tools you might have to take advantage of in the aftermath could be your own two hands.
The tasks you are called on to handle might take absolutely everything you’ve got to accomplish, but you’ll be glad you are able when the time comes.
The more sweat you put in now the less blood and anguish you’ll have to shed later after a tornado.
Storm Awareness
Storm awareness is a crucial skill for staying safe and giving yourself time to react when in tornado country or tornado season.
Although tornadoes can be unpredictable and sometimes up here without warning, it never fails that there are some common markers that are indicative of conditions likely to spawn tornadoes or of an active tornado on the ground.
Learning to recognize these signs will give you a major advantage.
First, tornadoes almost invariably spawn out of an existing, powerful thunderstorm system. Chances are you won’t have much to fear from tornadoes during clear, calm days.
Second, certain meteorological features indicate the likely presence or imminent formation of a tornado.
Among them, any sign of circular rotation in a cloud layer is an immediate warning sign that should send you scurrying for cover, as is the sudden cessation of rainfall.
Do note, however, that many tornadoes are concealed by driving bands of rain that mask their appearance.
If there is a lack of rain, listen for a howling, freight train-like sound that is characteristic of active tornadoes on the ground. If you hear this roaring sound, especially if it is growing louder, take cover at once.
Lastly, many tornado survivors report strange colored skies immediately preceding the arrival of a tornado.
Anytime the sky has a yellowish or greenish hue you are probably in for a serious storm if not a tornado outright.
This color is due to soil and other particulates being lifted high into the air where they tint the light of the sun. If you notice this ominous hue in the sky, don’t wait, take cover.
By staying alert to the characteristics of tornadoes and the storm systems that are likely to produce them you’ll maintain situational awareness even in circumstances where you don’t have access to weather alerts.
Practice These Skills Today
Tornadoes are terrifying, powerful storms that produce wide paths of total destruction and can prove to be quite deadly.
There is not much that man can do to hinder such an event but with the right skills and proper procedures it is possible to greatly improve your chances of survival during one of these powerful twisters.
Learn and practice the six skills outlined above on this list and you’ll be better prepared for coping with tornado season.
Is Cooking on a Rusty Grill Safe? 9 Easy Ways to Clean It

It’s the middle of summer, and that means cookouts! If you’re like most people, your grill is probably covered in rust.
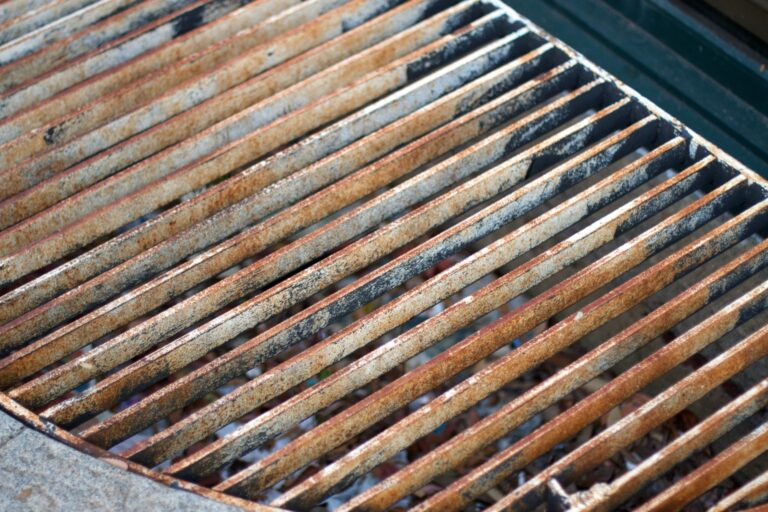
You know you should clean it, but that is a chore, and messy besides. It won’t hurt to put it off just a little longer, right? So is cooking on a rusty grill safe?
Yes, it is safe to cook food on a rusty grill as long as the rust is not flaking off into the food. Ingesting rust particles is generally harmless unless the quantity is extreme.
However, rusty grills may be prone to breaking or malfunction and this could be dangerous.
It is important to clean the rust off of your grill for two reasons: first, so that the food you are grilling does not taste like metal; and second, so that your grill does not start a fire.
In this blog post, we will discuss 9 easy ways to clean rust from your grill.

9 Easy Ways to Clean Rust from your Grill
Method One: Vinegar and Water
Soak a rag in white vinegar thinned with just a little water, then use the rag to scrub the rust off of the grill. The vinegar is acidic and will help to break down the rust and make it easier to remove.
This method works well when rust is minor, so called “dust rust.” the good news is that vinegar is totally safe to consume, no harmful residues.
Method Two: Baking Soda and Water
Mix baking soda with water until it forms a thick paste, like runny drywall spackle. Apply the paste to rusty areas on the grill and let it sit for about 30 minutes, perhaps a bit longer. Rinse with water and scrub off any remaining baking soda using a coarse pad or brush. Give it a final rinse and you are good to go.
Method Three: Soft Drink
Pour a can of Coke or some other soft drink over the rusty parts of your grill, and let it sit for several hours (or overnight).
The acid in the Coke will help to dissolve the rust pretty handily. For serious rust, a shallow container that can hold the grill grate a two liter bottle of soft drink will help.
Scrub if needed, rinse well with clean water.
Method Four: Lemon Juice
Soak a rag in lemon juice and use it to mop the juice onto the rusty spots, or leave the rag draped over the trouble area.
Scrub the rust off of your grill using a brush or abrasive pad. Lemons are acidic and will help to break down the rust, but make sure you rinse with water to neutralize it!
Method Five: WD-40
Spray rusty areas on the grill with WD-40 and let it sit for a few minutes. The WD-40 will help to dissolve and loosen the rust.
Scrub the aftermath away with a wire bristle brush. A thorough soap and water rinse is required after this one!
Method Six: Salt and Lime Juice
Mix salt and lime juice until it forms a thick paste. This creates a powerful one-two punch of abrasive salt and acidic juice that will wipe out most rusty areas.
Apply the paste to rusty areas on the grill and let it sit for about 30 minutes. Rinse with water, assess and then repeat with fresh mixture until the rust is gone.
Method Seven: Steel Wool
Soak steel wool in water to lubricate and use it to scrub the rust off of the grill.
Progressing from coarse to fine will reduce rust in a logical progression, but take care because it can scratch your finish, leaving “cobweb” marks behind.
Rinse thoroughly to remove any residue and traces of the wool.
Method Eight: Commercial Grill Cleaner
There are many brands of grill cleaner that can be purchased at most hardware stores or grocery stores, from the mild to the insanely aggressive.
Follow the instructions on the bottle to clean rusty areas on your grill, but make sure you always wear appropriate protective gear and use it in a well-ventilated area. As always, rinse thoroughly when finished!
Method Nine: Power Washer
If you have a power washer, you can use it to clean heavy rust from your grill. Point the spray nozzle at rusty areas on your grill, stand off a bit and hold the trigger observing for removal before you close in.
The force of the water will help to remove any rust buildup but can damage grill components if you are not cautious. You might have to try several nozzles, angles of attack and ranges to find the sweet spot.
Whichever method you choose, be sure to rinse the grill thoroughly with water after cleaning.
This will help to remove any residue and particulates left behind from the cleaning and prevent them from contaminating your food. Wire bristles from brushes are especially bad news!
Now that you know how to clean rust from your grill, there’s no excuse not to!
Get out the vinegar, Coke, lemon juice, WD-40 or grill cleaner and get scrubbing. Your grill will be looking good as new, and much safer to use, in no time.
Seasoning Your Grill
One way to help keep your grill in good condition is to season it before you use it.
This will create a barrier between the metal and food, which will help prevent rust and keep contaminants from getting into your meal. Here’s how to do it:
- Start with clean grates. If they aren’t clean, take the grates off of the grill and soak them in hot, soapy water for about 30 minutes.
- Scrub them with a brush to remove any built-up dirt or debris.
- Rinse them off and then dry them completely.
- Apply a thin layer of vegetable oil or grill seasoning paste to all surfaces of the grates using a clean cloth or paper towel. Take note of the smoke point temperature.
- Put the grates back on the grill and heat them up to the smoke point of your oil/seasoning paste. Keep them hot for about 15 minutes.
- Turn them off and let them cool completely before wiping off any residue. Your grates should be a glossy, dark color.
You can also season your grill periodically throughout the year to help keep it in good condition. Just be sure to clean it first so that the seasoning will stick properly.
How Can Cooking on a Rusty Grill be Dangerous?
Cooking on a rusty grill can be dangerous because the grates may break, or pieces can break off in your food.
A grill grate or grill body that fails unexpectedly could send your food plunging into hot coals, or a hot burner assembly tumbling out of the bottom of the grill or even into you!
Aside from the obvious risk of severe injury, you could start an accidental fire that will be difficult to arrest under the circumstances.
The most important thing you can do to prevent this is simply to keep the grill clean and rust-free. By cleaning the grill, you’ll be inspecting it for damage and degradation that could indicate a dangerous condition.
Also, rust can build up a surface of sorts that, while brittle, could conceal severe damage and loss of structural integrity beneath it.
It should also be pointed out that sometimes a grill component is just too far gone to save. Grates and small parts can be replaced, but if the body of the grill is rusted out or wobbly, it is time to consign it to the scrap heap and get a new one!
Keep that rust at bay and you can have confidence in your grill!

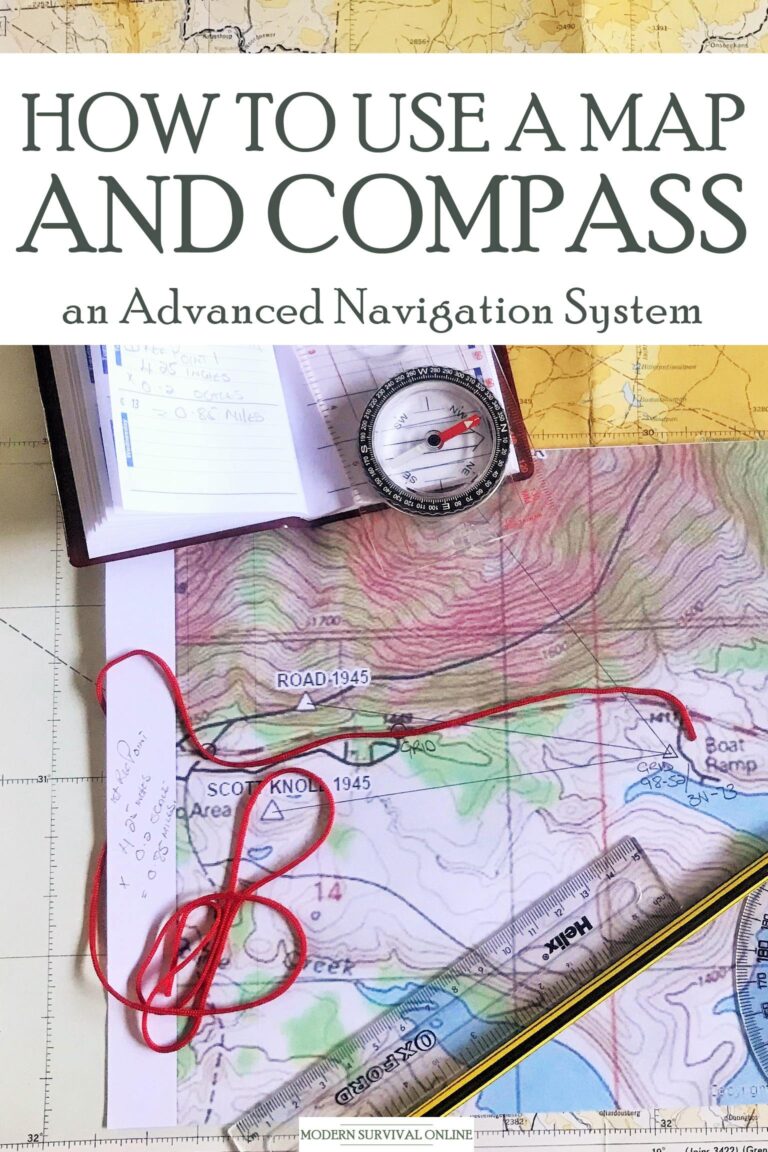
How to Use a Map and Compass – an Advanced Navigation System

You are familiar with the use of a compass and a map, and their supporting roles in defining navigation.
Maps and compasses are simple to use, so don’t be overwhelmed by the huge amount of information out there.
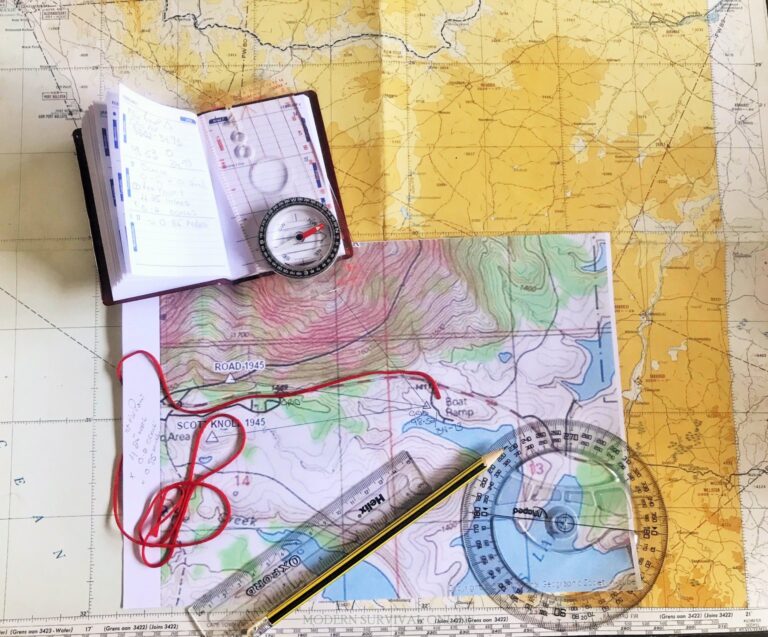
A map can only give you a relative bearing or direction, and a compass only a direction or bearing but no knowledge of the terrain and its features.
Combined, they make a formidable navigation aid, which with use will become natural and easily handled. I will outline some fundamentals and bolt on skills that you can add to your navigation tool box.
This article will show you how to use a map and compass to avoid getting lost, and to get you to where you want when you don’t have modern technology at your disposal.
The Basics
Map
- Topographic map of the area or areas you will be moving through. For USA maps your free downloads can be found at the United States Geographic Survey or USGS.
- Map of your area in the relevant scale 1:24000 1 inch is equal to 24000 inches on the ground or 1:25000/1:50000 1 centimeter on the ground is equal to 250000 or 50000 cm on the ground.
- Taking scale into account, the smaller the scale the more defined the Topographical Map and the more cluttered.
- Contour lines indicate height and gradient. They never cross.
- Store in a waterproof Ziploc bag or laminate. If you fold, reinforce the folds.
- The Map is a representation of the ground and the ground a representation of the map
- The top of the map is always North.
- Maps will give you the relevant Magnetic North Declination (ensure it is up to date)
- Familiarize yourself with the legend.
Compass
The compass can be used for accurate position determination. These are the two types of compasses that will serve you well for navigation and orienteering:
- The Baseplate Compass
- The Baseplate Mirror Compass
That being said, let’s keep these in mind about compasses:
- Magnetic North will always draw the Compass Needle to its point of reference.
- Check your compass regularly for accuracy.
- The rotating bezel can be dialed in to compensate for declination and define the bearing True North.
- Use the compass to orientate the map.
- The Compass will have a magnification lens fitted to read map features easily.
Using the Map and Compass Together
These basics will see you right in case of a navigational emergency, what this article will do is provide you with the method to stay on course, making navigation more accurate and easier to apply the basics.
The map and compass work together in a symbiotic relationship, supporting one another in confirming position and orientation of the map to the ground and your physical position in relation to the ground and map.
Keep in mind the acronym A B C which stands for Align, Bearing, Course.
Align
- The Compass and The Map – Place the map on a flat surface, draw a line from your position to the reference point you wish to move to.
- Align the compass long edge along the line.
Bearing
- Rotate the Bezel Dial until you have boxed the magnetic needle on North – Red in The Shed.
- The Degree at the base of the Travel Arrow is your bearing.
- You are now orientated on the point you wish to move to.
Course
- Lift your compass, orientate your body by moving it to align with the Magnetic North or True. North if you have allowed for Magnetic Declination.
- The Travel Arrow will show the direction you must move in, your course.
Positioning
Map Cross Reference
Take a look at the “map” below. What unique and identifiable features are immediately available to you and can you identify them?
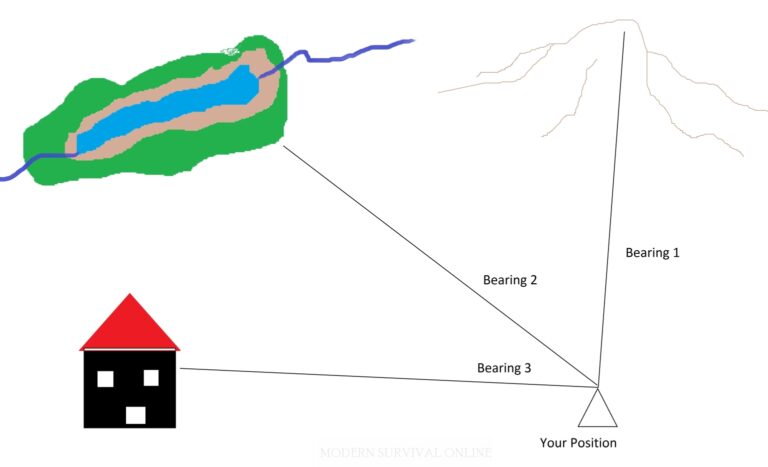
Some of the things that jump out immediately:
- The Mountain Feature is prominent
- The Lake
- The Farm House
Orientate the Compass to True North using the map to identify delineation.
Take a bearing to each of the features from your position.
The three bearings are your cross-reference points. Drawing a line on your map from each point until they intersect – the point where they cross over each other. That is your position on the map.
Align. From this point you can accurately Align yourself to the ground and fix your position on the map. This is your known starting point.
Bearing. If you have to move from this point to a given reference point or rendezvous point, you can take a Bearing to this point with the compass giving you a visual queue on which to walk.
Course. Plot the Course on your map by drawing a straight line from your fix to the reference point, irrespective of topographical features. This is your map bearing to your next point.
Trigonometric Beacons, Verified Heights, and Surveyors Beacons
Maps record trigonometric surveyors’ beacons. They are identified by position numbers, and are placed on the highest land features in an area. They are used for defining a single point on the earth’s surface as referenced by the map coordinates.
These surveyors’ beacons or Trigonometrical beacons are very useful and provide accurate points of reference.
They are spread throughout the entire country and represented on your map as Spot Heights or Trigonometric Beacons representing a specific height.
The USGS topographical maps do not show Surveyors Beacons as the information cannot be verified. The National Geodetic Survey is the agency that undertakes the verification of heights and land features.
The information is detailed and can be accessed on the site, the explorer option gives you historical data and GPS verified beacons. Validated markers are pinpointed on the maps and you can cross reference using the onsite tools here.
The top of the map is always North, align the compass along the maps grid lines. This is with or without taking magnetic declination into account.
Declination will impact your bearings on the ground; however, you are working with the map only and using the compass to find or read off the map bearings using the maps declination as reference.
The triangulation to these points from your position will fix your position on the ground and on the map.
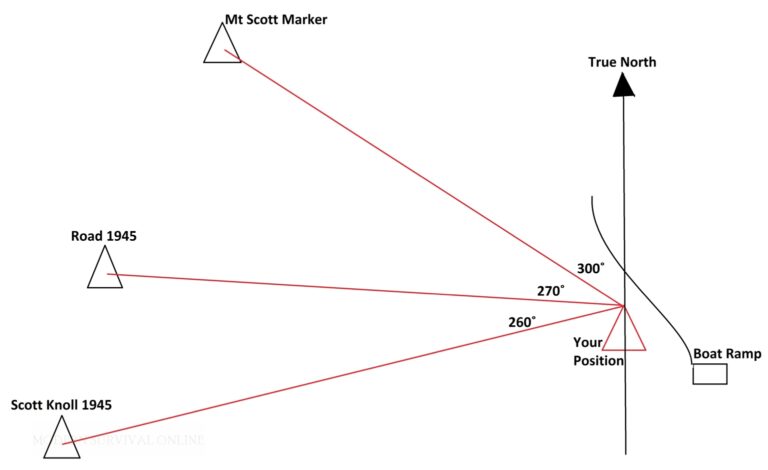
Lifting the diagram off the above map to simplify, orientate the map to ground using the features you can see. Your map will be orientated to True North.
Standing at the boat ramp, draw three lines through the three markers on the map, the point at which they intersect is your position on the map. Plot your fix using the maps grid reference.
Shooting the bearings with the compass will give you 3 points of reference to fix your position and which you can use later when you move of so write them down.
These are dominant reference points that are obvious from the ground. The road and the boat ramp are a balancing feature, it gives your fix a solid reference on the map.
Pencil in your position with a triangle, then shoot the bearings to the grid reference your position:
Remember Three for Me – Three Bearings to Find your Position
Deciphering Topographic Contours
The topographic map shows the contours in relation to the surrounding ground layout. If you want to plan a hike or bug out through an area, knowing where you are going is paramount.
Before you start your journey, these questions require answers:
- What you will encounter?
- How you will traverse through the area?
- Where are my reference points?
- What are my catch points?
- Features I can use as handrails?
- Distance per Day
- Gradients
- Critical Features
Your questions are not limited, they are dependent on YOUR needs. A stroll down to the jetty is not the same as planning an overnight traverse of a valley or a climb up to the summit of Mt Scott.
I follow a military maxim that was drilled into my core, it is an overlay that should council your decisions and help you to tackle any eventuality and maximize your experience.
Everything you do, every decision you make will impact the quality of the experience.
Let’s take a look at how a couple of hours of map orientation and familiarity will impact what you eat, what cloths you wear, the backpack you take, the water you drink, ultimately the enjoyment you derive from taking a stroll with nature.
Orientating Yourself on A Map
You are secure in the knowledge that you know where you are, now to figure out the route to where you are going.
Using your map, you want to walk to where the road crosses the rail line, this is your reference point. The fastest route is to follow the rail line to this point, this is your route and your handrail.
If you tray from your course, you can always rely on the rail line to guide you onward and be your catch point if you wonder off to far.
You see an interesting old structure and deviate from your route to take a look. If return on the path you took to get to the structure you will walk into the rail line, it will catch you. From here its easy to re-orientate yourself and carry on to your reference point.
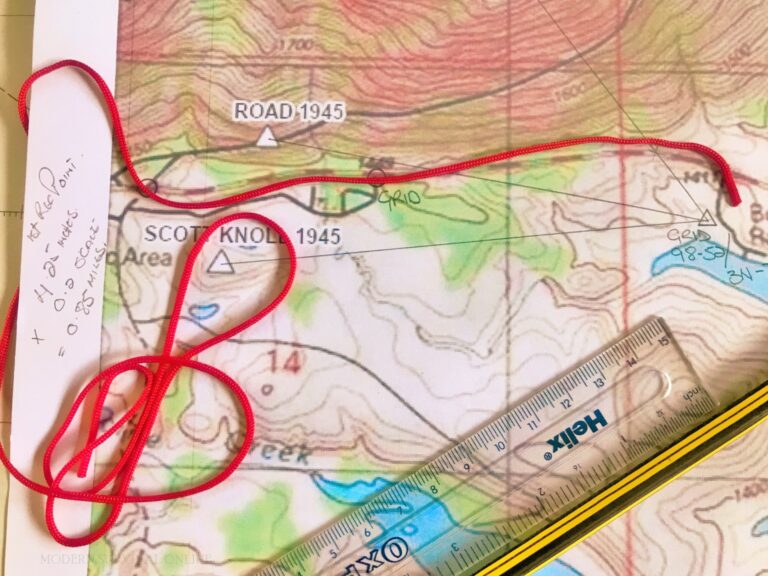
How far will you walk if the scale is 1 inch on the map is 24000 inches on the ground, written as 1:24000.
Using the lanyard string from the compass, lay it out along your route from your fixed position all the way along your route taking the twists and turns that can see, as in roads or paths etc.
Arriving at your first way point, this is the visual reference point that you can see from your fix. Take a bearing to this point along a straight line, so when on the move you can sight along the travel arrow of your compass to ensure you are still on track.
Using the string, lay it out along your ruler to establish the exact length then measure the distance against the maps scale.
Tip: Have some Blu Tack (also called Prestik) stored in a small lip gloss tub – place small bits along the route and press the string into it to hold it in place, especially around bends. Do not pull or stretch the string it will throw out you’re reading.
If in inches, your distance will be in feet and miles. If in centimeters the distance will be measured in meters and kilometers.
Now that you have established your distance, you can set off confidently.
Contours
Your topographic map is an aerial view of your surroundings, so how do you create a 2D view of the map for reference purposes?
The key is the topographic lines and the distance between them, the topographic interval is the guide to the slope and its degree of gradient.
Useful Tip: Even though straight up is the shortest route, it is the most difficult and will burn your bodies’ reserves to conquer the steep slope. Paths, including game paths follow the contours and ascend in a circular route, it would seem longer but will save your energy and will save you time.

The contour intervals indicate a progressive rise in 100 feet or meters, depending on the map you are using.
The contours are moving from 1100 to the top of the hill to 1500; that’s an increase of 400 feet or meters.
- If A, is the top of the hill and B is your point below, the contour lines between are close together indicating a steep slope, not one to tackle due to the steep gradient.
- If A, the top of the hill and C is your point below, the contour lines between are further apart indicating a gentler slope, with a steep midpoint. This could be a route taken, however the energy it will sap may count against you.
- If A, is the top of the hill and D is your point below, the contour lines between are widely spaced indicating a gentle slope, this would be a prime route to ascend to the top of the hill as its gradient is a gentle increase gradient.
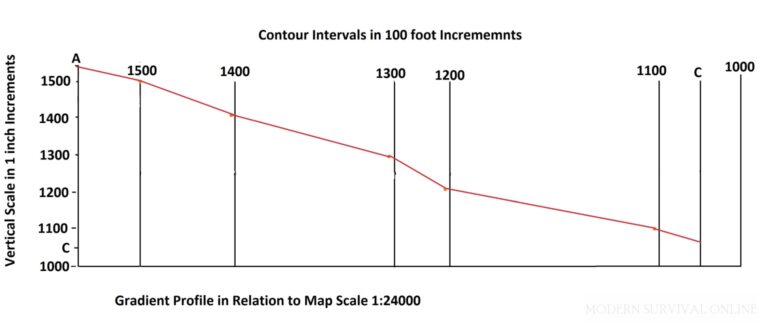
It is now possible to establish a gradient profile using a cross section of the contour intervals.
Doing this exercise will help you to establish land features as the appear on the ground, familiarizing yourself with your map using profiling will sensitize you to map features.
Circumstance may dictate you move fast, that will entail making snap decisions, your life and any with may depend on it.
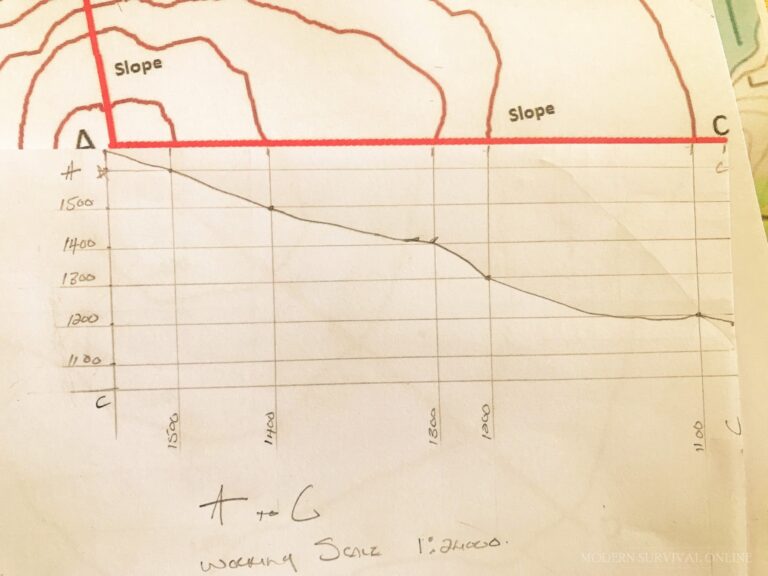
Using a blank piece of paper, run it along the line you have drawn from point A to point C. From A mark off the index contour lines as they appear on the map.
The contour points will give you the horizontal reference points on the ground.
Use the scale of the map, 1:24000, these points as your vertical reference in inches.
Taking the profile of Point A to Point B you can see the difference in the slope; the gradient is steeper and not a safe option.
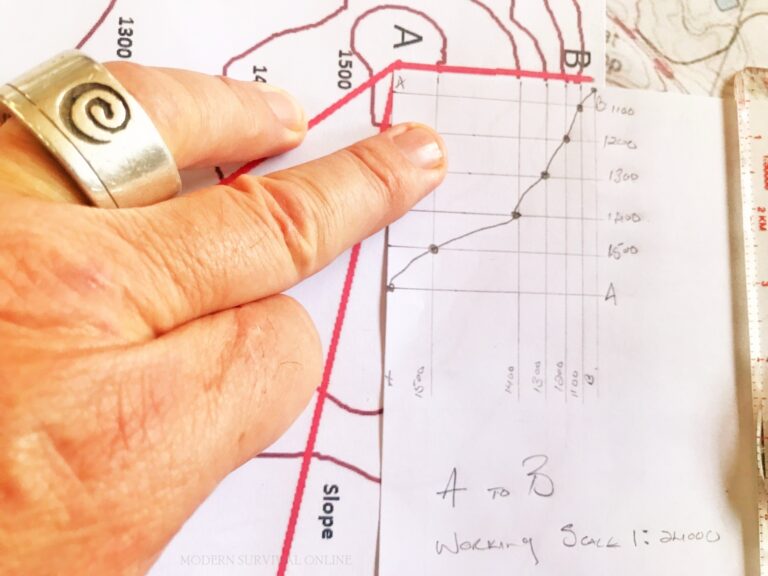
Contour profiling gives you a visual representation of what you will face on the ground.
Important Features On A Map
Rivers and Waterfalls
Rivers and waterfalls are represented on your map by the contour lines.
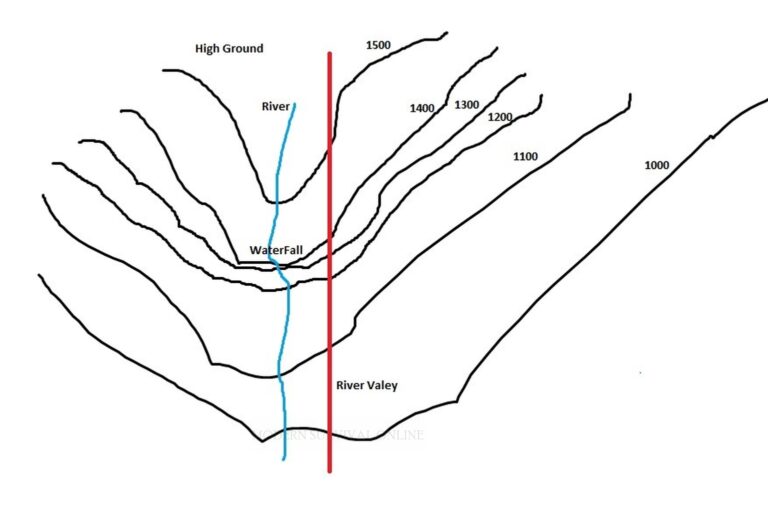
V is the Key – the downward point indicates that the topographic contours are representing a River Valley.
The contours that close on each other, they are almost touching, will represent a waterfall.
The further apart the contours the gentler the slope and so the gentler the flow of the river, steep slopes give water speed.
Spurs and Ridges
A ridge is a long narrow hilltop or watershed as rain runs off its slopes It is also called the ridgeline, the long narrow outline silhouette outlined against the sky.
A spur is another ridge or hill that runs off laterally from the main feature.
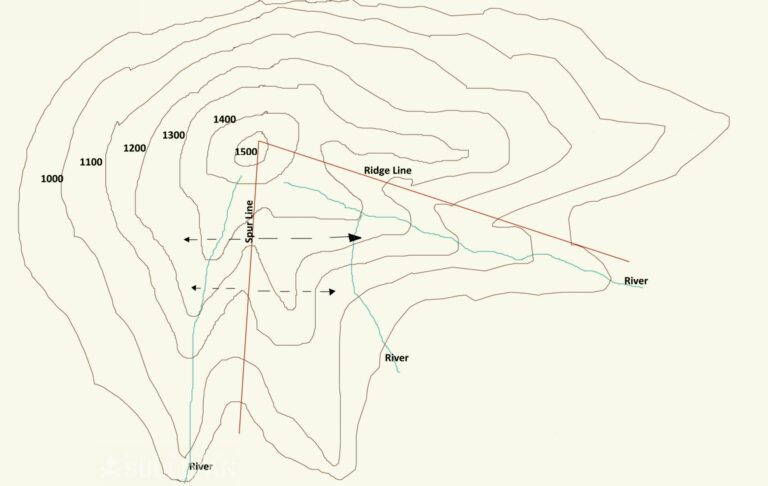
Remember the V is Key – Inverted the V represents a ridge, a sharp top line running out from the summit of the hill of mountain.
If you need to cross a mountain range as part of an expedition or a way out of an emergency situation, you will need to find the best route possible. The most accessible and a path exposing you to the least possible risk.
Passes and Saddles
A saddle is the lowest point between two high points on a mountain range or it splits a ridge allowing access to the area beyond the ridgeline.
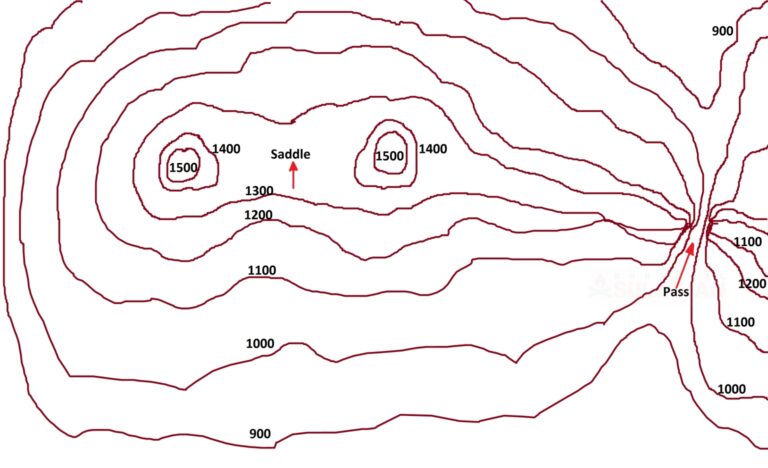
Looking at a Mountain Range you will easily identify the Saddle and the Mountain Pass. When planning your route, the pass may seem inviting and if unobstructed would be an option.
Water likes the easiest route and can erode the path making it steep, slippery and heavily wooded.

On The Move
You are navigating everyday of your life, going to work, driving across town, finding the bathroom in the dark, friendships, social interactions, work and business.
Everything requires a map and compass; some things are learned like knowing your way to work, and some require an attention to detail like hiking the Grand Canyon.
As with most things, the human condition wants to know and we map our lives with an attention to detail. So it is with mapping geography.
There are “life hacks” that we can use for both:
- Map Orientation with Compass
- Map Orientation to the Land Features
- Catch Features
- Handrails
- Reducing the clutter – Working with the main features
- Shooting a Bearing
- Back Bearings (Safety Bearing)
- Negotiating Obstructions
- Pacing
- Folding and Thumbing the Map
- Using the Maps Symbols Effectively
- Advanced Dead Reckoning
Catch or Collecting Features
Moving between points on the ground to reach your destination details plotting a course. Your course will have multiple reference points that you will use to guide you on your way.
On a map it’s as simple as point A to point B…
However, on the ground with its hills and valleys, boulders and rivers and a number of other obstructions you will have to plot your course, between, over and around these.
Point A as a starting point will require navigation to various points called catch points along your route, literally visual points that you can see that you will navigate to and will “catch “you and point you the next catch point on your route.
Handrails
As with a staircase, the handrail is there to guide you on your journey, it’s a safety device you can refer to, to keep you from losing your way and ensuring you can recognize terrain features and catch points.
Plotting your route on the map provided you will find a number of land features that will help guide you on your way.
- Orientate Map to the Ground
- Use the Compass to Orientate the Map
- Plot a straight line from A to B on the Map
- Shoot a Bearing to Point B to get a travel bearing
- Note the Map Features
- Identify them on the ground
Map Features
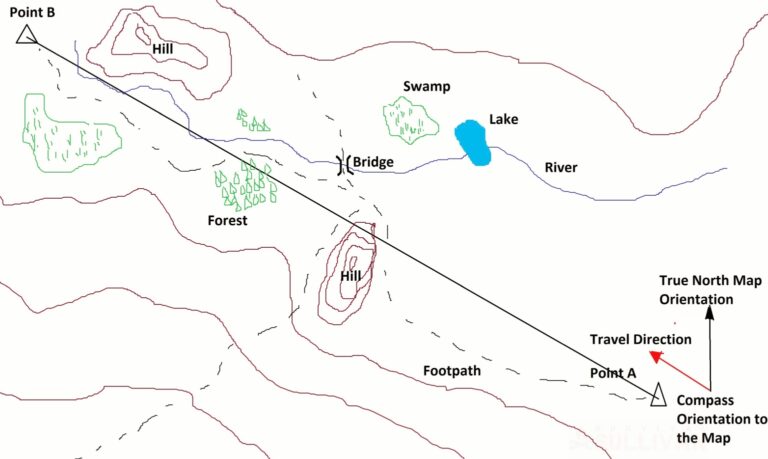
As you can see from the map, there is a hill in the direct line to point B and a footpath is indicated on the map.
Identify the major features on the map and the ground, discard minor features, like the swamp next to the lake.
Stay focused on the main features and their orientation to your position. Look back to recognize them if you have to back track.
Using the hill as a catch point, take a bearing from your fix to the Hill, and walk in that direction. Even if you go slightly off course due to unseen obstacles, the hill will catch you if you are off course.
The lake is a visible point from most directions, you can use it as a handrail. It’s on your right side, the hill is in front of you.
Keeping your direction with the compass to the hill and the lake on the right you are now orientated to the major land features that will keep you on track.
Even without the compass you can quick reference your Lake Handrail to stay on course.
Once at the Hill, you can move towards the lake to navigate around the Hill as shown on the map, and pick up the trail that is outlined.
Another example would be if the bridge was your first reference point. You want to use it to cross the river easily, and not expose yourself to the hazards of a fast-moving water source to get to your next point.
The bridge is however hidden in the river valley and cannot be seen from your vantage point, the hill now becomes your catch point from where you can find the track that will allow you to find the bridge.
Orientate your map once you hit the catch point and mark its location, as you head off to find the track look back, if you overshoot you can always find your way back to a known point and start again.
What happens if you can’t find the trail? Well, you have a general idea of where the bridge is, it’s over the river and from the hill you take a bearing in its general direction as you take a heading from your map.
The river is an excellent catch point, but it can be confusing if you hit the river with no bridge in sight. The question is left or right, it’s an upstream, downstream thing. If you know the direction of flow.
Orientate Yourself
At this point you could move into a depression that obscures the lake, refer to your map. Its easy to take a wrong turn here, as paths or trails encourage us to take their course. If you can see the bridge, orientate yourself with your map to the ground.
Use your compass to ensure you are on the correct bearing to Point B.
You can see the river on your right, this will now become your next handrail as you navigate to your next point.
The map shows a path that runs through the forest, shoot a bearing to the forest edge, and if you keep to the path, you can orientate your self to the forest edge as a catch point.
The approach to Point B has a swamp on the left and a hill on the right, the map indicates that the path weaves its way through these two obstacles. You are still using the river as your handrail and can use it to navigate your way.
This portion of your trek could be the hardest: the swap level may have risen due to heavy rain, the path could be overgrown with lack of use or washed away. Its important to keep a bearing on Point B.
If you are completely disorientated, you can use your safe bearing or the back bearing.
Moving on the trail you are using, maintain visual contact with your major land features, if you leave the trail to negotiate an obstacle, you can use it to back track if you hit a non-navigable dead end, say a swamp hole or deep mud.
Leaving the trail, note your feature and shoot a bearing to it, if you need to back track and can’t see it, you can use your compass to orientate yourself to the last bearing you shot. Three-meter-high reeds can “blind” you, DO NOT PANIC, refer to your compass, you have got this.
On the Move Pacing
You need to set out now, its time to move, light is going and your rendezvous with the hiking club is at Point B. Plotting the course, using the string and the map scale you know its approximately 3.8 kilometers to you destination including negotiating the hill and following the paths circuitous route.
Using the track at the sports ground where you live, you have figured out your pace over a given distance, taking into account that the track is a level and even surface. Your pace rate per 100 meters is 67 right side paces per 100 meters.
You can cover 100 meters at a brisk walk in 90 seconds or 1.3 minutes – that’s 13 minutes a kilometer on the flat track. Taking terrain into account you have been able to maintain this pace over hard uneven terrain.
3.8 Kilometers x 13 minutes = 49.40 minutes
Distance (Ground distance A to B) x Speed (Time per kilometer) = Time (Total time to Point B)
Taking variance into consideration, that time that unseen obstacles can add to your initial calculation. Stops to admire the view, orientate at catch points, drink water etc.
Variance can add up to 10% to your travel time on average 49.4 minutes to destination plus 10% is 54,34 minutes.
I always round up and give myself enough time between points, minutes count but taking a wrong turn can add hours. Even if you are in a rush check your numbers, recheck bearings and land features.
That said you are now ready and there is a simple yet effective map practice that will shave time off your trip, the technique is called thumbing the map.
Folding and Thumbing the Map
You know where you are and you know where you are going, the whole map is not relevant right now, so fold it.
Fold it along the other edges parallel to your route, leaving only the relevant details of the map exposed. The land features on your route are memorized and you have had a good look around to associate the map with the ground.
Every time you change direction to follow a different leg, refold the map to parallel your next course line.
Keep your thumb on your fix, your starting point and as you move along let your thumb move along the course you plotted in relation to the land features you are familiar with. This method will save you time by reducing stops to check your position.
It will help you zoom in on your position without having to take in the whole map and realign it with the general ground features.
Handy Tip: Draw an Arrow on your thumb nail it will help you maintain direction:
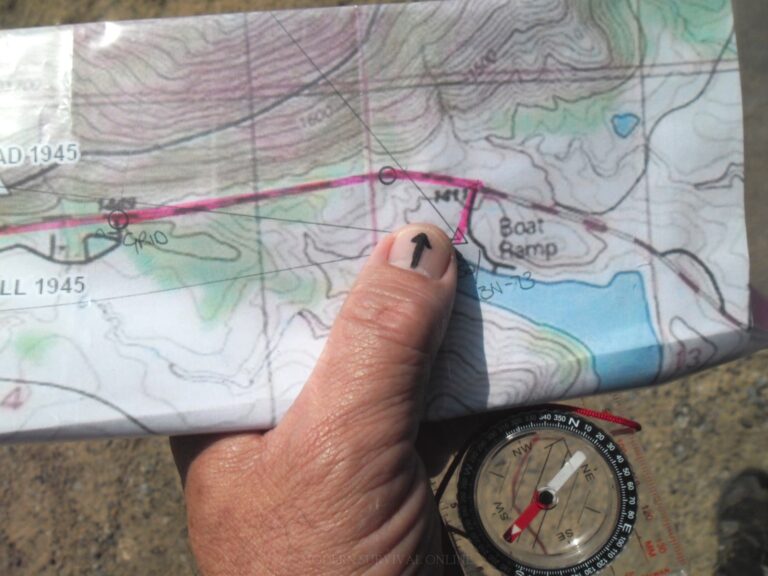
Don’t let go of the map, even if you get distracted or fall, you will be able to quickly reorient and find your way.
It is important to practice this method in familiar surroundings to build confidence and ensure your safety.
Handy Tip: A mnemonic for you to remember: DDT Catches Flies = Distance Direction Terrain Catching Features
Using the Maps Symbols Effectively
Using the maps symbols identify the map features, mark them and memorize them. I personally draw my own map with these features on, ensure it can overlay with the original map.
This, bare bones map will be a precision tool to ensure I don’t get side tracked and helps me remember my route, even without a map.
Keys to Navigation
The best teacher is practice, its your excuse to get out, enjoy nature, explore your neighborhood, and learn new things.
Navigation is a fundamental skill; it is your security in finding your way and making life an enjoyable experience.
The Keys as outlined in this article are your map and compass, they unlock navigation and with practice will become so natural that in many cases you will automatically know which way you are going.
Familiarize yourself with the basics of both, learn the information on your maps and practice patience in your work.
Trust yourself, if you are unsure take a moment. Rather lose half an hour, see it as a rest for your body, than lose hours finding your way again or worse, getting totally lost.
- Learn your A, B, Cs
- Three For Me
- Remember DDT Captures Flies
Most importantly, have patience with yourself and others, don’t panic and have fun.