Every day, behind the veil of bureaucracy, super-secret scientists invent new lights, lasers, and technology that could cause armageddon if it were to get into the hands of a non-government actor. Meanwhile, the tinkerers of the world work hard to build something more useful than an advanced mousetrap. The dichotomy that has existed between military and civilian night vision is tearing fast, meanwhile, Phantom Hill Designs is not waiting for daddy government to say we can have our NODs and Laser, too. By incorporating a visible/white light, IR laser, and IR illuminator into a single housing, all for under $800, the CTF-1 looks like it could redefine what a true entry-level night vision setup would look like.
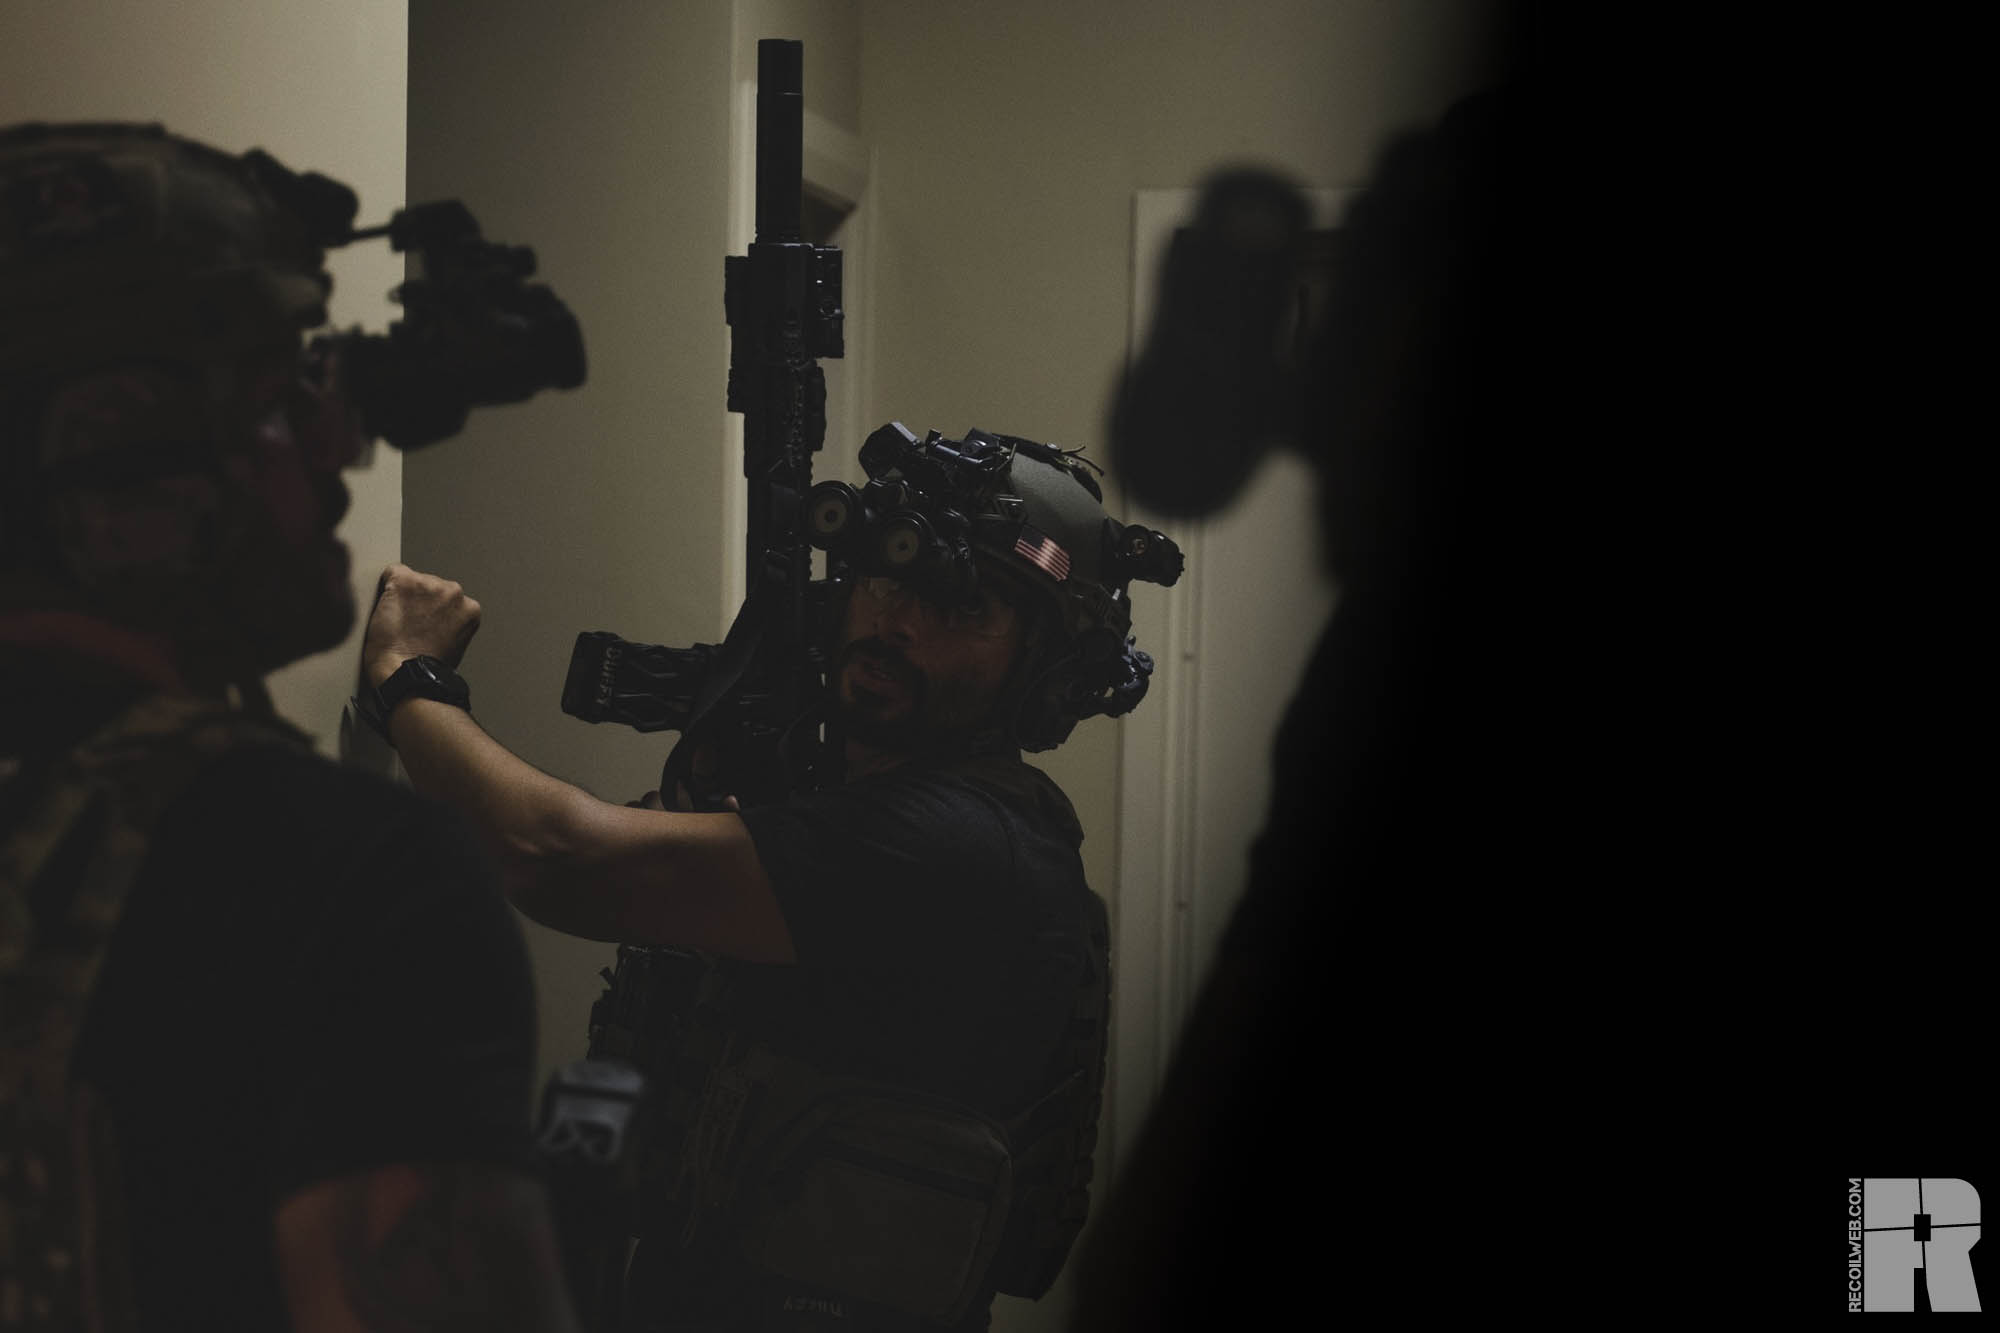
At the end of the day, there’s no truly casual way to get into night vision. At the same time, items like the CTF-1 are pushing the cost of entry down to more attainable levels. Being night vision capable requires a functional ecosystem of gear starting with NODs but extending to the firearm as well. NODs, Mount, Helmet, Firearm, Suppressor, Optic, Light, Laser, and Illuminator quickly add up. And while we’ve seen some more affordable-but-performing options cover so many of these bases: from opting for a bump helmet instead of a ballistic one, to rolling with a Vortex Sparc SolAR instead of an Aimpoint T2 Micro, one necessary item has seen very few new options: the IR aiming device.
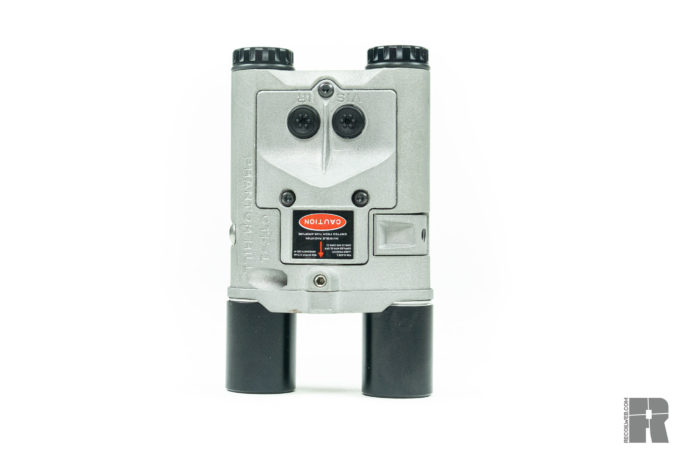
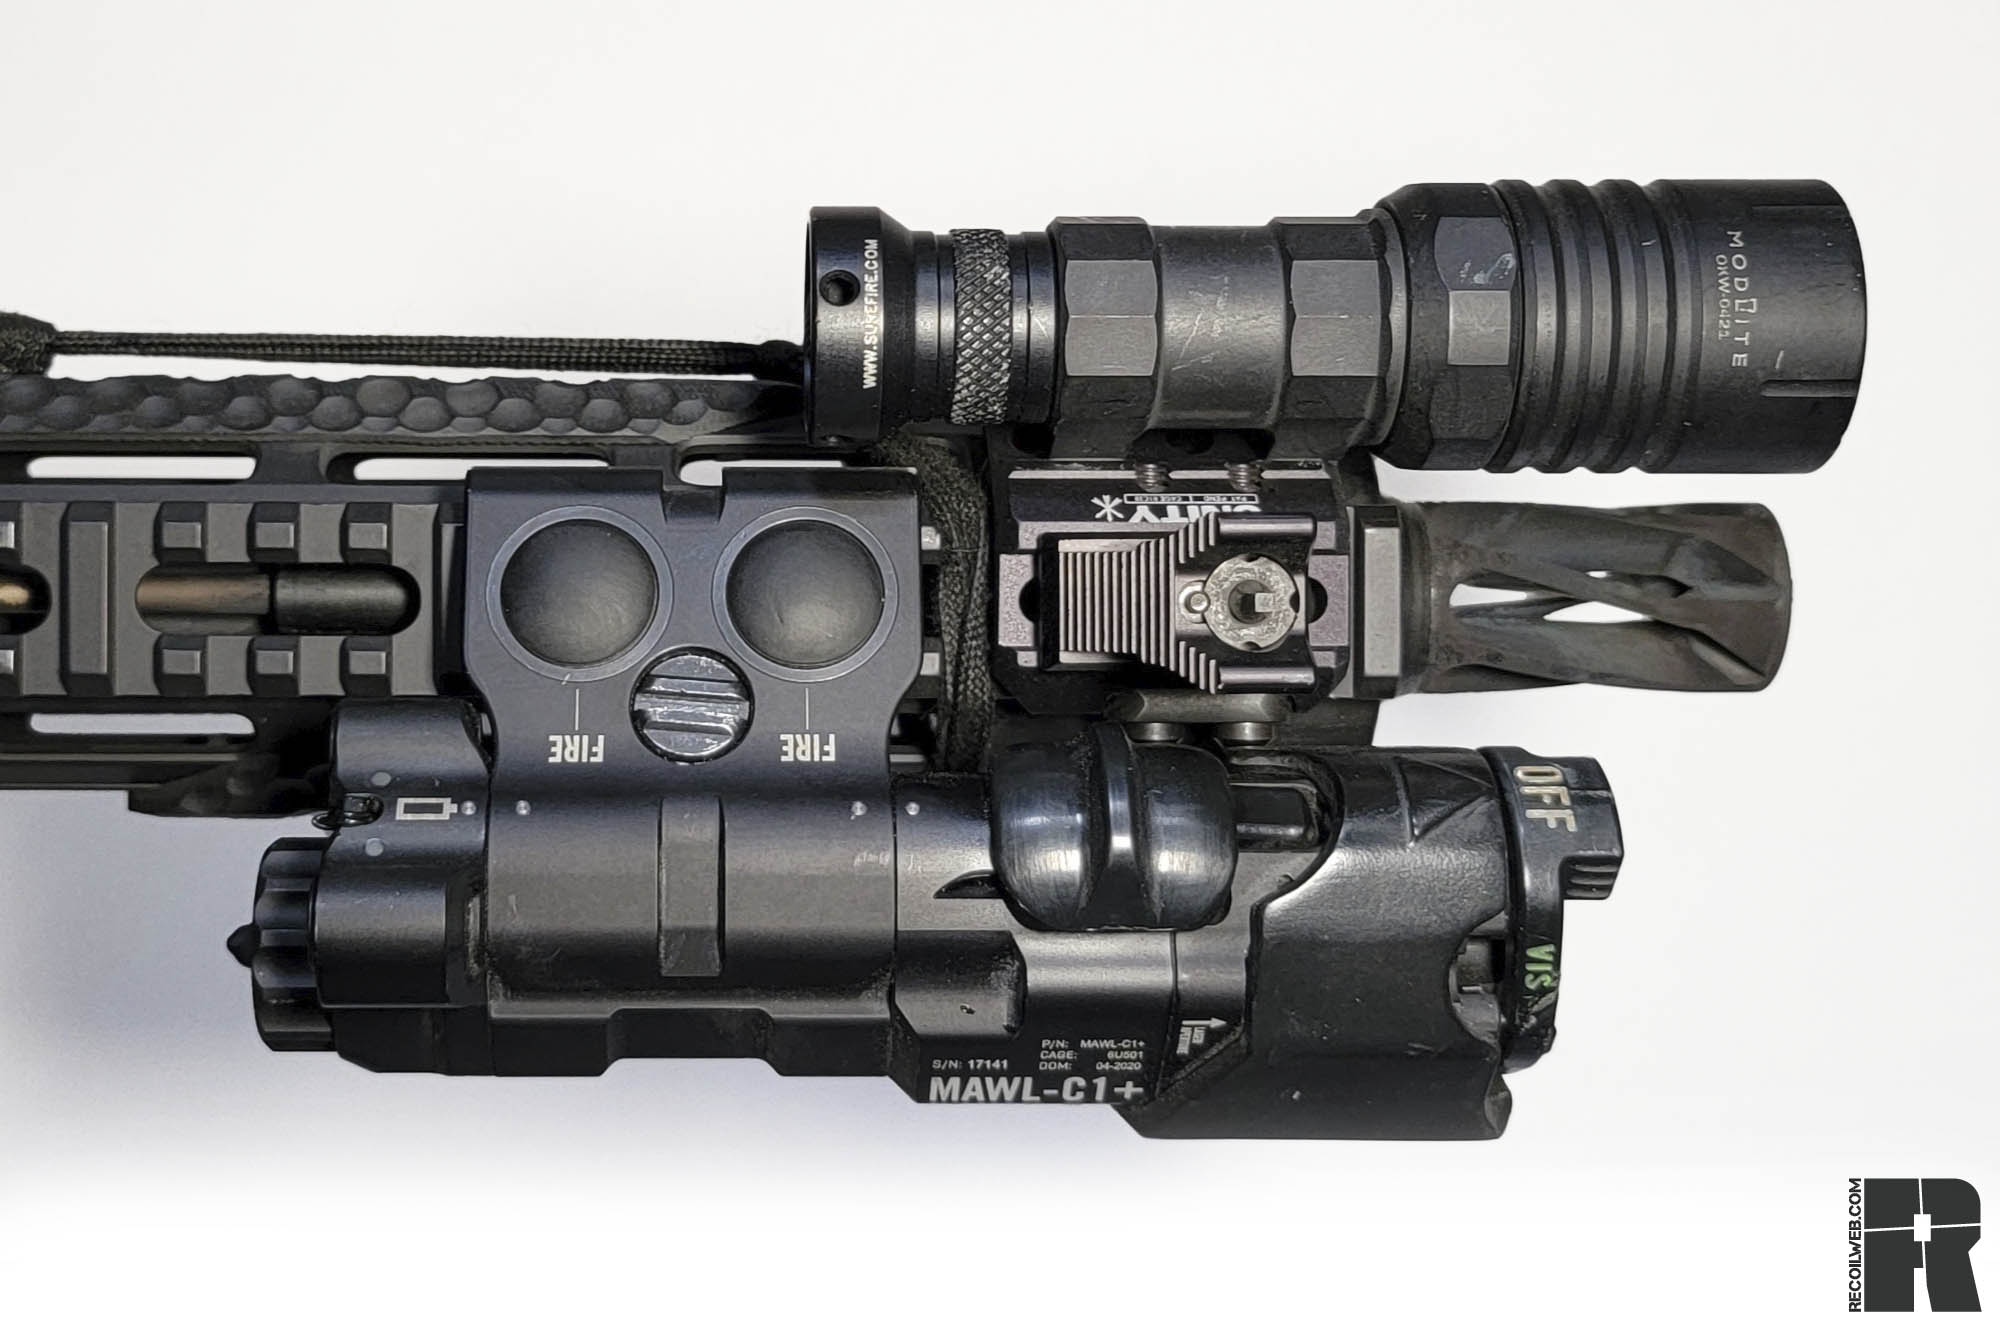
The top/left light button coincides with the light, and the right button operates both the light and laser at the same time.
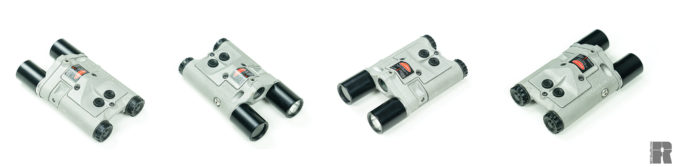
The Phantom Hill Designs CTF-1 combines a 380-lumen white light with an IR designator and IR LED flood/illuminator into a single unit that takes CR123 batteries. The housing sets it apart even further, being 3D sintered/printed out of aluminum, with integrated actuator switches: one for visible, one for IR. The laser can be zeroed, and adjusts with non-clicking set screws.
The two heads: one for IR, and one for white light, screw off to reveal LED bulbs. Rumor is future versions might accept Surefire, Modlite, or similar pattern heads, but we are unable to substantiate this at this time. Users can still swap out the lenses.
Since it uses an IR LED for the illuminator, it doesn’t throw a sharp, central cone, but rather a bloom that cools as it gets further from the center.
Keeping Up With the Concept
The Phantom Hill designs CTF-1 is not trying to replace the PEQ-15, nor undercut the DBAL, but provide a functional system that solves multiple needs. It aims to outperform pistol-style designators, without costing the $1,500 of a typical civilian laser. Does it accomplish this? Technically yes.
As unfair as it is, the standard for such systems is often driven by what is being fielded in the military. To compare a Surefire Mini Scout, and full-power PEQ-15, which easily can cost north of $4,000 altogether, not to mention the volatility of the secondary market, an $800 solution really doesn’t sound so bad. The release of the Phantom Hill CTF-1 couldn’t be more perfectly timed with the growing crowd of civilian night vision owners who are pioneering in their own right just what night-vision capable can mean.
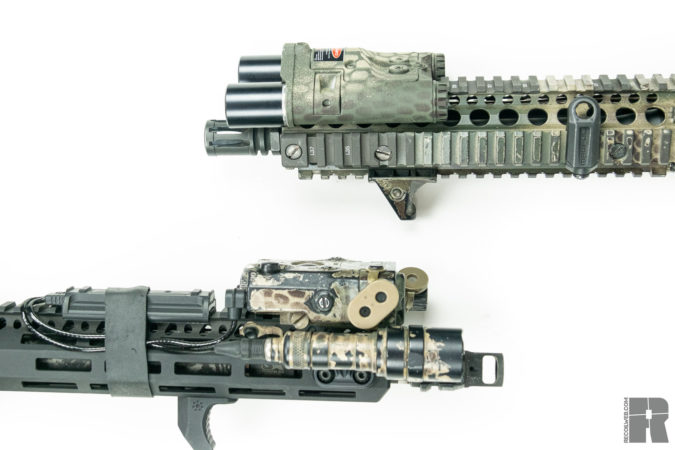
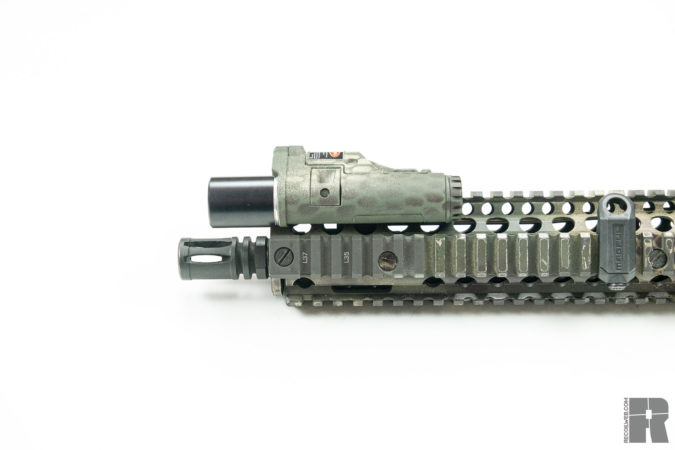
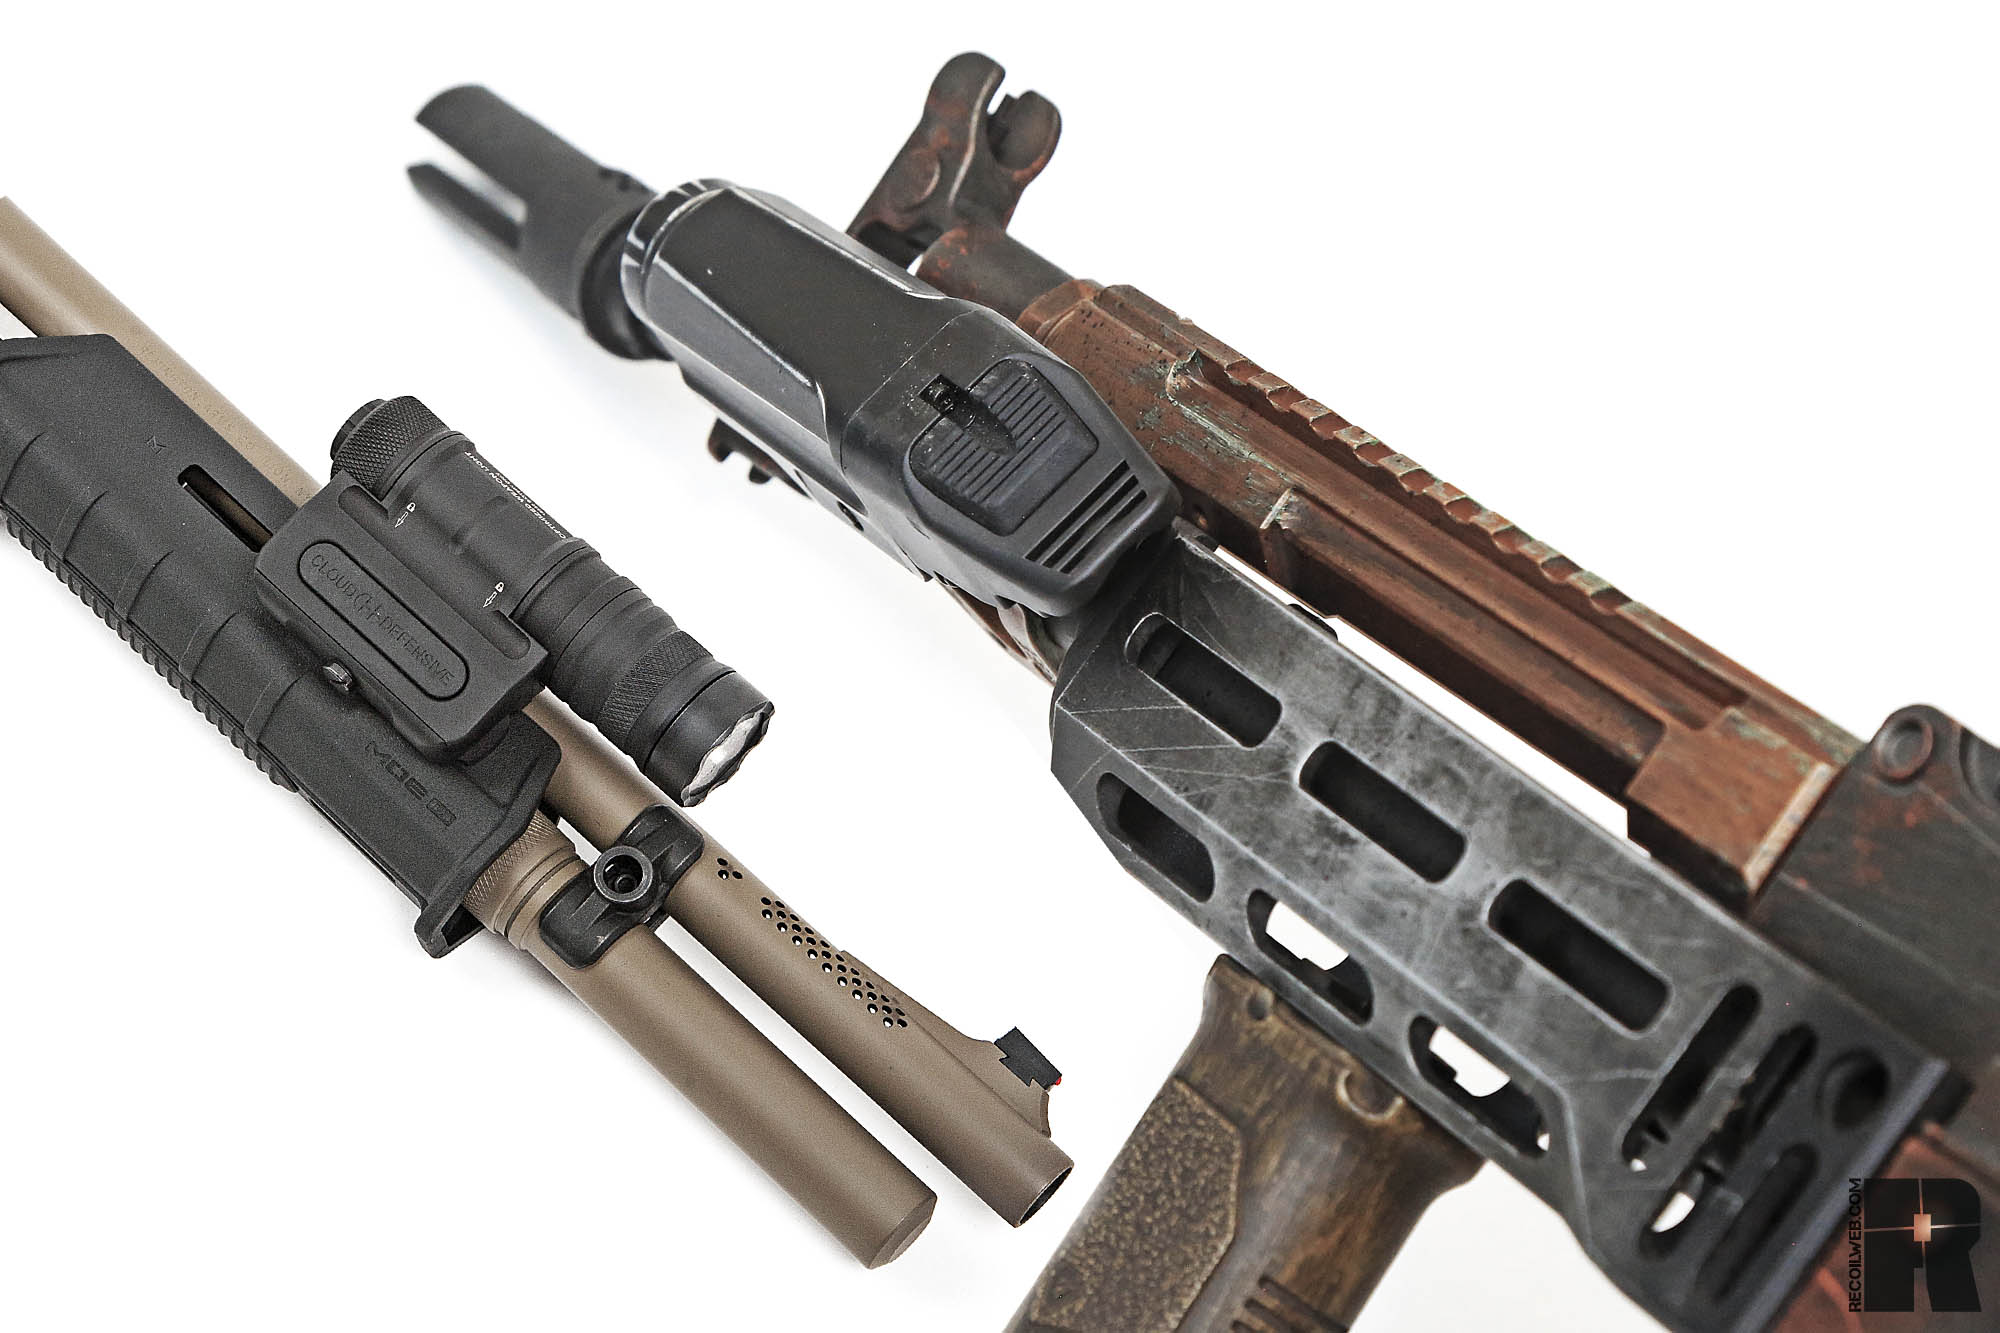
Top: CTF-1 on a MK18 rail, Bottom: PEQ-15, and Surfire Mini-Scout.
The light, laser, and illuminator are best described as qualitativelyadequate: they’re bright enough, crisp enough, and patterned to play their roles effectively. Quantitatively, others will out-perform the CTF-1, but not proportionally to the cost of entry.
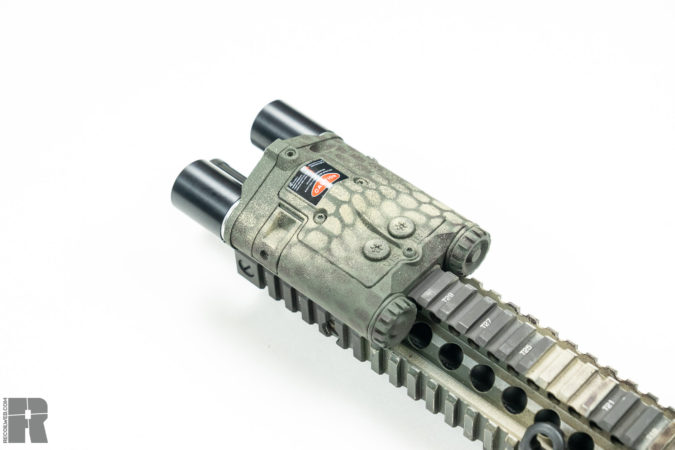
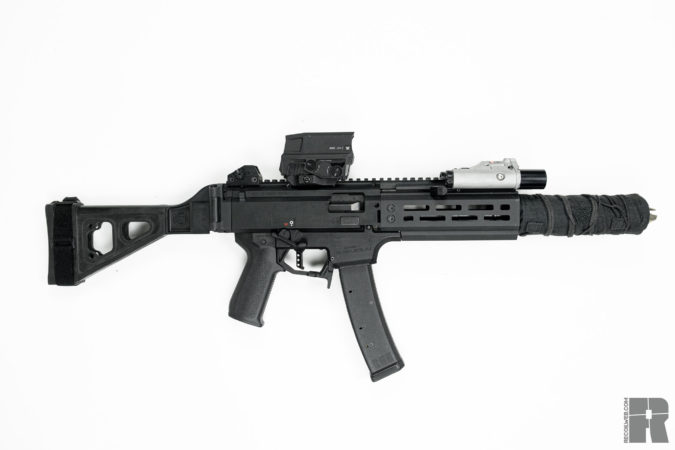
Clearly designed to ride on an AR-15, the shape of the CTF-1 can’t go on just anything. The tubular sections that hold the batteries and LEDs ride lower than the attachment point for a profile closer to the rail. As a result, firearms without a raised top rail won’t accept it. Good thing the AR-15 isn’t going anywhere. For those outfitting a CZ Scorpion, the HB Industries rail works.
The buttons are surprisingly crisp in a world of mushy options. Although a small ridge divides them from each other, they are close enough together to raise concerns of hitting the wrong button in a pinch: exactly when you don’t want that to happen. In Special Operations circles, accidentally triggering your white light is treated like a negligent discharge of a firearm, and for good reason. Capping the white-light side, and spending some serious time with the Phantom Hill CTF-1 are highly recommended.
The left button activates the white light, the right activates both the light and the laser.
The sintered metal body differs from other lasers, as it tends to absorb light, or at least not reflect it as much. This matters very little in the daylight, but factors in at night, in the event that you’re not the only one seeing in the dark. Cameras that can pick up some of the IR spectra are still becoming more and more affordable: your camera doorbell and cell phone most likely stretch just a bit into it.
Carrying the Fire
Phantom Hill’s design does more than illuminate the darkness for those who can see in the dark. It signals and supports a growing interest in Night Vision gear from entrepreneurs and tinkerers. It is here in history when we typically see the sudden proliferation and improvement of technology, and we’re okay with that.
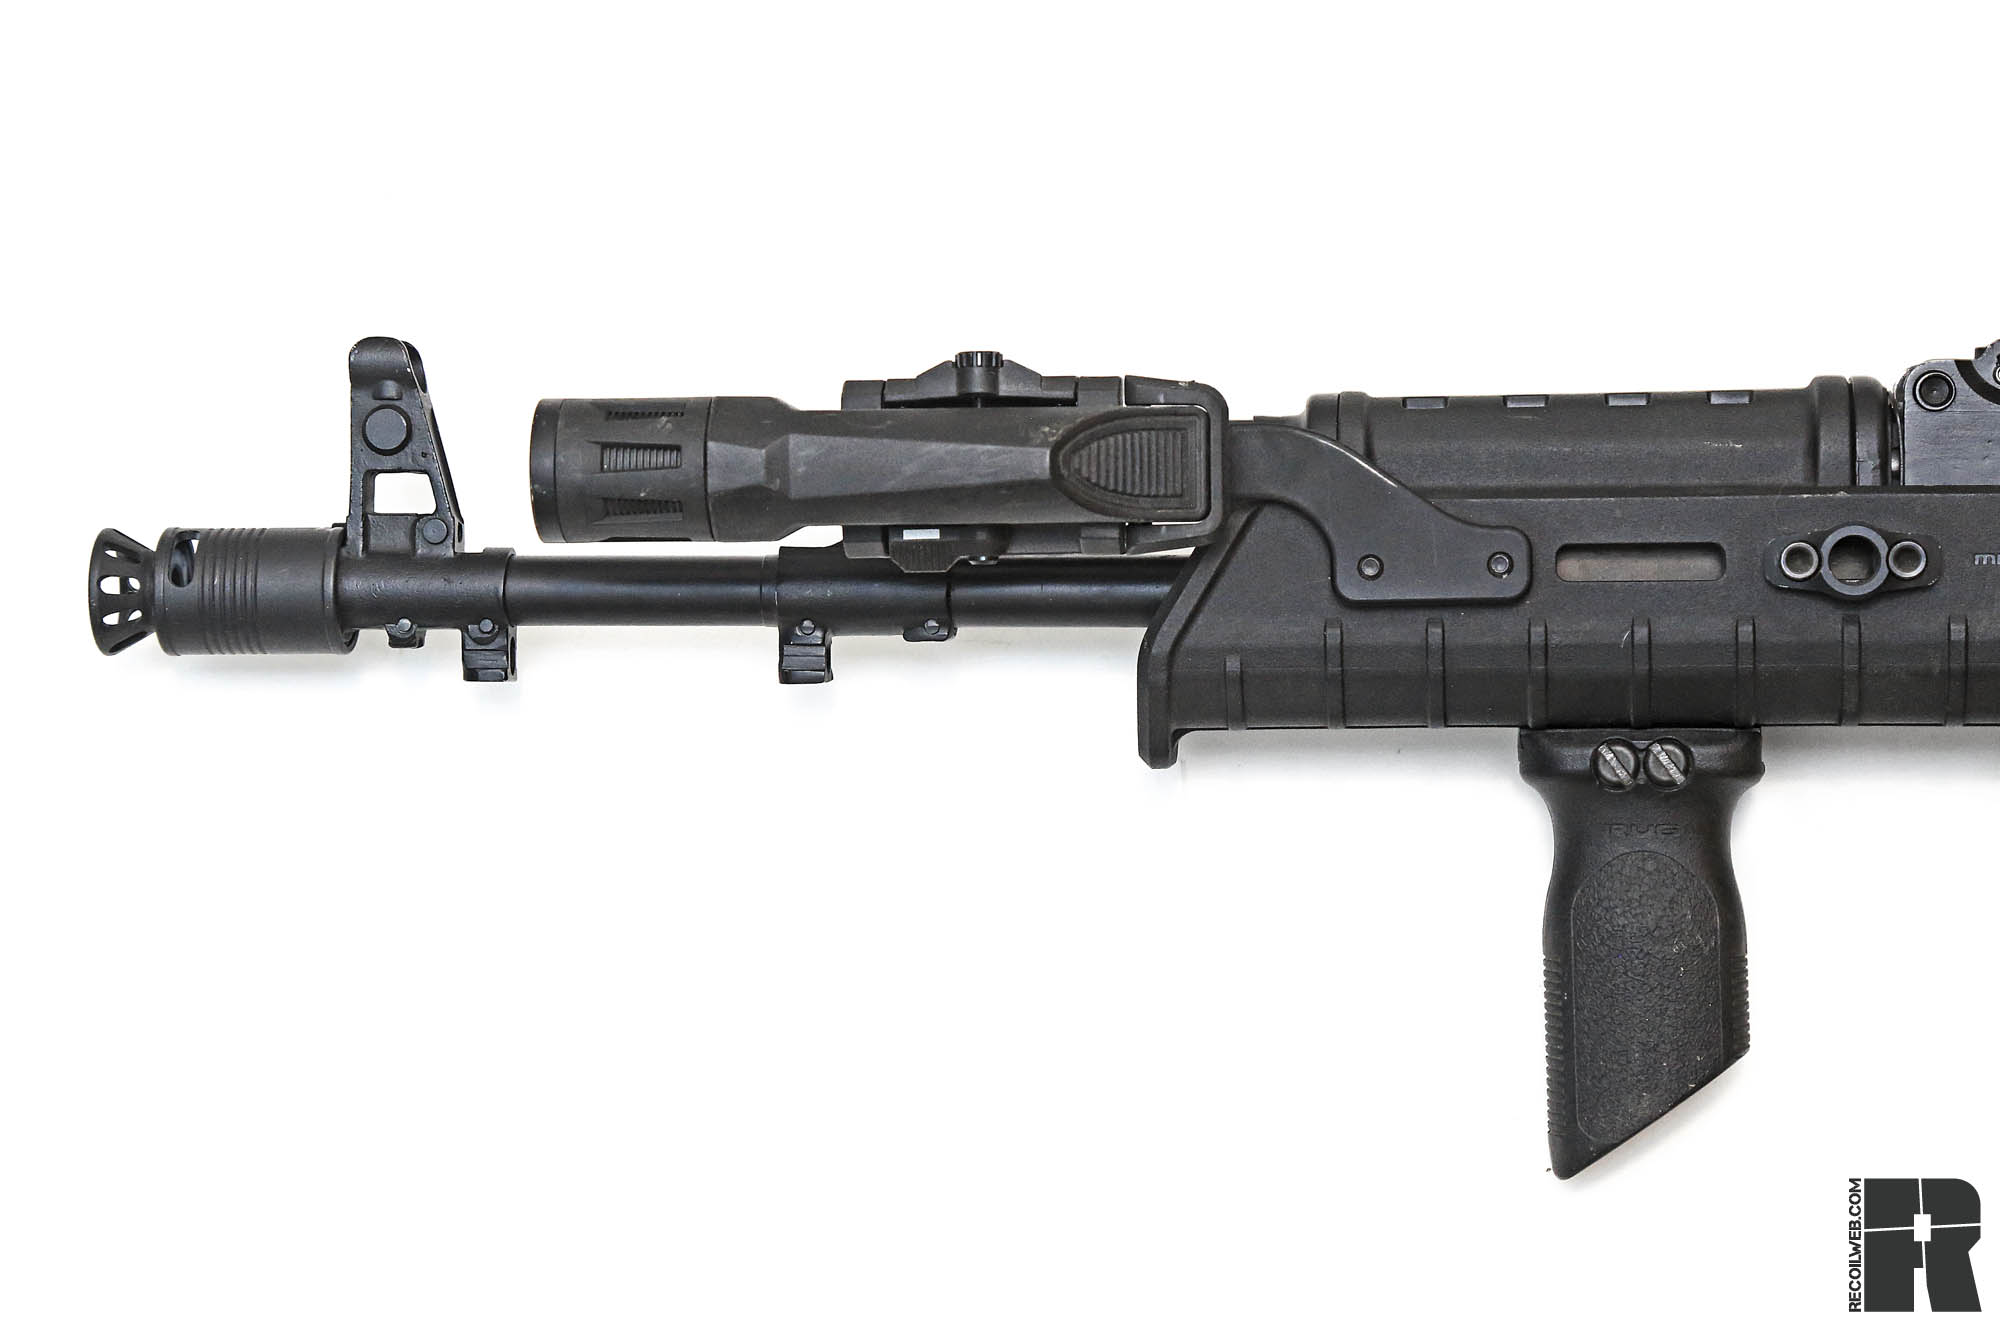
The CTF-1 almost looks like it was designed for the MK18.
The CTF-1 carries its weight as a one-stop-shop for those who are aware of working with its nuances. It distinctly lacks the pompous bravado of saying that it’s “just as good” as military-grade counterparts, but instead brings a functional light, laser, and illuminator to the table in a single unit that runs on some of the most common batteries in the ecosystem. While on one hand, the CTF-1 solves a problem, on the other, it inspires future possibilities.
Phantom Hill Designs CTF-1
Weight: 9.9 ounces with batteries Length: 4.75 inches Height: 1.5 incches White Light: 380 lumens IR Laser: 850nm IR Illuminator: 850nm Batteries: 2x CR123 Battery Life: 3 hours MSRP: $800 URL: phantomhill.design
The switches by which you activate a light are crucial pieces of equipment. Whether you choose to use the onboard tail cap or a pressure pad/switch, it’s critical to be able to simply activate your light when you need it. First, let’s begin with why it’s important to have a light on a rifle. Light provides us with data collection, communication, and control. For example, collecting data includes positively identifying a target and assessing a suspect’s hands or demeanor to make the wisest decision based on the circumstances and environment.
Communicating with light is more than signaling for help. For example, if you’re pointing light at a door, window, hallway, or anything, without saying anything, your partner will probably join you and look at the same thing. That’s just one example of communicating with light.
Last is control, the magical art of shining light in someone’s face causing them to see nothing but light and/or the back of their eyelids. When the photoreceptors in your eyes get overloaded, there’s a natural reaction for your eyes to constrict and your lids to close. Some even look away and block light with their hands. At that point, you can see the potential threat, make better decisions based on the data, and now control their vision. This works with powerful lights with good candela, so don’t skimp on a light. Now let’s talk about setting yourself up for success.
ERGONOMICS
When setting up a rifle, we want everything to be natural and easy. You don’t want to stretch too far to get a grip or make harsh rotations that are uncomfortable to reach your tools. You want it to be ergonomic, comfortable, and easily accessible. Due to the amount of variation in the world of firearms as well as humans, you’ll have to adjust, experiment, and probably swap things around to find your “just right” solution.
Some things to keep in mind when narrowing in on your solution is to be open-minded, plus make sure it works for right- and lefthanded activation, for the ways you plan to use the setup, and for your expected environments. You never know what will work well until you try it. You can also look at examples (like in this article) or try different setups in classes. This’ll give you ideas and possible solutions for the lights, lasers, and switches you plan to use.
RIFLE LIGHT OPTIONS
Weapon-mounted lights are the most popular for rifles and are a must-have. There are many ways that you can mount a light on your rifle. A few factors to consider include: What kind of light are you using? Where do you want to mount it? Do you want a tail cap, pressure pad, or both? Also, what additional accessories will you be adding, such as lasers, sights, muzzle devices, and rail covers?
When selecting your rifle light, choose wisely. I prefer high candela lights like Modlite and Cloud Defensive over the rest but that’s my preference. Choose what best suits your needs, or perhaps you need to use what you’re issued. To narrow down your choices, look at these criteria. First, what’s its output? Does it give you what you need and want? I personally look for high candela and decent lumen output. Secondly, look for a light that allows you a few options for activating it, with momentary and constant-on options. Third, select a light that allows multiple mounting options to give you options for where to place it and accessories around it.
Next, you need to figure out how you want to activate it. Are you trying to keep it very simple and use a simple tail cap switch or do you want a separate or more advanced switch? Three different options currently exist for activating a light. The first is very simple — a tail cap button. Most lights come with one; if depressed lightly, it offers momentary light, and if pushed hard, it usually clicks and stays on. Second is a remote switch/ pressure pad. These usually attach via a different tail cap with a wire that routes from the back of the light to a switch that attaches to a convenient spot on your handguard. Third is an integral switch, buttons that are already on the body of the light for a standalone solution. Either way, the choice is yours.
[Some lights feature mounts integral to the light body itself, while others require a separate Picatinny or M-LOK mount. There are pros and cons to both but, generally, lights placed high and close to the bore line provide the most direct illumination from behind the gun]
LIGHT PLACEMENT
Where you mount a light is another critical consideration. If you place it on your rail, make sure you can activate the light ambidextrously and from different body positions. You may also need to consider the placement of your laser, if you’re using one. To determine a good spot to place your light, first look at the way you hold the rifle with nothing attached. Where your hands naturally land on it are good places to put your switches. Then, mount your light somewhere ahead of that.
There are a wide variety of different mounts to put your light almost exactly where you want it. Try placing it as far forward as you can without interfering with your suppressor or muzzle device. This helps keep it out of the way of your support hand grip and helps avoid funky shadows and splash off the front of your rifle that may obscure your data collection.
[Non-standard weapons like AKs and shotguns may require additional planning including special mounts or unconventional positioning.]
Lastly, I prefer to mount lights around the Northern hemisphere of my rail, at 9, 10, 11, 12, 1, 2, or 3 o’clock on the rail. Not that it’s wrong to mount it lower, but this can have adverse effects on your ability to grip the rifle. Light placement considerations for non-standard firearms are very specific to the available mounting surfaces, but the same guidelines still apply.
LASER INTEGRATION
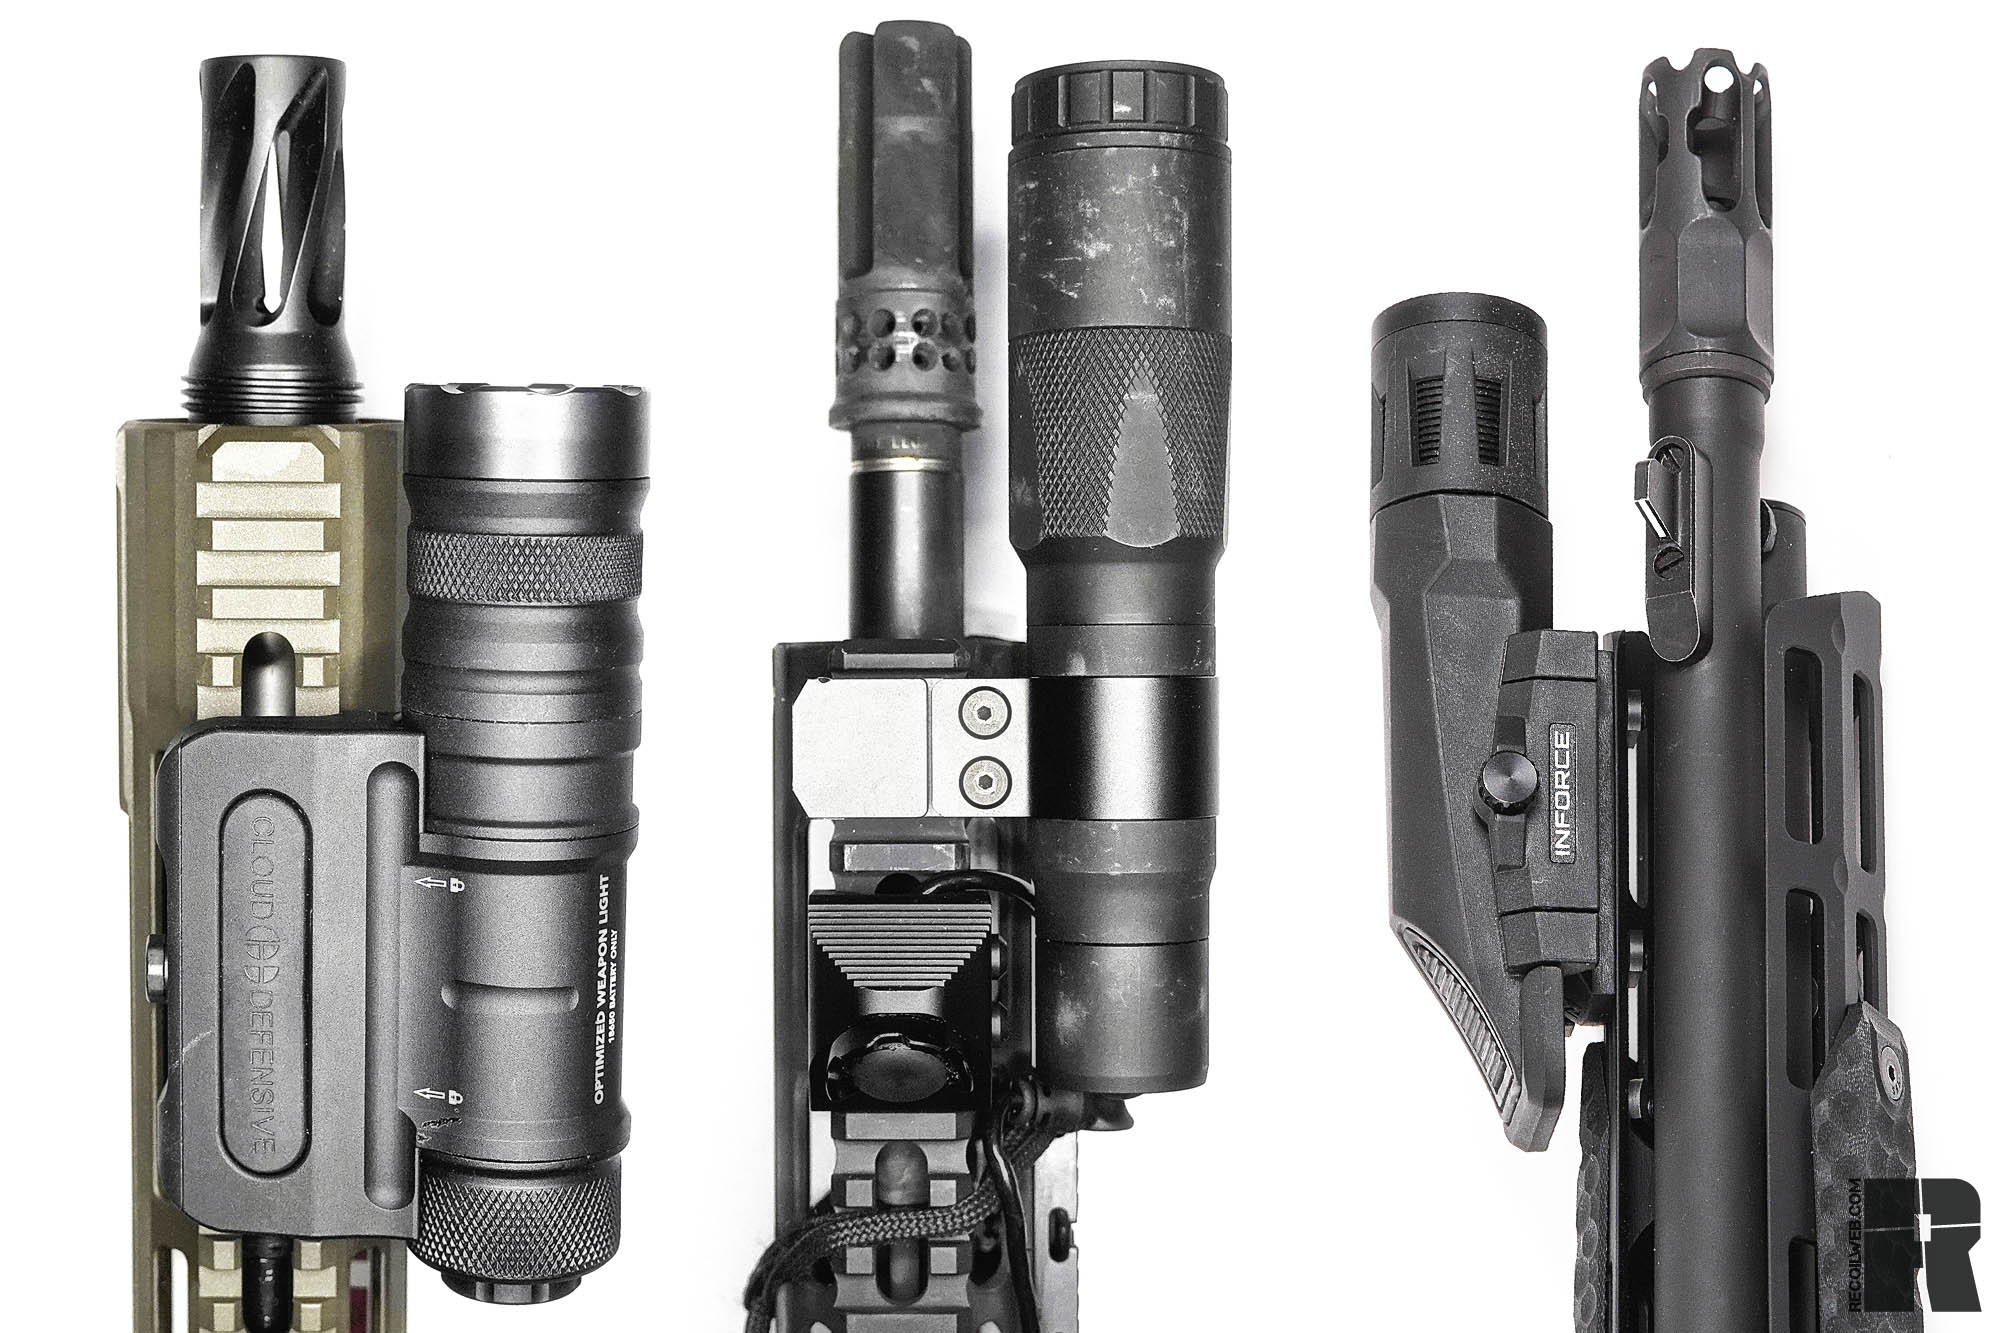
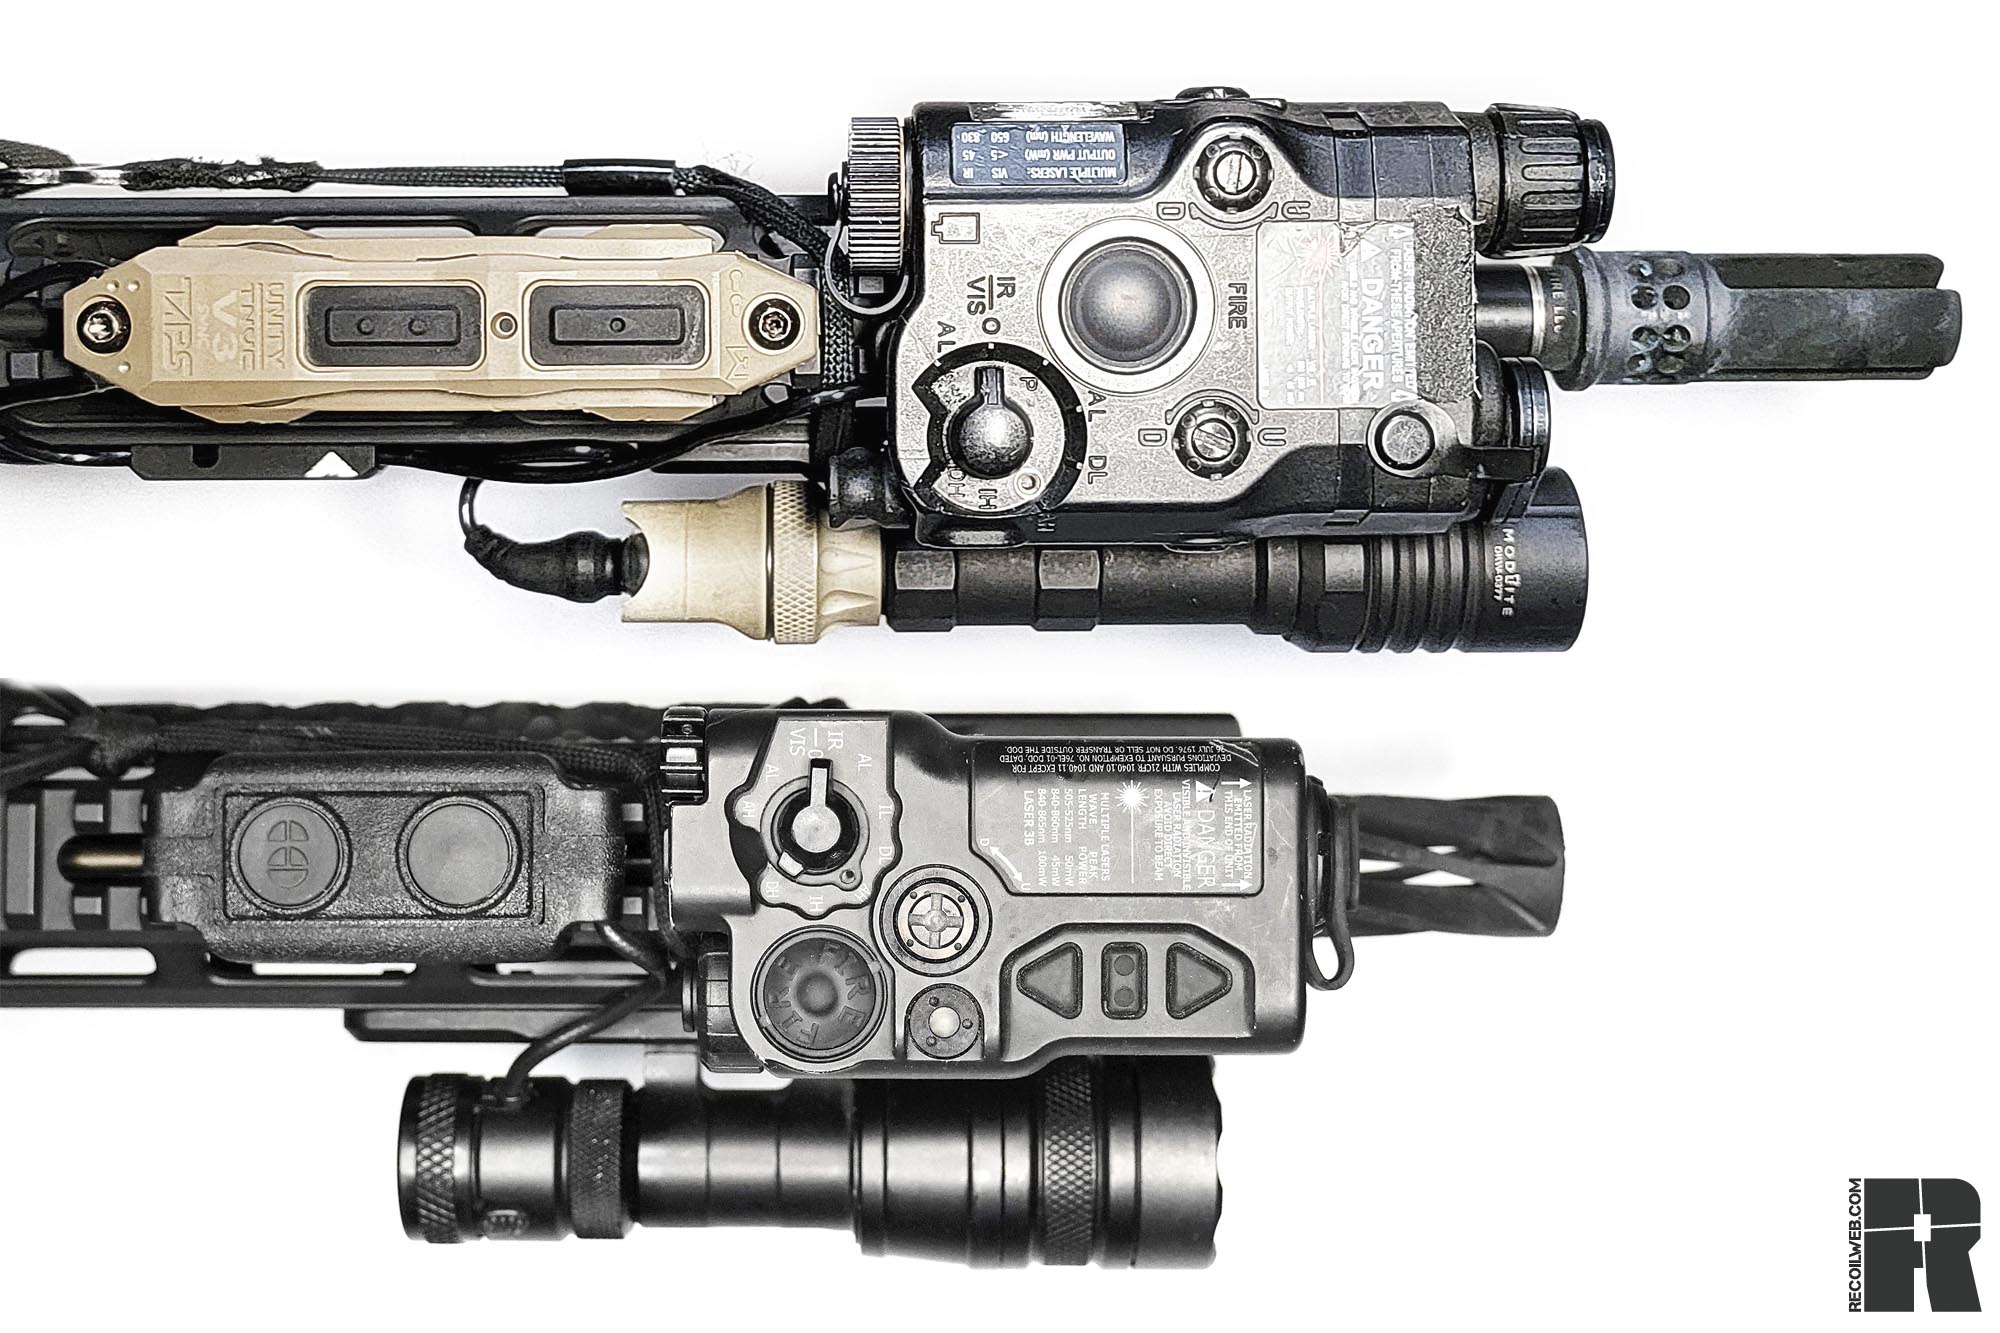
If you’re into or preparing for the night vision game, this section is for you. When integrating a laser, you need to carefully think through your configuration. Depending on your choice of laser, you’ll need to fit your light around it. Most lasers are meant to be mounted as forward as possible and at the top rail (12 o’clock). This allows the laser to optimally project forward without bouncing off a switch, sight, hand, or rail. It also makes it convenient to use the on-board buttons as your primary switch, or as a secondary if you want to use a remote switch. Lastly, it’ll be in a good position for mode changes. Follow the same considerations for positioning your laser’s switch, depending on how you mount it, as for your light. It may feel like Tetris, but there are several options to set up ways to effectively activate your light and laser — button stacking, dual switches, or using the integrated buttons. Button stacking refers to placing a light and laser button next to each other in a way that’s suitable for your use, and is an art of its own. All of us have different hands, strength, rifles, handguards, abilities, and so many other factors. So, the art of button stacking has to work specifically for you. Some of the ways people do this is with two Modlite Mod buttons, a Mod and Unity Hot button, or an integrated button and Mod/Hot button. All of this depends on your chosen light or laser.
Dual switches are a simple solution but can lack the ergonomics that some need due to the rail space available or their chosen setup. SureFire’s dual switch and the Unity TAPS are the dual setups that play in the realm. The SureFire dual switch has one pressure pad for your light and one for your laser. The Unity TAPS features several different configurations. It can be mounted to Picatinny, M-LOK, and KeyMod. It also has different button layouts to fit your needs.
[Remote switches can be especially useful when integrating IR laser/illuminator units.]
Last is the use of integrated buttons. This results in a clean setup with no wires, but often presents other issues. If your laser is a box style, this method usually works well for those with larger hands. The MAWL works well for most hand sizes. You also usually end up with your light and your laser on opposite sides of the rail, not a huge deal but a consideration.
CONCLUSION
Overall selection, placement, and use of your light is a personal decision. You should seek some professional instruction and learn what right and wrong look like, so you can make an even more educated decision on what you need. You should also add some low-light dry practice into your routine — most people practice this even less than support hand shooting. Lastly, keep on learning. We can all continue being students and adapting to our ever-changing environment, always doing better.
Home » Camping » Thule’s Tepui Foothill Lets You Carry More Than Just a Rooftop Tent
Thule’s Tepui Foothill is the next generation of usability in rooftop tents.
In late 2020, Thule announced its Tepui Foothill rooftop tent, or RTT. It’s a slimmer-profile two-person tent that distinguishes itself by leaving space on a vehicle’s roof rack for other gear instead of taking up the whole roof.
I had the chance to test it out, and it’s a great option for those who might have forgone rooftop tents because of other storage needs.
In short: I loved that the Thule Tepui Foothill ($2,000) freed up space on our roof rack for carrying kayaks, bikes, and a roof box.
The tent took longer to set up and pack away than other rooftop tents we’ve tried. However, when deployed, it was comfortable inside even for 6-foot-tall sleepers, with storage pockets that kept inhabitants organized.
And awning-protected roof vents and windows kept us out of the weather and remained warm or cool depending on the season.
Thule’s Tepui Foothill Rooftop Tent
What It Is
Rooftop tents are an excellent alternative to tent campingif you don’t need that real estate for anything else.
Most rooftop tents take up the whole roof, but Thule’s Tepui Foothill is different. The tent is longer and narrower than most other RTTs. This leaves space on the roof for boats, bikes, a roof box, and more.
Setting Up the Thule Tepui Foothill
To set up the Foothill, I unzipped the zippers around the perimeter of the tent. Thule doesn’t use one continuous zipper but several zippers to make zipping and unzipping easier.
Unzipped, with the internal frame clicked into place and awnings staked out, the Foothill is spacious inside with plenty of pockets. And its mattress is as comfortable as the thicker Tepui mattresses I’ve tried.
Setting up the tent is a bit of a project. Once the cover is unzipped, the tent folds open and is supported by the roof and its ladder, which stores inside the vehicle until you set the tent up. The tent is built on Tepui’s newly designed base that reduces tent weight and has improved strength and stability.
Unlike some RTTs, this tent doesn’t automatically pop up. The telescoping internal frame must be clicked into place by crawling inside the tent and pressing pre-assembled poles into place to support the roof.
Once that’s done, flexible metal stakes hook into awning grommets on every side before sliding into receptors on the tent frame.
Advanced Weather Protection That You Control
Massive roof vents and windows on all sides keep wind, weather, and sun out. Or they can let the breeze in, as you prefer.
The tent has oversized entrances on both sides — it’s symmetrical, with an oversized panoramic rear window and dual skylights for airflow and stargazing. Each window has both a screen and a polyester ripstop flap. The roof vents can also be open or closed.
And even with one side of the tent battened down to allow space for a bike, kayak, or roof box, there was still steady airflow.
The Inside
(Photo/Berne Broudy)
The Foothill tent has loads of space inside. The peak of the roof is 38 inches. One 6-plus-foot tester said it was one of the roomiest RTTs he had slept in.
With an 84 x 47-inch sleeping space, that makes sense. For reference, a queen-size bed measures 80 x 60 inches. It didn’t feel crowded with two people inside, but there wasn’t a lot of extra space on the sides.
The sides of the tent come equipped with organizer pockets that held a headlamp, a book, and other small things off the floor.
Trade-Offs
Having anything on your roof will impact your gas mileage, or if you drive an electric or hybrid — your range. It impacted mine about 15% per charge with local driving, and the impact was greater at higher speeds and with highway driving.
The Foothill’s cover comes completely off when you unzip it to open the tent, and it took me a few tries to get it back on when the tent was new. Leaving bedding inside compounded the problem. But the cover stretches a little bit over time, which made the process progressively easier.
This rooftop tent isn’t a pop-up. To set it up, you need to unzip it, attach the ladder, flip it open, then crawl inside to press the frame into place to give the tent structure. Then you set up the awnings and load the tent with personal gear. This is less than ideal, but as I said, it’s a trade-off.
Breaking the tent down required the reverse process. The more I did it, the quicker I got. But this wasn’t a great tent for inclement-weather camping. When I tried to break the tent down in a rainstorm, both the tent and I got wetter than was ideal. Because the ladder doesn’t stay attached to the tent for transport, I also had a wet ladder in my car.
How much space you have on the roof once the tent is installed depends on the length of your roof bars. The tent’s closed dimensions are 83 x 24 x 9.5 inches. Most vehicles have space for at least a single bike, roof box, or boat racks. And keep in mind that the 122-pound tent can hold 400 pounds of static weight.
Final Thoughts on the Thule Tepui Foothill
The Foothill solves a certain set of problems that RTT campers face. And if you’re a camper who loves sleeping on the roof, but who also needs to carry other gear up there, this tent is a great choice.
Home » Climbing » The Super-Burly Metolius Safe Tech: The World’s Safest Climbing Harness?
Metolius builds its Safe Tech harnesses to handle any gnarly climbing missions you throw at them. In our testing of the newest version, that’s just what it did.
The Metolius Safe Tech harnesses have a reputation for being the safest climbing harnesses around. And testing the most recent All-Around iteration gave me no reason to doubt that status.
It stood up to multiple short, burly climbs (and my crappy trad technique) on sharp, coarse granite. It was also comfortable on longer routes in Red Rocks and gave a highly bomber feel on sometimes eventful sport belays.
In short: The Metolius Safe Tech felt beefy to wear and resisted abrasion better than any harness I’ve ever worn. Heavy-duty material choices and bartacks suit it for outings on sharp rock, alpine terrain, or repetitive trad climbing. A slight and easily correctable manufacturing inconsistency was the only drawback.
(Photo/Sam Anderson)
Years of Prior ‘Tests’ Prove Positive
My previous years of unsanctioned “testing” may have driven home the reliability point even harder.
I’ve been using Metolius Safe Techs for multiple generations of the rig. They’ve consistently held me together and proven dependable from long trad outings to grueling sport climbing work sessions.
But I’ve got a confession to make. I got my first one off the chemical-saturated shop floor of a window-cleaning business. I had no idea who’d previously used it, how much, or for what. In fact, in those days, I didn’t even know you had to double it back manually — I’d only ever used harnesses with quick-adjust-style buckles.
All I knew was that it kept me safe, and it endured consistent abuse season after season.
The author, with mediocre crack technique and even worse hair, in 2018; (photo/Cody Lee Hanson)
I soaked it in sweat on soupy days in the Texas shoulder season. I scraped it through chimneys and big, burly cracks at Indian Creek and The Diamond.
I’m more conscientious about my gear now, but I doubt it would bother my new Metolius Safe Tech All-Around harness if I weren’t. As expected, the safest climbing harness in the world didn’t budge during testing.
First Impressions: Negligible Weight Penalty
The Safe Tech’s utility was evident right out of the (included) storage bag. The harness is engineered directly toward heavy use and durability in abrasive conditions. Compared to my other, lighter-duty sport climbing harnesses, the rig was rugged — but punched at about the same weight.
The size small Safe Tech weighed in at 16.4 ounces. By comparison, I found the lightweight, less-padded Petzl Adjama barely saved me any weight at 14 ounces.
(Photo/Sam Anderson)
Considering the Safe Tech’s sturdy materials, the minimal disparity surprised me. I also noticed how easy it would be to inspect each component — instead of hiding the webbing and stitching inside the belt, which is standard on most harnesses, Metolius opted to layer everything on top.
The belt webbing was one continuous, visible strip. The various loops tacked down on top of it or, in some cases, between it and the padded hip belt, but with visible bartacks.
(Photo/Sam Anderson)
The top tie-in point was the most reinforced I’ve ever seen, with three layers of nylon.
(Photo/Sam Anderson)
Testing the Metolius Safe Tech All-Around Climbing Harness
I used the Metolius Safe Tech for trad and sport outings for a few months, including several multipitch days in Red Rocks. Aside from one hangup that didn’t affect safety and resulted from Metolius’ handmade manufacturing process, I had zero complaints. (More on that later.)
(Photo/Sam Anderson)
This was the first time I’d worn a Safe Tech with a main buckle that I didn’t have to double back manually. I noted the departure from the traditional Safe Tech style, with “DANGER” stamped into the side of the buckle that the double-backed webbing covers.
As typical, though, the inside of the belt had an orange stripe to make safety obvious. As long as you’ve got orange on the outside by the time you start climbing, you’re good.
(Photo/Sam Anderson)
Climbing in the Safe Tech was the same reliable experience I’d always found it to be. The gear loops gave me comfortable access to my equipment without sags or imbalance, even on the small harness size.
Double Belay Loop Utility
That said, the two belay loops did slightly crowd the pass-through space inside the top tie-in point. The system did make organization easy on long rappels — rapping off one loop while clipping into anchors with the other made sense.
And I can see the utility of the double loop for guides or anyone who typically does long routes with more than one partner. Keeping multiple belay devices organized would be easier with multiple loops.
(Photo/Sam Anderson)
I did find that belaying with the same carabiner on both loops felt best. Each loop is a little narrow, and my belay carabiner tended to dance around a bit if I only used one at a time. Using a specialty belay carabiner with an “anti-cross-loading” system would solve the problem.
Long-Haul Comfort
While enduring half-hour-plus hanging belays during long days out, the Safe Tech never dug into my (bony) hips in a way that felt distracting. I’m not one to get overly cranky about discomfort on long routes — it comes with the territory — but comfortable equipment does make a difference.
(Photo/Sam Anderson)
Falling felt as comfortable as ever. The Safe Tech didn’t have the widest belt of any harness I’ve ever worn, but it had plenty of cushion to keep me from developing sore spots.
Manufacturing Quirk Results in Home Fix
My only complaint centered around the rear attachment points for the leg loop risers. Metolius decided on a “quick-release” setup where the buckle slides through a nylon loop. The idea is that releasing the leg loop requires rotating the (capsule-shaped) buckle 90 degrees.
However, the loops on my particular harness were loose enough that the buckles could slip through on their own. On one occasion, I lowered from a climb and noticed it happened once I started dumping gear.
(Photo/Sam Anderson)
I fixed the problem with hair ties and found it less than critical for one crucial reason: leg loops are not a safety feature. The essential safety components of a harness are the tie-in points and belay loops — leg loops make hanging and falling more comfortable by helping facilitate a sitting position.
(Photo/Sam Anderson)
The utility of dropping the loops is also clear: If you pull down your pants when nature calls, it gives you a lot more room to work with.
Metolius Safe Tech All-Around Climbing Harness: Sizing, Final Word
Overall, the Safe Tech did everything I asked it to do. The need for the slight home modification on the leg loop risers was a trade I was willing to make for Metolius’ hand-crafted quality everywhere else.
(Photo/Sam Anderson)
If you’re in between sizes, I would recommend sizing up if you’re going to load the rig down with gear. The small size harness positioned equipment just right around my 28-inch waist with up to a light jacket under it. Wearing layers of jackets would have made it a different story.
The Best Climbing Harnesses of 2022
We found the best climbing harnesses of 2022. Whether you’re sport climbing or mountaineering, we have you covered. Read more…
Home » Climbing » The Best Women’s Climbing Shoes of 2022
Increase your performance in the gym or at the crag with the best rock climbing shoes for women. Whether edging on vertical granite, heel hooking steep boulders, or smearing on gym volumes, these picks will help you feel confident on your next climbing day.
Climbing shoes are incredibly nuanced and diverse in shape and feel. Finding the right shoe depends a lot on what type of climbing you’re doing and what type of rock you’re doing it on. Add in the fact that sizes, rubber type, and fit vary wildly from brand to brand, and it’s no wonder that finding the right shoe can be a challenge.
That’s why we’ve spent months seeking out and testing the top 10 best climbing shoes to meet your climbing needs and goals, examining factors like the shoe’s profile, closure system, fit and feel, comfort, performance, and sensitivity.
This article delves specifically into the subject of women’s climbing shoes, but we also have gear guides for the best climbing shoes and rock climbing shoes of the 2021 Olympic Games. And if you’re a little lost in the world of climbing vernacular, we have a definitive guide to climbing jargon to help you through.
A few of the shoes we tested and recommend; (photo/Eric Phillips)
These shoes smeared up multipitch slab, jammed into a range of crack widths, withstood drizzle, and hit the crag during 90-degree Fahrenheit summer heat. The routes were scattered from Canada to Colorado, on various North American granite, and ranged between trad climbing, sport climbing, and toprope.
And while there isn’t a single pair of shoes that works for every person’s feet and climbing style, we’ve highlighted a variety of options. It can be useful to have different shoes for different climbing disciplines if you dabble in more than one, as many often do.
These are the shoes we wear and love — the best climbing shoes that will make you hit the boulders or the crag with more confidence than ever.
For even more help finding the best fit, refer to our buyer’s guide and FAQ at the end of this article. And if you’re looking for a specific type of climbing shoe, feel free to jump to it here:
Multiple testers said the Evolv Kira ($130) is super-comfortable out of the box, performs well, and has the convenience of Velcro straps, making them our top pick shoe. The Kira has thin rubber in certain spots to reduce pressure points and thicker rubber in high-wear zones to increase durability.
The rubber is Evolv’s proprietary TRAX SAS, which is durable while remaining sensitive. The upper is also made with vegan-friendly synthetics, a feature consistent with all Evolv shoes.
The shoes smeared well on vertical granite and thin holds, as they are not too down-turned or aggressive. They worked great for crack climbing too, as the Velcro straps are on the inside of the shoe instead of the outside, where they risk more abrasion.
One guide, who has now added this pair to her work quiver, does 100% of her Indian Creek climbs — a place known for its splitter cracks — in Velcro shoes. The straps are more durable than laces, and they slide off and on easily during multipitch climbs when you want to give your feet a break.
“This unique closure system provided the efficiency of Velcro but a more enhanced, customized fit, like laces,” said one tester who has narrow feet.
This is a great all-around shoe, which is why it claims our top spot. But if you’re looking for a stiff, aggressive shoe for hard bouldering or steep sport climbing, we would look elsewhere to meet those more specific needs.
Specs:
Closure: Velcro
Weight: 13.6 oz. (pair)
Upper material: Synthetic
Rubber type: 4.2mm TRAX SAS
Pros:
The unique closure system is fast and customizable
Great shoe for all-day comfort and all-around performance
Works well on slabs, face, and in cracks
Velcro straps are on the inside of the shoe, making them more abrasion-resistant
Cons:
Not for climbers seeking an aggressive, stiffer shape
Not a top choice for bouldering or steep sport climbing
Due to the flat last and nonaggressive character, one tester — who used this shoe on 5.9- to 5.11-rated multipitch granite in Yosemite, South Lake Tahoe, and Colorado’s Taylor Canyon — had this to say: “The Momentum is not my go-to gym shoe, but it’s a great cragging shoe and is good for beginner climbers.”
It also comes with a price tag that’s hard to beat, making it a great budget pick for someone just getting into the sport.
The Black Diamond Momentum ($95) gets a thumbs-up for breathability. Its synthetic knit upper provides great airflow. And the shoe’s ability to flex and mold to the foot makes for a comfortable fit. Its flat profile makes it great for all-day climbing, as more downturned shoes tend to be uncomfortable for long periods.
One drawback: The rubber isn’t all-time quality, so it slips at times, especially on indoor holds. But the tester said it works best outside.
Specs:
Closure: Velcro
Weight: 13.2 oz. (pair)
Upper material: Synthetic knit
Rubber type: 4.3mm rubber
Pros:
Competitive price
Great shoe for beginners
Flat and comfortable
Cons:
Missing top-notch rubber, so indoor climbing gets slick
Climbers may want a higher-performing shoe after some time
Best Women’s Climbing Shoe for Beginners: SCARPA Force V
Ready to start climbing? TheSCARPA Force V ($159) is a solid beginner option that will grow with you.
It’s an awesome all-around shoe with great padding, support, quality rubber, and a roomier toebox. Plus, foot entry and exit are easy with large pull tabs, a soft tongue, and easy Velcro straps.
“The moderate profile and flex of the midsole provide enough support for endurance or longer days of climbing but not for routes that are too extreme,” said one tester.
This is another shoe with a flat last that makes climbing all day a comfortable affair, but it’s not the best option for steeper climbing.
Specs:
Closure: Velcro
Weight: 17 oz. (pair)
Upper material: 1.8mm suede
Rubber type: 4mm Vibram XS Edge
Pros:
Less aggressive last for long days on rock
Great padding
Easy to take on and off
Cons:
Lacks stiffness for climbers desiring rigid support
Best Women’s Climbing Shoe for All-Day Comfort: Tenaya Ra Woman
The Tenaya Ra Woman ($155) gets a gold star for foot-width response, meaning the shoe adapts well to a wider foot. One tester said, “The shape is flexible and stretches nicely around an expanding foot on a hot day or back-to-back pitches. These are one of the most comfortable shoes I’ve tested straight out of the box, as most other climbing shoes take a while to break in.”
The curve of the shoe is moderate and flexible, but the toebox has supportive rubber reinforcement for toe-hooking, difficult footholds, and abrasion resistance. This comfortable, all-around shoe excels at routes that have a mix of low-angle face and steep sections with sharp, small holds.
Our only real gripe with this shoe is when cinched tight on narrow feet, the Velcro straps can be a bit too long and prone to snagging.
Specs:
Closure: Velcro
Weight: 12 oz. (pair)
Upper material: Microfiber
Rubber type: 4mm Vibram XS Grip
Pros:
Excellent foot-width response
Flexible shape
Comfortable out of the box
Cons:
Closure’s Velcro straps are a bit long for narrow feet
The La Sportiva Solution ($180) is drastically downturned in the toebox, provides excellent support for high arches, and has a narrow heel cup, making it a great choice for those with slim feet. The Fast Lacing System, which is an integrated single-strap Velcro attachment, allows for quick closure. But the straps are a tad long for super-narrow feet, our testers found.
“I love the support and hug that these shoes give my feet on vertical climbs. In contrast, I might not choose these shoes for a long, multipitch day or lower-angle routes,” said one tester.
The Solutions shine in the arenas of bouldering and steep sport climbing, as their downturned nature makes toeing in on small footholds much easier than with a flatter shoe. The heel cup allows you to employ heel hooks for powerful bouldering moves, and the rubber on top of the shoe allows for purchase on those finicky toe hooks.
Because of their aggressive nature, these shoes are not our pick for multipitch routes or all-day comfort. But if you want a high-performance shoe for those hard boulders or your latest overhung sport climbing project, look no further.
Specs:
Closure: Velcro
Weight: 17 oz. (pair)
Upper material: Leather/Lorica
Rubber type: 4mm Vibram XS Grip
Pros:
Awesome high-arch support
Aggressive shoe for bouldering and steep sport climbing
The So iLL Street LV ($139) offers a fit for narrower feet, with the “LV” standing for “low volume,” but “there’s also quite a bit more volume in the forefoot compared to other narrow designs,” said one tester with a wide forefoot and narrow heel.
If you’ve shied away from other women’s-specific climbing shoes because you’re afraid they’ll be too narrow, the Street LV might strike the balance between having a well-fitting heel and a forefoot that isn’t as tight as a corset.
This pair’s aggressive parrot-bill shape powerfully dominated overhanging bouldering problems. More experienced climbers will appreciate the Street’s ability to perform well on steeper, more difficult terrain.
This shoe may prove to be too narrow for those with wider feet, but for those looking for a tight-fitting shoe to send their next project in, the Street LV is a good choice.
Specs:
Closure: Velcro
Weight: 16 oz. (pair)
Upper material: Synthetic
Rubber type: Dark Matter rubber
Pros:
High-performing for angled, overhanging problems and routes
“This is a great all-around shoe for experienced climbers that need a step up from a beginner shoe, and the breathability is excellent,” said one tester who climbed in 80-degree F weather while avoiding sweat-soaked feet.
The heel cup of the SCARPA Vapor V ($195) is comfortable, and the upper is very supportive. And we like that the rubber is sensitive and high-quality, allowing for precise footwork when needed.
“The edging and precision were tricky for small pockets because of the toebox shape, but the flexibility is amazing,” added the tester.
This is a great step up from the flatter profiled shoes at the beginning of this review, as the Vapor V is moderately downturned but not aggressively so. This allows for more versatility on varying rock types and terrain.
Specs:
Closure: Velcro
Weight: 14.8 oz. (pair)
Upper material: Microsuede and leather
Rubber type: Vibram XS Grip2
Pros:
Nice intermediary choice for progressing climbers
Excellent breathability
Moderately downturned for versatility
Cons:
Squarish
Slimmer toebox is not super-conducive for edging power
The La Sportiva Women’s Skwama ($180) pairs the sensitivity and flexibility of a slipper with the downturned action of a much more aggressive shoe. “These excellent shoes are high performers on boulders and sport routes, and work just as well in cracks with their low-profile build,” one of our testers said.
Their sensitivity makes these shoes shine, as they flex and press on the smallest footholds in overhung terrain. Their patented S-heel construction ensures secure heel hooking action, and their Velcro enclosure allows for easy on-and-off at the boulders or crag.
While these shoes excel at climbing pockets, toeing into finger cracks, and smearing on granite slabs, they fall short when real vertical edging comes into play. The softness that makes these slippers so comfortable and shine in other ways doesn’t make for the best shoe for serious face climbing — you’d want to opt for a stiffer shoe with better edging capabilities if that’s your primary type of climbing.
The La Sportiva Women’s Miura VS ($185) are pocket climbing, vertical edging machines. “The stiffness of this shoe allows for precision on technical granite face climbs in California, to the long limestone sport routes of Mexico,” said one of our testers.
Built for pushing on micro edges and small pockets, your confidence on thin routes will surely improve with the Miura VS.
The downturned shape of this shoe makes it excel in steep climbing as well. This is a highly asymmetrical model, which combined with its downturn, provides tension throughout the shoe and places the toebox directly over your big toe for top-notch pulling and pushing power.
“These shoes are workhorses for vertical faces as well as steep boulders and routes,” said our lead tester.
To perform their best, you will want to downsize the Miuras, which can make them painful. These are also not our top choice for slab climbing or crack climbing, as they are too stiff and aggressive for those types of terrain.
Miya Tsudome is a former rock climbing guide for the Yosemite Mountaineering School, has been climbing outdoors for the past 8 years, and is a fan of climbing sport, trad, and alpine routes across the country as well as trying hard on boulders.
She has climbed all over the granite cliffs of Yosemite and the east side of the Sierra Nevada, has spent months shoving her hands and feet into the sandstone cracks in southeastern Utah, and has traveled to Spain and Mexico to sample international limestone.
Years of climbing on different terrain and in different disciplines have guided her to know what she is looking for in her climbing shoes, and she hopes to bring an objective view to the strengths and weaknesses of popular shoes for women today.
Buyer’s Guide: How to Choose Women’s Climbing Shoes
Testing climbing shoes in Colorado; (photo/Eric Phillips)
Identify Your Climbing Style
“To choose a rock climbing shoe, analyze the terrain where you’ll take the shoes and determine where you’ll be doing 70-80% of your climbing. Then dial in the right fit,” said Stefanie Kamm, athlete manager and digital marketing coordinator for SCARPA North America.
Kamm started climbing in 2012 and climbs weekly in Boulder Canyon, Colorado. So she knows a thing or two.
One of our testers, Miya Tsudome, a former rock climbing guide in Yosemite National Park who has been climbing for 8 years, also has some advice to give:
“It’s nice to have a shoe that can do it all, but more often than not us rock climbers will have many different types in our quiver. If you like to boulder and climb overhanging sport routes sometimes, it will benefit you greatly to have a more aggressive shoe.
“If at other times you like to do long multipitches or go crack climbing, you’ll want a more comfortable pair. If you’re serious about climbing, don’t be afraid to buy a few to round out your arsenal.”
We spent months testing these 10 pairs of climbing shoes and can provide you with all the information you need to choose your next pair.
Shoe Shape & Fit
The shape, or last, of a climbing shoe greatly determines its purpose. In general, bouldering, overhanging, or vertical single-pitch routes need shoes with a tight, performance-type fit, also known as aggressive, down-cambered, downturned, or slightly downturned. The So iLL Street LV and La Sportiva Solutions are good examples of aggressive shoes.
A flatter last, like in the Scarpa Force V or Black Diamond Momentum, might be more comfortable for multipitch and low-angle, sub-vertical climbs. Commonly, rock climbing guides and new climbers choose a flatter shoe for all-day comfort. As you progress or are drawn to harder styles of climbing, you may look to upgrade to a more aggressive model.
Shoe softness refers to the pliability of the rubber in the outsole, which increases sensitivity, or a climber’s ability to feel the rock features. The slipper-like La Sportiva Skwamas is a good example of a sensitive shoe.
Comparatively, harder rubber provides more foot support and can be better when you need to stand on very small footholds on vertical terrain. The stiff La Sportiva Miura VS shoes are the wizards of this style of climbing.
A good fit is greatly determined by foot compatibility with that last shape and the shoe size. This is also a subjective measure, as everyone has a different foot shape. Make sure there are no air pockets around the foot or heel. Toes will curl under in a downturned shoe compared to a flat shoe.
Most people also size down from their street shoe size. If you haven’t done so before, try sizing down in half-size increments and see how that feels.
Your toes should always curl slightly, and shoes should always feel tight for best performance. If you prioritize all-day comfort, find a flat shoe where your toes barely curl.
Whether you choose a Velcro or lace closure system will alter the feel and fit, so try out both. Lace closure systems are typically more adjustable, while Velcro systems make it easier to take your shoes on and off. Also, a shoe’s materials affect the fit over time, as shoes with a leather upper will stretch while synthetic uppers will not.
The Tenaya Ra provides all-day comfort; (photo/Eric Phillips)
Leather vs. Synthetic
“Microsuede or leather uppers are less durable than synthetic uppers, but they are comfortable and stretch out. Synthetic uppers are more abrasion-resistant and have a tight fit for performance or competition,” said Kamm.
Vegan footwear addresses leather uppers and footbeds. Some brands, like Evolv, are known for their vegan products.
When trying on shoes with leather uppers, they can stretch over time, sometimes up to a half-size larger. This is important when considering what size to buy, and sometimes it will benefit you to buy a size that feels a bit too tight knowing they will stretch in the future.
Women’s-Specific Shoes
Overall, women’s-specific models have a lower-volume heel, narrower last, and softer or thinner rubber for easier flex and more sensitivity. We encourage you to try on a ton of shoes to find the foot mold that fits your foot the best.
Kamm explained, “Not all companies use two different lasts for men’s and women’s versions. Some use the same foot mold as the men’s shoe, make it smaller, change the color, and call it women’s.”
Also, be open to wearing any shoe regardless of gender. “A lot of men with a lower-volume heel prefer the women’s version,” said Kamm.
Velcro vs. Lace-Ups
Climbing shoes with Velcro straps are easy to take on and off, making them a good choice for bouldering, gym climbing, and single-pitch climbing. Some models, like the La Sportiva Solution, have one integrated Velcro strap that zig-zags over the tongue of the shoe and can be easily pulled tight and attached via its Velcro tab. This ensures a nice, snug fit.
Other models, like our top pick, the Evolv Kira, have two Velcro straps across the top so you can dial in the fit over two parts of your foot.
Shoes with laces, on the other hand, can be cinched tight, and those who are very concerned with having their shoes fit as perfectly as possible for high-performance will opt for models with laces.
While either type can be and is used in all different styles of climbing, each will still have certain limitations. Velcro straps can work fine for many types of cracks, but may make it harder to fit into hand cracks and larger. Modern shoes with Velcro straps allow room for rubber on top of the toebox, which will greatly aid in toe hook maneuvers.
Lace-ups will have a slimmer profile overall and may be more appropriate for crack climbing. While lace-ups ensure you’re able to fine-tune your fit, they may not be the best for steep bouldering where the laces can get in the way of toe-hooking.
Soft vs. Stiff
Soft versus stiff shoes come into play when you’re getting serious about finding a shoe to match the terrain you’ll be climbing on — and pushing yourself to try harder grades, making this more applicable to intermediate climbers.
Our best recommendation for beginners is the Scarpa Force V for its comfortable, flat profile and softer feel. Having a softer shoe is good if you’re just starting out because it’ll allow you to feel footholds more and learn better technique.
If you’re graduating from your beginner shoes, you’ll wonder what direction you need to go in for your next pair. The La Sportiva Skwama is a good example of a soft shoe. Its slipper design sports a super soft midsole, allowing it to flex and smear with ease.
Soft shoes like this one are great for steep or off-vertical terrain because paired with their aggressive downturn, they allow you to pull in on small footholds and smear on bad feet and small cracks.
Stiff shoes, like the La Sportiva Miura VS, are made more so for edging and climbing on small pockets. With so much stiffness throughout the shoe, you are able to more easily stand on dime-size edges than with a flexible shoe like the Skwama. This is because your whole foot is supported.
In summary, if you find yourself climbing on steeper routes or, conversely, slabby routes and cracks, a softer shoe like the Skwama would be a good match. If you’re more into vertical routes with pockets or tiny edges, a stiffer model like the Miura VS would be the shoe for you.
FAQ
What Is the Best Brand of Climbing Shoes?
The best climbing shoe is the one that fits well and supports your climbing style and goals. Some of the leading climbing shoe brands — like Five Ten, La Sportiva, and SCARPA — are generally well-regarded, but personal preference is the most important factor.
What Are the Best Climbing Shoes for Beginners?
On this list, we’ve named the SCARPA Force V as our favorite beginner climbing shoe. The Force V is comfortable, durable, and adaptable to a wide variety of foot shapes and climbing styles.
For new climbers, comfort is more important than advanced features like a downturned last or a massive patch of toe rubber. The Force V is precise enough to progress in the gym or at the crag, but ultimately it was designed for comfort. With the Force V, new climbers can focus on learning the sport, improving, and having a good time.
Should You Wear Socks With Climbing Shoes?
Most climbers prefer not to wear socks with their climbing shoes. It’s generally accepted that wearing socks decreases sensitivity and reduces the effectiveness of your climbing shoes.
These days, climbing shoe companies are working hard to make thinner, more sensitive shoes, and wearing socks is often seen as a step backward.
However, when climbing in cold conditions, some climbers find a pair of socks can be an essential way to maintain warm feet. In the end, it’s all personal preference. If you like to wear socks, wear socks!
Should Your Toes Be Curled in Climbing Shoes?
That depends. Many advanced shoes are designed to be worn with the toes curled to maximize precision and toe power.
When the toes are slightly curled, many climbers find it easier to transfer power to the point of the shoe and stand comfortably on tiny footholds. This is especially important in shoes that are both stiff and aggressive, like the SCARPA Boostic.
However, curled toes are not comfortable, and such an aggressive fit is unnecessary for many climbers. For all-day comfort in the gym or on multipitch routes, a roomier fit is probably the way to go. Beginning climbers should prioritize comfort above all else.
The Best Running Shirts for Women in 2021
Check out our review and guide to the best running shirts for women, including top picks from Patagonia, Stio, icebreaker, and more. Read more…
The Best Leggings for Women in 2022
After 2 years of intensive testing, we found the best leggings for women. Go from yoga to the mountaintop to the coffee shop without a hitch. Read more…
These slippers are one of my favorite belongings. I wear them constantly (even when I should probably put on “real” shoes), to the grocery store, camping in the van, and even on chill climbing approaches. This updated model uses more recycled materials. Check out our full review to learn more.
This charger can be a game-changer on road trips and for those living the van life. According to BioLite, it can charge a smartphone five times and a 13-inch laptop once. In real life, I get at least that out of this charger — it’s allowed me to go close to a week without having to recharge.
The North Face Sierra Peak Hoodie — Women’s & Men’s: $145 (50% Off)
Everyone needs a go-to puffy. This one features 800-fill down, plus The North Face’s own Heatseeker recycled polyester insulation under the shoulders for better under-pack comfort. The attached hood is also adjustable.
This inflatable standup paddleboard is designed to stably glide through the water, from lakes to rivers. It includes lots of bungees to strap down your gear. And, it comes with a hand pump, paddle, carrying bag, leash, and fin.
Get the camping basics for a two-in-one package with this deal from Kelty. Two three-season sleeping bags that zip together, a four-person tent, and self-inflating sleeping pads will get you started for your next camping trip.
Take some me-time in this solo hammock wherever you find trees — or get a stand to set it up anywhere. Made of soft, durable ripstop fabric, the whole thing packs into the attached stuff sack, which doubles as a storage pocket while in use.
Ibex Woolies Base Layer Bottoms — Women’s & Men’s: $103 (10% Off With Code FRIENDS)
These base layers are made of thick and comfortable merino wool. I’ve worn them skiing and winter running, and the skin-tight design and flat waistband keep them from sagging or riding up. Plus, they wick moisture and control odors well.
For backcountry travel or emergency preparedness, having a water filter is a necessity. The LifeStraw is lightweight, cheap, and easy to use by simply drinking through it. It advertises the ability to remove parasites, bacteria, and micro-plastics.
Home to 840 miles of coastline, 280 state parks, and nine national parks, the Golden State has plenty of picturesque campgrounds on offer. Here are a few of our favorites.
Camping is a great way to get outside and drink in the views. While some campgrounds are located in a dirt parking lot, others offer stunning views with endless outdoor activities at your fingertips.
And as the fourth-largest state in the U.S., California has more to boast than most: 163,695 square miles; hundreds of state parks, state beaches, and state forests; and, according to the LA Times, over 13,000 campsites.
Here are seven California campgrounds that you’ll be dying to write home about. We’ve also included where they are located, as well as must-have info to prepare for your visit.
Moro Campground, Crystal Cove State Park
Moro Campground – Crystal Cove State Park; (photo/Rebecca Parsons)
Located in Crystal Cove State Park in Laguna Beach, Moro Campground is perched atop a hill with panoramic views of the ocean. The campground offers options for tents and RVs, and it provides easy access to the coast and the canyon.
If you’re feeling adventurous, Moro Campground also has three primitive hike-in sites: Deer Canyon Campground, Upper Moro Campground, and Lower Moro Campground. These campgrounds are all worthy of a visit, but when it comes to views, the bluff campsites are the best.
Crystal Cove is home to 3.2 miles of coastline, 46 historic beachfront cottages, and 2,400 acres of backcountry wilderness, so there is no short supply of outdoor activities available. Laguna Beach is also home to numerous art galleries, shops, and fun restaurants, so a trip into town is definitely worthwhile.
Operating season: year-round
Number of sites: 32 primitive sites, 27 hookup sites, 30 non-hookup sites, 6 ADA-accessible sites
A California campground’s list would be incomplete without Yosemite National Park. You really can’t go wrong when it comes to camping in Yosemite, but my family’s favorite has always been the housekeeping camp.
Located in the heart of the Valley alongside the Merced River, the camp offer bare-bones cabins as well as the option to pitch a tent or sleep under the stars. From the campground, there are stellar views of Half Dome and Yosemite Falls — the campground is as picturesque as they come.
The central location offers easy access to the free park shuttle, convenience stores, the river, and several hikes. During your time in the Valley, hike to Vernal or Nevada Falls, float down the Merced, or simply sit back and watch the world go by.
Operating season: April 8-October 11, 2022
Number of sites: 266 units/sites, with ADA available upon request
(Photo/Rebecca Parsons)
Located just outside of San Luis Obispo in central California, Morro Bay is located a stone’s throw from a lagoon and a natural bay. Offering tent and RV camping, the campground offers views of the bay and the iconic Morro Rock.
Popular activities in the region include sailing, fishing, hiking, surfing, and bird watching. One of my favorite things to do in Morro Bay is to explore the mudflats at low tide — lots of fascinating creatures live in the mud, and it’s the perfect spot for a mud fight.
The campground is also home to a museum with exhibits that cover cultural history, Native American life, geology, and oceanography.
Operating season: year-round
Number of sites: 134 campsites (includes 30 RV hookup and 12 ADA-accessible sites)
Hidden Valley Campground, Joshua Tree National Park
If you’ve never been to Joshua Tree, be prepared to step into what feels like another planet. The dry desert landscape interspersed with Joshua trees and rugged rock formations is unlike anything I’ve ever seen before.
Home to 44 sites, Hidden Valley campground is surrounded by oversized boulders and can accommodate both tents and RVs. Joshua Tree is best known for rock climbing, but it also offers incredible hiking, stargazing, and a chance to glimpse the wildflowers blooming in the spring.
If you strike out on scoring a campsite, there is plenty of BLM land right outside of the park on which you can pitch a tent.
(Photo/Rebecca Parsons)
One of the most iconic parks in the state, Pfeiffer is a must when visiting Big Sur. Spanning 1,006 acres, Pfeiffer Big Sur State Park is positioned on the western slope of the Santa Lucia Mountains. Tucked away beneath the redwoods, Pfeiffer campground offers hiking, biking, car, and RV campsites as well as one cabin.
The park is home to a wide array of plants and wildlife — common flora and fauna include redwoods, conifers, oaks, sycamores, cottonwoods, black-tail deer, gray squirrels, raccoons, skunks, and birds.
Often referred to as “mini-Yosemite,” the park offers a number of scenic hikes, biking routes, a picturesque waterfall, and ample opportunities for swimming. Big Sur is one of the most beautiful stretches of the California coastline — a visit is a must.
Operating season: year-round
Number of sites: 189 sites (tents and RVs) and one cabin
Fee: $5 for hike-in/bike-in site, $35/night for a standard site, $50/night for hookups
Maximum stay: yes, 7 nights max during busy season (30-day cap stay per year)
KOA Campgrounds Turn Trendy With These Glamping Experiences
With its all-new, five-star hipster aesthetic and luxury upgrades, KOA encourages you to try a new way of glamping this summer. Read more…
Rippers Cove, Catalina Island
(Photo/Rebecca Parsons)
Located less than 50 miles from Los Angeles, Santa Catalina is part of the Channel Islands. Known for diving, hiking, and fishing, the island offers a quick escape from the hustle and bustle of city life.
The island has a number of stunning campgrounds available, but Rippers Cove takes the cake. The campground is boat-in only, meaning you either must boat, kayak, or standup paddle to it.
While it may take a little extra legwork to get to, staying at Rippers is well worth the effort, as you’ll be treated to beautiful views and little or no crowd. Should you stay at Rippers, I recommend hiking to the ridge for sunset or sunrise and packing a snorkel mask so you can explore the kelp forest.
Operating season: year-round
Number of sites: 3 boat-in only sites (meaning you either must boat, kayak, or SUP)
Mill Creek Campground, Redwood National Park and State Parks
If you’ve yet to rest your head under a canopy of redwoods, then you need to add a visit to Redwoods National Park to your bucket list. Walking through the redwoods is a magical experience, and Mill Creek campground offers an incredible backdrop for camping.
Home to the tallest trees on the planet, Redwood National Park also encompasses 40 miles of coastline as well as prairies, woodlands, and rivers. Offering 145 campsites, the campground hosts tent campers, trailers, and RVs.
Located several miles off the highway, the campground feels far removed from the civilized world and is equal parts beautiful and tranquil. While in the park, be sure and don hiking boots and explore the hundreds of miles of incredible trails on offer.
Operating season: May-September
Number of sites: 145 sites for tents, RVs, and trailers, and 6 ADA-accessible sites
Fee: $7/night hike-in sites, $35/night standard sites
See the Redwoods: 7 Best Hikes in Sequoia & Kings Canyon National Park
Looking for the best hikes in Sequoia and Kings Canyon — two of California’s most gorgeous, redwoods-covered parks? We’ve got you covered. Read more…
Everything You Need to Know About Kayaking the Catalina Coast
Located less than 50 miles from Los Angeles, Santa Catalina is an island oasis for adventurers and laid-back beachgoers alike. Learn more on how to kayak the coast. Read more…
Home » Motors » 2022 Can-Am Defender Review: Save a Truck, Ride a UTV
Sometimes, the most fun you can have is the practical kind. Such was the case on my recent trip to Georgia, where Can-Am offered two vehicles for testing — the 2022 Maverick X3 and the Defender.
If you’ve read part one of this trip report reviewing the X3 (a race car in offroad clothes), you’ll know that the weather turned bad in a hurry, with wind and thunder scouring the hills of the Iron Mountain Resort. But, as our hosts said, this ride was going to happen, rain or shine.
And it’s that all-weather attitude that made the Defender every bit as fun as its performance counterpart. The Defender is a utilitarian design aimed at farmers, ranchers, and hunters.
Full disclosure: Can-Am paid all expenses on this trip. This, if anything, heightened my skepticism when approaching the test. Read on to see how the Defender won me over.
In short: The 2022 Can-Am Defender is a versatile thoroughbred of a workhorse. Its chassis and powertrain are rugged enough to tackle a variety of conditions. And with a starting price of less than $12,000 ($13,200 for the HD7), it’s a great alternative to tearing up your work truck.
(Photo/Can-Am)
2022 Can-Am Defender DPS HD7
The Rundown
After the wild ride in the 200-horsepower X3, I opted for something a bit more utilitarian — a 2022 Defender DPS HD7, with a 650cc Rotax ACE engine drawing 52 horsepower and 41 pound-feet of torque from one plucky cylinder. And though all Defenders come with a roof, I decided to see if the mesh-strap doors would offer any additional protection against the rain.
Can-Am’s engineers included some thoughtful details, both in and out of the cab. These include a removable toolbox/glove compartment on the passenger side, which includes a ruler etched onto its lid.
Also, the 38 x 54.5 x 12-inch cargo box has a few recessed spaces cut into the bed, sized to hold work buckets. Add in some cupholders and a fold-down center console, and I was sitting pretty.
(Photo/Josh Wussow)
Still, a question nagged: Why pay $13,000 for an open-cab UTV when you could spend the same money on a second- or third-hand truck? I put this question to Dale Brisby, a real-life rancher and rodeo star who uses Can-Am products on his farm.
The gist of it is this — Defenders are more maneuverable, versatile, and easier to maintain than your average pickup. Their nimble 62-inch width and 83-inch wheelbase allow them to get into areas where a truck simply won’t go — and the cost of keeping them running is far less.
He specifically mentioned hauling feed and other farming materials, along with the ease of repeated ingress and egress. And he’s not wrong. When it came time to hop into my particular Defender, the process was incredibly easy.
Getting out — well, that’s where things got a little hairy.
One quick note before we hit the trail. This particular Defender can tow 2,500 pounds and can carry half a ton in its cargo box, but our ride was essentially unladen. With just my own weight to add to the HD7’s 1,460-pound mass, I fired up the engine and headed out into the rain.
The Ride
(Photo/Can-Am)
While our ride in the X3 was primarily offroad, the Defender’s route mixed in a fair amount of pavement. The vehicle behaved well here, steering flatly through some pretty wet corners.
And once we got to the dirt, the Can-Am DNA found its chance to shine. Deep ruts and puddles abounded, and the 11 inches of ground clearance and 27-inch XPS Trail Force tires powered through without incident.
Well, except for one. At some point, we came to a very long, very deep stretch of mud. After watching the drivers in front of me navigate the obstacle, I decided to have some fun. I counted to 20, waited for them to pull ahead, and put the spurs to the single-cylinder.
(Photo/Can-Am)
The wave of mud that washed over me is, sadly, not pictured here. But when I tell you it cleared the windscreen, I’m not exaggerating. Still, this wasn’t so much as a hiccup for the Defender.
As I stuck my head out the side of the cab (which is dangerous; don’t do that), the vehicle plowed its way through the swamp as if it simply wasn’t there.
I thought the roof would help me stay dry. And I was right, mostly. But the damage to my pants had already been done. The red sands of Iron Mountain lived up to their name, destroying the jeans I’d worn for the occasion.
And it was absolutely worth it.
Trims, Options
Speaking of worth, let’s talk trims. While my tester starts around $13,000, the very base models can be had for less. Winches, full doors, windshield wipers, and other such options are also available, along with a stable of engines. Buyers can choose from three seats, six seats, four wheels — or even six.
At the top of the range sits the Lone Star Cab, at a whopping $33,199. But with an enclosed cockpit, JL roof sound system, and climate control, these are full-on luxury trucks scaled down into a UTV frame.
If you have the cash to spend, they’re definitely worth a look.
(Photo/Can-Am)
Conclusion
Personally, I enjoy the lower cost, high-utility feel of the HD7. Even if my muddy joyride didn’t allow for the chance to test it under load, this UTV felt incredibly capable. If I had a farm or large tract of land, it’s the kind of vehicle I’d want to have stored away in my shed.
So, if you’re looking to get so dirty that you have to throw away some clothes, check out the various models of the 2022 Can-Am Defender. Spec one out for yourself, and you may be surprised at the utility you get for your money.
“The pandemic has had an outsized impact on women’s mental health, and we’re thankful to support incredible organizations like Outdoor Journal Tour in helping to heal those wounds through restorative time in the outdoors,” Hipcamp CEO Alyssa Ravasio said.
What exactly is this mental-health-focused, get outdoors initiative? The program centers around group workshops, meditations, and group hikes. It’s about community, supporting each other, and getting outside. And right now, you can sign up for both free events close to home, or a big group campout next month.
What Is #WeHikeToHeal?
(Photo/Outdoor Journal Tour)
Registering in #WeHikeToHeal gives participants access to a whole array of group hike events. Hikes are currently scheduled across Georgia, Pennsylvania, Tennessee, and California. Registrants can also participate in weekly virtual offerings like journaling, meditations, and other mindfulness challenges.
“The Mission of #wehiketoheal is to encourage women all over the world to tap into the healing and empowering influences within ourselves, our communities and the great outdoors,” wrote Outdoor Journal Tour.
The campaign’s culminating event is an all-inclusive campout and retreat from May 28 to 30 at the Black-owned BoMax Ranch in Crawfordsville, Georgia. (Get a sneak peek of the destination on Hipcamp.)
How to Join
Any women who wish to participate can join the weekly virtual and in-person gatherings and programming. A new challenge, or focus, will be introduced each Sunday through May. Registration to participate is free.
Then, there’s the campout portion of the program. The (all-inclusive!) retreat pricing for 3 days — including access to bathroom and shower facilities, meals, workshops, classes, and swag — ranges from $225 to $600, depending on your choice of accommodations.
‘My Ikon: My Ride’ follows legendary snowboarder Russell Winfield and junior rider LJ Henriquez on a shared mission to diversify and grow the snowboarding community.
This film was shot this past season at Palisades Tahoe, Stratton, Crystal Mountain, and Big Bear Mountain Resort. With it, Winfield and Henriquez aim to welcome others and encourage them to join in on their passion for snowboarding.
As the nation’s first Black male pro snowboarder, Winfield is determined to achieve his goals. Now, he’s inspiring the next generation of snowboarders of color to achieve and even surpass their dreams. Why? Because diversity, equity, and inclusion matter — in all ways, in all places, and in all sports.
Integrated powder skirts, adjustable hoods and hems, and a plethora of pockets — all features that can make or break a snowboard jacket. Find our best picks here. Read more…


 A California campground’s list would be incomplete without Yosemite National Park. You really can’t go wrong when it comes to camping in Yosemite, but my family’s favorite has always been the housekeeping camp.
Located in the heart of the Valley alongside the Merced River, the camp offer bare-bones cabins as well as the option to pitch a tent or sleep under the stars. From the campground, there are stellar views of Half Dome and Yosemite Falls — the campground is as picturesque as they come.
The central location offers easy access to the free park shuttle, convenience stores, the river, and several hikes. During your time in the Valley, hike to Vernal or Nevada Falls, float down the Merced, or simply sit back and watch the world go by.
A California campground’s list would be incomplete without Yosemite National Park. You really can’t go wrong when it comes to camping in Yosemite, but my family’s favorite has always been the housekeeping camp.
Located in the heart of the Valley alongside the Merced River, the camp offer bare-bones cabins as well as the option to pitch a tent or sleep under the stars. From the campground, there are stellar views of Half Dome and Yosemite Falls — the campground is as picturesque as they come.
The central location offers easy access to the free park shuttle, convenience stores, the river, and several hikes. During your time in the Valley, hike to Vernal or Nevada Falls, float down the Merced, or simply sit back and watch the world go by.

 If you’ve never been to Joshua Tree, be prepared to step into what feels like another planet. The dry desert landscape interspersed with Joshua trees and rugged rock formations is unlike anything I’ve ever seen before.
Home to 44 sites, Hidden Valley campground is surrounded by oversized boulders and can accommodate both tents and RVs. Joshua Tree is best known for rock climbing, but it also offers incredible hiking, stargazing, and a chance to glimpse the wildflowers blooming in the spring.
If you strike out on scoring a campsite, there is plenty of BLM land right outside of the park on which you can pitch a tent.
If you’ve never been to Joshua Tree, be prepared to step into what feels like another planet. The dry desert landscape interspersed with Joshua trees and rugged rock formations is unlike anything I’ve ever seen before.
Home to 44 sites, Hidden Valley campground is surrounded by oversized boulders and can accommodate both tents and RVs. Joshua Tree is best known for rock climbing, but it also offers incredible hiking, stargazing, and a chance to glimpse the wildflowers blooming in the spring.
If you strike out on scoring a campsite, there is plenty of BLM land right outside of the park on which you can pitch a tent.


 If you’ve yet to rest your head under a canopy of redwoods, then you need to add a visit to Redwoods National Park to your bucket list. Walking through the redwoods is a magical experience, and Mill Creek campground offers an incredible backdrop for camping.
Home to the tallest trees on the planet, Redwood National Park also encompasses 40 miles of coastline as well as prairies, woodlands, and rivers. Offering 145 campsites, the campground hosts tent campers, trailers, and RVs.
Located several miles off the highway, the campground feels far removed from the civilized world and is equal parts beautiful and tranquil. While in the park, be sure and don hiking boots and explore the hundreds of miles of incredible trails on offer.
If you’ve yet to rest your head under a canopy of redwoods, then you need to add a visit to Redwoods National Park to your bucket list. Walking through the redwoods is a magical experience, and Mill Creek campground offers an incredible backdrop for camping.
Home to the tallest trees on the planet, Redwood National Park also encompasses 40 miles of coastline as well as prairies, woodlands, and rivers. Offering 145 campsites, the campground hosts tent campers, trailers, and RVs.
Located several miles off the highway, the campground feels far removed from the civilized world and is equal parts beautiful and tranquil. While in the park, be sure and don hiking boots and explore the hundreds of miles of incredible trails on offer.


