

Step By Step Guide To Build A Backyard Root Cellar For Survival
Figuring out how to build a root cellar is not a new trick.
In fact, it’s an ancient one.
It’s one of the oldest survival tricks in the book.
But is utilizing the earth for refrigeration still necessary?
In America, there’s an appliance called a refrigerator, duh!?
Our $3,000 stainless refrigerators and chest freezers take care of ALL our food preservation needs, right?
Plus, we have an overabundance of reliable power to run those things forever; everyone knows that.
No one needs to (or cares to) store their food underground anymore, right?
WRONG. I care, and you should too.
So today, we’re going to cover the following topics:
TABLE OF CONTENTS
Why Root Cellars Are Still Important
How Underground Food Storage Works
Two Main Types Of Root Cellars
How To Build A Root Cellar
What You Should Store In It
Organizing The Interior Space
Root Cellar Food Organization
5 Dangerous Root Cellar Enemies
How To Hide Your Root Cellar
Maintaining Your Root Cellar Food

Are You Ready For The Tough Times Ahead? Take My 60 Sec Quiz To See If You’re Part Of ‘The Fragile Masses’ Or Not… Start Quiz Now!

Why Root Cellars Are Still Important
When humans discovered they could increase the shelf life of their food by storing it underground, society was revolutionized.
Suddenly, humans could preserve grains, nuts, fresh fruit, and vegetables for longer periods.
Now immediate food consumption was no longer necessary; having to gorge on it all before it went bad.
Instead, we could now stockpile and preserve our harvests in root cellars prepping for the lean winter months.
It’s the technology that frontier families used to maintain a healthy diet and avoid starvation.
But wait, don’t refrigerators do that nowadays? Yes, but with one big difference – refrigerators depend on electricity.
This makes refrigerators very convenient – until you lose power.
So convenient, in fact, that our society has all but lost this old technology, knowledge, and know-how.
This is a damn shame because there are so many reasons why a backup supply of healthy food is extremely useful – even, dare I say, life-saving.
Be it a massive wildfire, contagious disease, worldwide financial collapse, or an EMP strike.
If any of these horrible events are bad enough and last long enough, having a backup food preservation system may evolve from a fun hobby to a survival necessity.
And while having a backyard root cellar is not a guarantee of survival success, not having one may lead to starvation.
This ancient survival technique may separate those who thrive from those who perish in a “shit-hits-the-fan” scenario.
So a root cellar is an excellent off-grid food preservation system. It’s pretty much a requirement for anyone concerned about losing grid power for good…
If you’re serious about being prepared for anything, you need to add a root cellar to your lifestyle.
But building a root cellar is not a quick project and one you shouldn’t rush.
You need to take your time for proper planning. Because if you don’t, chances are good that you’ll make mistakes. And food storage mistakes can jeopardize all of your food stockpiling efforts.
How Underground Food Storage Works
Root cellars ALL have one thing in common. They take advantage of stable underground temperatures! Why underground? It all has to do with the seasonal variation in temperatures.
As you dig down into the earth, the layers of soil between you and the surface act as a blanket insulator from the surface.
For example, in the hot summer, underground temps are much cooler than the surface.
In the winter, a few feet underground is much warmer than a howling blizzard outside.
And you don’t need to dig far to get the benefits…
In fact, in most U.S. regions, at just 10 feet under the surface, you’ll constantly find cool 50-60 degrees, soil temps.
Approximate Soil Temps At 10 Feet Underground
A root cellar takes advantage of these stable, cool temperatures.
And temperature control is an important component in prolonging the shelf life of perishable foods.
Because we all know that cool temperatures extend our perishable food’s shelf life.
For proof of this, leave your milk out on the counter all afternoon in the summer. Near-instant spoilage, while that same milk will last weeks in a cool refrigerator.
A root cellar is nature’s refrigerator without the need for chemical refrigerants or electricity.
And that’s the simple beauty of underground food storage; it extends your food’s shelf life without depending on modern technologies.
But there’s a bit more to it than that…
Using the earth’s lower temperatures is smart, but there are unique challenges you’ll need to overcome to do so successfully.
↓ Everything You Need To Know About Root Cellaring↓
As A Way To Introduce You To Skilled Survival, We’re Giving Away Our #78 Item Complete Prepper Checklist. Click Here To Get Your FREE Copy Of It.
2 Main Types Of DIY Root Cellars
Depending on your time, energy, and funds, there are two main types of root cellars to choose from: small and large.
Small underground food storage systems primarily consist of buried containers, while larger setups typically include a separate building.
So let’s start with the quick, down, and dirty option first; the small buried root cellar container.
The Small Buried Root Cellar Container
This option is similar to burying a survival cache.
But instead of storing gear and equipment, with this option, you’re focusing on storing food.
Remember, anything stored underground at a depth of several feet will stay at a consistently cool temperature between 50-55 degrees F (regionally dependent).
The best containers for this method are the ones not susceptible to water damage or degradation.
Naturally, that eliminates wood crates or cardboard boxes because, over the course of time, natural processes will eat away at these containers and eventually devour whatever’s inside.

![]() Instead, using metal garbage cans, plastic drums, or plastic storage totes is the best option.
Instead, using metal garbage cans, plastic drums, or plastic storage totes is the best option.
Just ensure the container is made of strong materials to prevent collapse and won’t degrade when in contact with moisture for extended periods.
This straightforward method of underground food storage is the easiest on a tight budget. It’s also the quickest to achieve, and acquiring materials is not difficult.
It’s also the closest method to the original root cellar!
When Indians and native Australians buried their food, they did so in clay pots, but they surely would have used waterproof plastic containers if available. But for them, plastic was still centuries away.
Note: if you live in freezing climates, expect your buried food container to be inaccessible during the cold months. When the ground freezes, it becomes difficult or nearly impossible to dig it back up.
Also, extremely low temperatures present a liability for sealed containers; anything stored in a jar, can, or bottle will likely freeze and burst its container. Food for thought!
↓ Cool Ideas For Inexpensive and Easy-to-Make Root Cellars ↓
The limitations of these smaller containers become obvious once you want to expand your underground food storage supply.
Plus, it will be a royal pain to dig them back up regularly to check on your food and rotate your foods (more details later).
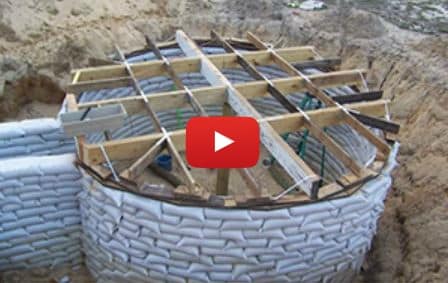
So if you want a single large root cellar instead of many smaller ones, you need a larger walk-in backyard root cellar.
One you can fill to the brim with food and wait for the worst.
Image Source

The Backyard DIY Root Cellar
A walk-in-style root cellar is a step up from buried caches. But they do require a bit more time and money.
Here’s a quick overview of how to build a root cellar and how it should function once complete.
↓ How To Set up A Root Cellar ↓
It can produce a similar result with a much more utilitarian design. Besides the excavation, earthbags don’t require as much specialized knowledge to build.
It’s not a skilled trade like masonry or bricklaying.
This is all pure function with no fancy arches and a straightforward log roof.
Of course, not everyone has space (or the need) for such a large root cellar. In fact, an array of smaller root cellars can keep your produce separated.
This also helps reduce the risk that one event can take out your entire supply.
Imagine having a few of these simple garbage can root cellars on your property.
They can also act as secret food caches and make sense around a bug-out location!
↓ Our Simple Inexpensive Root Cellar Build ↓
Finally, if you have an unheated basement with plenty of space, you can always build an indoor root cellar.
This is often the most convenient option out there since you don’t have to go outside to get your produce!
This root cellar building project is extremely well documented.
They take you from measuring for rough lumber to building walls. They even go over insulating and installing ventilation.
↓ Build Our Root Cellar In The Basement ↓
↓ Insulating The Root Cellar To Keep The Cold IN ↓
Remember, you can tweak any design details to fit your specific needs.
Such as:
- How many people do you need to supply?
- Which types of products you’re most likely to use?
- How much total volume do you need for storage?
- Your build costs.
- DIY skills?
Get a realistic picture of the interaction between all these variables. This can help narrow down the best root cellar design for you.
To successfully build a root cellar, you must start with the end in mind.
You can’t just grab a shovel and start digging.
Well..actually, you can, but trust me, you’ll soon regret that approach. Instead, you’ll meet all your goals and get what you want with the right root cellar plan!
Here are the following root cellar issues you need to think long and hard about before breaking ground.
Consider Your Budget
Obviously, the size of your wallet will play a significant role in determining the size and quality of your food storage cellar.
If you can go “all-out” on this project, then go for it. Purchase the best materials, build it on your own land, and make it as big as possible.
What better way to spend your money than on important survival projects?
But, if you are like me and severely confined by your bank account, then you’ll have to make compromises.
So I’ll do my best to suggest some cheaper alternatives. Some “corners may be cut,” while others are not. Keep this in mind as we move forward.
Digging The Hole – Excavation
Underground storage is, by definition, buried in the ground.
So the first step to building your big survival pantry is digging a hole for it. This hole can be underneath your house, in your backyard, out in the woods, or even in a secret spot in the middle of the desert.
But wherever it ultimately ends up, follow this advice: the deeper, the better.
Not only are deeply dug root cellars easier to conceal, but they provide cooler food storage temperatures.
So decide how large an area you want and start digging!
Use a shovel if you must, but ideally, an excavating machine will do the heavy lifting, but again, your budget will determine what’s possible.
Laying The Foundation
If you have the money to pour a concrete floor, DO IT! Otherwise, use the flattest stones you can find in the surrounding area.
One rock at a time, and you’ll eventually have a rustic-looking floor.
Wooden boards can also be used to achieve the same effect.
The reasons you want a solid floor are twofold:
- First, having a solid floor helps prevent rodents from burrowing through the floor,
- Second, it makes a smooth surface to set up racking or shelving systems.
Building The Root Cellar Walls
Once again, if you can afford bricks or masonry blocks for walls, that’s ideal.
Otherwise, similar to the foundation of your cellar, look for the materials for your walls in free resources in the surrounding area.
Stacking stones is a straightforward task (although it often requires some heavy lifting).
You can use mud or clay as a natural mortar to hold each stone in place.
Strong stone walls prevent unwanted pests from entering your food storage facility, and it also helps keep the place as cool as possible.
Adding A Ventilation Pipe
All root cellars require ventilation, with no exceptions.
You must turn over the air within the room to keep ethylene gas buildup in check. The good news is this is relatively straightforward.
Add a vertical PVC pipe within the structure that sticks above the roof. Then add a second pipe near the floor to draw fresh outside air into the storage space.
Capping The Ceiling / Laying The Roof
The best way to cap your root cellar is to pour a concrete slab over the top. You’ll need to support the roof fully from underneath before you pour.
However, pouring concrete will set you back some dollars. An alternative option is to lay treated 2x4s across the top of your cellar and then bury them under the dirt you dug out of the hole in step 1.
Of course, using materials that won’t degrade as fast as wood is preferable, but it will undoubtedly cost more. If you go with the 2x4s, make sure you use treated lumber, as it will hold up to rot much longer.
Just know it’s definitely a shortcut, but it’s simple, cheap, and effective at camouflaging your underground food structure.
Sealing Up Your Root Cellar
Make sure you fill and seal all door jams and ceiling gaps.
Gaps allow bugs, insects, and vermin into your food storage space. Not good.
Installing Doors and Locks

![]() The reasons for these are obvious. You need to be able to close and lock the place up when you’re not around.
The reasons for these are obvious. You need to be able to close and lock the place up when you’re not around.
So invest in a quality Rustoleum hanging lock to keep your food stockpile yours.
So now it’s time to begin the actual building of your own DIY root cellar. But having a set of proven root cellar blueprints will make your life much easier.
That’s why we recommend you check out The Easy Cellar plan. It’s the easiest backyard root cellar build we’ve come across.
Sure it’s a bit of an investment – but you’ll save a bundle with the right set of DIY root cellar plans.
Why? By preventing you from making costly mistakes!
What You Should Store In Your Cellar
What you store in your cellar depends on your goals.
If your goal is to stash long-term survival foods, build a large cellar to handle what you have today and what you may want to add to it over the years.
But what about fresh produce and vegetables from the garden? You should also make certain to design enough room for these seasonal items as well.
Non-perishables Are Your Friend
You’re good to go, whether it is canned, jarred, dehydrated, dried, or tubed. The further away from the expiration date, the better.
You should learn how to make pemmican for long-term protein needs and how to make hardtack for your long-term carbs needs.
The more foods that are non-perishable that you can afford to store in your cellar, the better off you will be for any future emergencies (big or small).
Add Some Fresh Stuff Too
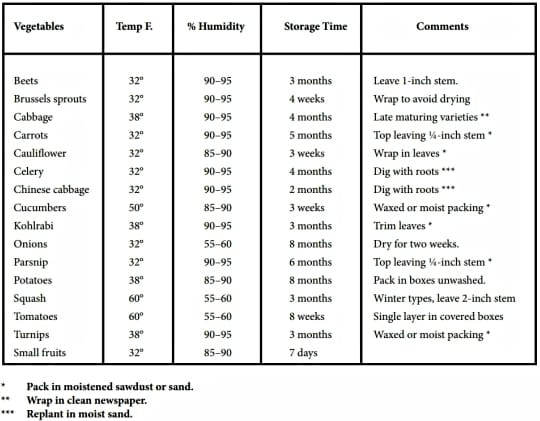
You can store fresh produce if you’re willing to maintain them regularly.
You’ll need to understand the humidity and temperature level, and you’ll need to consume the produce each year before the next crop gets stored.
There’s a particular technique for storing these kinds of foods because of the chemical byproducts they release.
Here’s a helpful chart that provides ideal root cellar storage temperature and humidity levels for various varieties of produce.
Survival Food vs. Fresh Garden Produce?
I think it’s safe to assume if you’re interested in underground food storage, then you’re interested in self-reliance.
Preserving your food harvests all winter long without electricity is about as self-reliant as it gets.
But there’s a conflict of interest between long-term survival food kits and fresh fruits and veggies. Any guess on what the conflict is?
It’s humidity. Moisture in the air.
The last thing you want with long-term dry survival foods is humidity in the air. You should do everything possible to avoid moisture touching your freeze-dried survival food. Even going so far as to add a high-quality dehumidifier to your food storage area.
But with harvested fruits and vegetables you’re trying to keep fresh through a single winter season, you want the opposite. You want a relatively high humidity (as much as 90%).
This high humidity keeps your produce from drying out. Helping to keep your stashed harvest both fresh and nutritious.
As discussed in the previous section, all foods last longer in cooler temperatures. So the cool air of underground food storage is ideal for both survival food and garden produce. So what’s a self-reliant person to do?
The way I see it, you have a couple of options.
Option 1. Don’t Store Your Freeze Dried or Dehydrated In Your Root Cellar
Whether you bought it or used a freeze-drying machine, freeze-dried food is not cheap. That’s why you might not want to store it in your underground food storage system.
Instead, only store your annually harvested produce there.
That way, you can crank up your humidity levels without fear of affecting your freeze-dried survival foods. But you’ll have to find a separate location for your long-term survival foods, like your basement.
Option 2. Create Separate Areas Within Your Root Cellar
Create separate containers or areas within your root cellars specifically designed for high or low-humidity environments.
This eliminates having two separate storage locations but complicates the construction and storing process, especially for a single large underground food storage building.
Option 3. Use Mylar Bags For Your Survival Food
Put your survival food in sealed Mylar bags with desiccants, and then put these bags into food-grade sealed buckets.
This double-seal setup should keep the room’s high-humidity environment from ever touching your long-term survival foods.
I think Option 3 is the best, but ultimately it’s up to you.
How To Control The Humidity
First of all, relatively high humidity is essential in root cellar storage.
A refrigerator produce bin holds the humidity somewhere between 90 and 95 percent. This high humidity is ideal for leafy greens and root crops. This prevents these foods from drying out and wilting.
Now underground soil temps in your area; are what they are. So there’s no way to control that.
But you can control the humidity levels using ventilation and adding moisture as needed.
If you have good ventilation and airflow, you can keep the humidity of a room relatively stable. Ventilation controls the flow of air and, thereby, the room’s humidity.
Now regardless of whether you want high humidity (for produce) or low humidity (for long-term dried foods and meats), your storage system must have ventilation.
Without ventilation, a room with fresh produce will fill up with a gas called Ethylene. Ethylene is released naturally from stored produce; without ventilation, it will build up and accelerate spoilage.
So the best way to control humidity in a root cellar is by installing ventilation and then adding moisture as needed.
One way to add moisture is to plan the root cellar floor with gravel instead of a full concrete pad. This allows you to take a hose or buckets of water and dump them on the floor.
Another way is by spreading damp burlap sacks over the produce.
Either way, the additional water will slowly evaporate up into the air. This evaporation process adds humidity.

![]() However, I highly recommend using a hygrometer to ensure that it doesn’t become TOO humid.
However, I highly recommend using a hygrometer to ensure that it doesn’t become TOO humid.
Why? If the humidity approaches 100% and the temps fall, moisture will condense. Wet produce is far more susceptible to spoiling.
So there you go. You install a simple PVC vent pipe to create ventilation and then bring in water to add humidity.
The PVC vent system consists of two PVC pipes. One is installed close to the floor and goes through the wall to the outside, while the other one is installed near the top of the cellar and exits through the roof.
The natural chimney effect will pull air out of the room from the roof pipe, and the floor pipe will bring fresh air in. Simple ventilation without electricity.
So now that you have a basic understanding of the concepts of a root cellar and hopefully have an idea of how you want to utilize yours, it’s time to start thinking about construction.
As A Way To Introduce You To Skilled Survival, We’re Giving Away Our Family First Food Planning Guide. Click Here To Get Your FREE Copy Of It.
Organizing The Interior
An efficient and usable space requires a fair amount of forethought.
You can’t just toss your food supplies in a haphazard heap and expect good outcomes. Believe it or not, there is actually a science to packing your underground food storage.
First is deciding how to keep everything organized. Are you going to use boxes, plastic tubs, or shelves?
Honestly, it doesn’t matter as long as you’re using separation to organize your underground food supply. Let’s discuss each option further.
Food Shelving Racks
 These are easy to build and fully maximize your available space. You can get premade shelving kits online.
Just buy and assemble.
Or you can buy the raw materials and build them yourself. The biggest benefit of building them yourself is customizing them to fit your space perfectly.
Food Boxes and Tubs
Storing your food on the shelf is a good first step, but organizing them gets easier when you use boxes or tubs.

![]() I like to use clear plastic bins to see the food and produce in them without emptying them.
I like to use clear plastic bins to see the food and produce in them without emptying them.
Under no circumstances use cardboard due to humidity breaking down the paper.
Note: make sure you don’t seal up your fresh produce bins. You can put veggies in boxes, bins, or tubs; just don’t put a lid on it.
Otherwise, the ethylene gas will get trapped.
↓ Root Cellar Tour ↓
Root Cellar Food Organization
This step is often overlooked but is paramount to extending the life of your underground food storage cellar. Keep everything elevated (on shelves or supports or pallets) to prevent any unwanted water damage.
But beyond this, it’s really important to keep the fruits and veggies stored in specific places.
Fresh fruits and vegetables (especially tomatoes, apples, and pears) produce that ripening agent we discussed called ethylene.
This chemical byproduct speeds up the decomposition of other produce. Basically, it makes everything fresh start to rot faster, and it’s a major problem that can result in a lot of food waste.
The easiest way to mitigate this issue (besides avoiding storing fresh produce to start with) is to:
- Keep the foods that produce ethylene at the very top of the cellar. The higher, the better. This will help prevent the chemical agent from infecting your other foods.
- Make sure to install a good ventilation system (as we discussed earlier).
Also, some produce stores better when it is cured at 80-90-degree F temperatures for around 10 days before being placed in storage.
A few examples of these foods are garlic, winter squash, onions, and potatoes. If you plan to store these, consider curing them before adding them to your underground root cellar.
Food items that require colder temperatures should be stored at the bottom of your cellar.
Amazingly, there will be a significant temperature difference between the top and bottom of your cellar. Often a big enough difference to keep food cold when it is stored flat on the ground.
Any canned items or jars with metal lids are in danger of rusting. Even if you monitor the temp/humidity very carefully, rusted cans are bad news.
Rust can compromise the seal on lids and thereby compromise the food inside. To prevent this, store all-metal containers in sealed plastic mylar bags (vacuum seals are ideal).
As A Way To Introduce You To Skilled Survival, We’re Giving Away Our Family First Food Planning Guide. Click Here To Get Your FREE Copy Of It.

5 Dangerous Root Cellar Enemies
Every survival project has its own unique obstacles. And when it comes to storing food underground in root cellars, there are 5 such challenges.
You must prepare to deal with these obstacles before putting your root cellar food storage system to the ultimate test.
1. Bacteria
Some bacteria are good for you, like the stuff in probiotic yogurts. But when storing your food underground, bacteria are always the bad sort.
If you allow any bacteria to fester in your root cellar stockpile, it will introduce food rot.
However, you can mitigate bacteria by storing your food in clean containers and removing any food showing the first signs of decay.
2. Fungi
Many mushrooms are delicious, while others are used for a “good” time. Still, others are poisonous (and potentially deadly).
But all varieties are bad if they spontaneously sprout on survival food.
You need to keep a careful watch on your food for any fungal growth.
3. Insects
Food with insect infestation can be a horrible and even traumatic experience.
Not only is it totally gross, but it may require you to throw everything out.
Once ants, beetles, maggots, flies, moths, or any other creepy crawly get in, they quickly infest everything they can. So keep these insects away at all costs.
We’ll get into insect repellant and eradication methods later…
4. Vermin
Rats, mice, raccoons, squirrels, or any animal with a nose and appetite for garbage; loves free food.
So use traps and hard-sided containers with tight seals for your underground food storage site. Otherwise, a significant portion of it may get snatched by uninvited pests.
5. Other People
Perhaps the most frustrating challenge of all is other humans. People love food, and they love buried treasure.
It is a combination that puts your underground stash of food in severe danger.
How awful would it be to visit your root cellar to find it’s been completely raided? Talk about brutal.
So, later on, we’ll discuss in detail a few camouflaging techniques to prevent this from happening. But it’s also important to keep the location of any survival cache (be it full of food, equipment, or relevant documents) a secret.
How To Keep Your Root Cellar Hidden
This is an essential step!
Just dropping off a bunch of food in the middle of the woods is not enough to protect it from motivated intruders.
Camouflaging helps keep your food hidden from people and animals alike, so it’s vital to protecting your survival goods.
Depending on which method of food storage you choose, different levels of work will be involved in hiding your food.
If you just buried a big plastic drum, it might be as easy as laying dirt, grass, twigs, pinecones, and anything else that looks natural over the top.
But if you have a full-fledged root cellar that needs disguising, you may need to get more creative.
For bigger structures, you should plant trees, shrubs, and other plants that grow in the area around your structure.
On top of this, make sure you bury it well and that the surrounding areas look natural.
Bigger storage facilities are harder to camouflage, but as I said at the beginning of this section: this step is essential!
So do not skimp out.
If your food supply is out of sight of potential thieves, it is certainly out of mind too.
As A Way To Introduce You To Skilled Survival, We’re Giving Away Our Family First Food Planning Guide. Click Here To Get Your FREE Copy Of It.
Maintaining Your Root Cellar Food Supply
Depending on how much of your food is non-perishable and how large your supply of food is will determine how much maintenance is required.
If you have lots of fresh foods stored or foods that expire rather quickly, then you’ll need to make regular supply/maintenance trips to ensure timely use and rotation.
That’s the biggest regular task of owning a food supply. Make sure you trade out expiring food for new food.
Keeping an eagle eye on your expiration dates is important because contracting a severe case of food poisoning in a survival situation, your chances of survival sink like a ship.
A case of food poisoning makes it difficult to ingest the essential nutrients and vitamins and can lead to severe dehydration and even death by starvation.

![]() To help prevent any spoilage, you should build a spreadsheet and label everything. Then keep the spreadsheet handy inside your food container/cellar and invest in a good labeler.
To help prevent any spoilage, you should build a spreadsheet and label everything. Then keep the spreadsheet handy inside your food container/cellar and invest in a good labeler.
Regular maintenance also includes:
- Checking seals on doors and walls to ensure that they have not been broken or chewed.
- Monitoring temperature and humidity, restocking food that has been used or thrown out, checking the locks for rust and degradation, and cleaning out triggered mouse/rat traps and flypaper.
- Also, make sure after multiple maintenance trips to your food storage site, you are not carving out a trail.
However, this regular maintenance can compromise all your camouflage efforts. Now there’s basically a line that leads straight to your food stash.
So always take unique routes to your underground food storage location and consciously work to cover up your own tracks around the burial site.
Final Thoughts
Burying food in an underground container or facility is a survival method humans have been employing for thousands of years.
This way of preserving food has saved countless lives from starvation since its inception. And it’s still entirely applicable today.
Building your own survival food cache is useful in times of calm and essential in times of chaos.
There is no telling what situation might force you to need your buried stash of food, but no matter what it is, having a backup supply of food is essential in today’s fragile and uncertain times.
Will Brendza
P.s. Are you ready for the tough times ahead?
Find out now by taking my short Readiness Score Quiz – it’s absolutely free.
Once complete, you’ll know exactly where you stand on the “fragile” vs.” resilient” spectrum.
So click here to start the Quiz….And don’t worry; the questions are so easy a 3rd grader could answer them.

Click on the image to begin the Quiz and find out once and for all if you’re part of “The Fragile Masses” or “The Resilient Few.”
The post How To Build A Root Cellar In Your Own Backyard appeared first on Skilled Survival.