


An electromagnetic Pulse (EMP) is the stuff of nightmares for most preppers. They are silent, can happen with little or no warning, and they may change life as we know it forever.
Unfortunately, there is a lot that is unknown about them as well. This adds to their mystery, mystique, and the terror.
The best-case scenario involves a minor blip as a few cars stop as well as dead cell phones.
The worst case involves the end of the modern age. Infrastructure is fried, and computers are smoked. In short, we’re back to 1800s technology without the know-how to survive.
While protecting the electrical grid is beyond most of our capabilities, drawing the circle a little closer allows you to guard what is most critical and meaningful to you. Let’s look at how to protect your most vulnerable electronics.

What’s an EMP?
EMP is the shortened version of electromagnetic pulse. An EMP can result from a man-made or a natural source.
A man-made EMP is caused by a high-altitude nuclear explosion. During the explosion, the released gamma radiation strips off electrons from atoms in the atmosphere.
This effect causes a build of electrons seeking a path to ground. This electrical charge accumulates on any conductor be it long electrical transmission wires or cellphones.
Natural EMPs are the result of a coronal mass ejection (CME). These massive explosions happen every day on the sun. The largest, earth-directed ones blow millions of tons of electrically charged particles toward the earth.
As these clouds hit, stress, and bend the earth’s magnetic field. This movement creates an electric force not unlike passing a magnet across a wire.
The longer the wire or larger surface area, the more massive the induced charge.
Where things go wrong for most of humanity, is in our daily reliance on electrically dependent tools. Highly computerized vehicles move our goods around.
Our delicate convenience electronics (e.g., cell phones and computers), keep us connected and our lives organized. Feeding this insatiable need is the electrical grid.
Unfortunately, the electrical grid consists of miles of perfect conductors for the charge induced by an EMP.
The resulting pulse is one that the grid, its transformers, and the electrical components at the end of the chain could handle.
Scientific studies have determined that in the event of a significant EMP, 90% of the population of the US would not survive the first year. These are obviously the most extreme results.
With a large number of unknown factors in an EMP, it is imperative that you make the minimum preparations to protect your ability to fully provide for your family during such an event.
What is a Faraday cage?
So how do you protect your equipment from an EMP? The answer lies in a device that is almost 200 years old.
Michael Faraday discovered you could electronically shield an object with a wire mesh.
Any electrical charge that encounters the cage remains on the surface and doesn’t penetrate to the contents. The result is an EMP-proof container.
At its most simplistic, a faraday cage is a metal box. The early test samples were simple wire cages.
Depending on the level of protection you are seeking, a cage of chicken wire will do. In our case, a solid metal container with well-sealed seams is perfect.
There are several simple options that you can easily purchase that get you close. From walkie-talkie-sized to generator-sized, it’s easy to source or make the perfect container.
The two primary requirements are
- the surface is made of conductive materials (e.g., tinfoil or steel)
- there are no open seams.
You can even double up isolated layers for a greater level of protection. Let’s take a look at a few construction options.

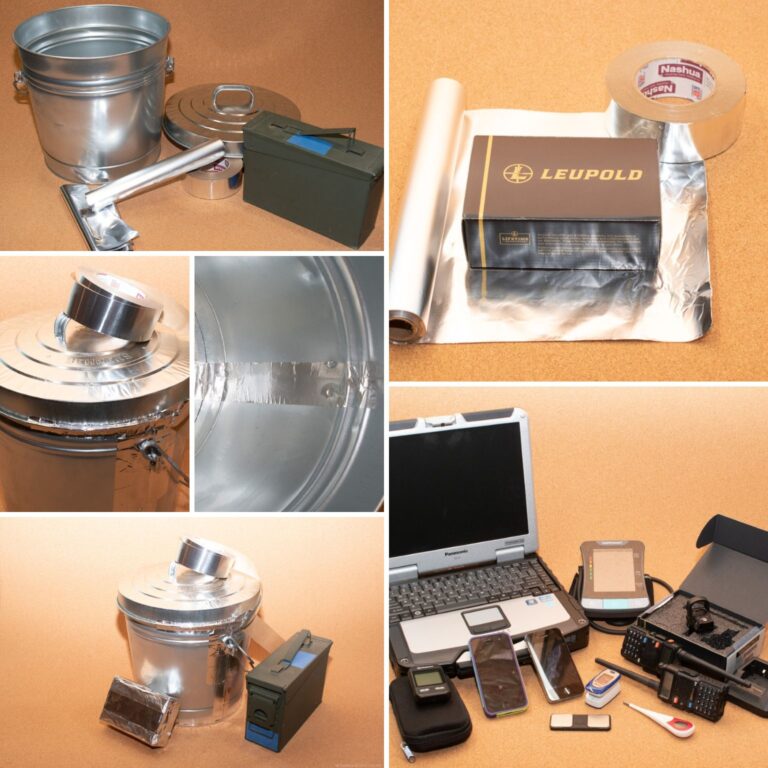
4 Simple Faraday Cage Designs
A Faraday cage is relatively simple to construct given the right materials and knowledge. Here are four different cages that you can improvise to store your critical goods.
Before you start construction, do a test fit to make sure that your design can fit the items you want to store.
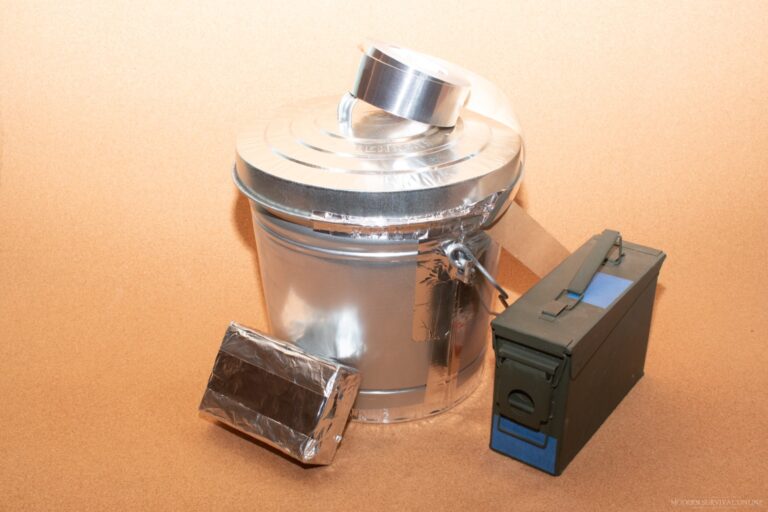
Ammo Can Faraday Cage
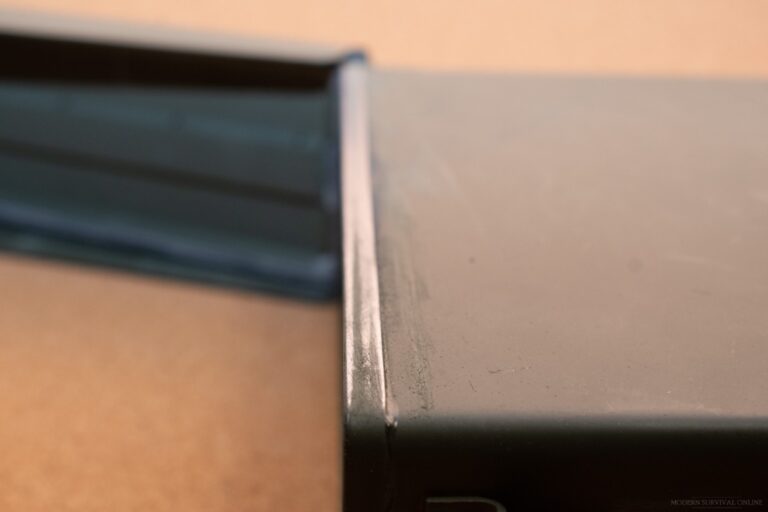
The first easy option is to use an ammo can. Ammo cans have the advantage of metal construction, a locking lid and they come in a variety of sizes.
First, open the can and remove the rubber seal. Rubber is an insulator, and you need solid electrical contact between the lid and the box.
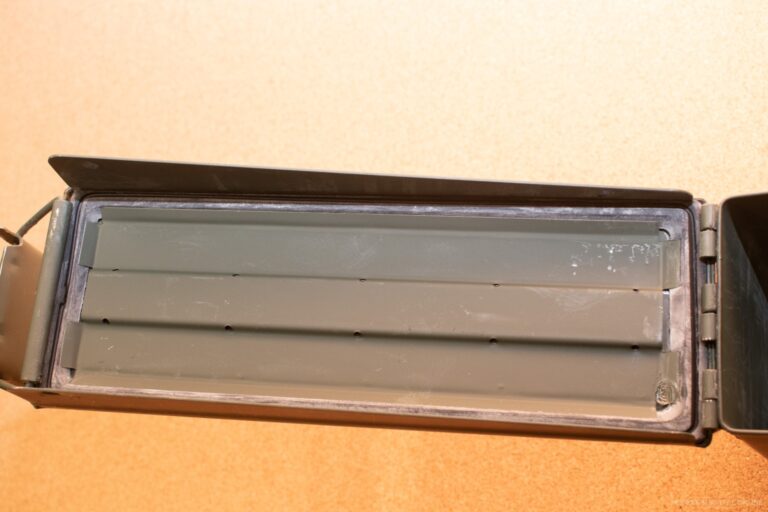
Next, break out the sandpaper and remove the paint from the top quarter inch of body of the ammo can.
Sand it down to bare metal both inside and out. Then tackle the groove you removed the rubber gasket from.
This will take a little work as the channel is narrow, but you need to make sure that the entire groove is bare metal. Side to side and front to back.
Now that you have two good conductive surfaces, you need to guarantee that they make contact. The best way is with a conductive gasket.
If you can’t get your hands on a proper gasket, then you can improvise with a bit of tinfoil or even copper wool. Copper wool is a steel wool substitute that won’t corrode as quickly as steel wool.
Just roll up your gasket material into the shape and size that fills the channel. The lock on the lid will hold the gasket in place.
Finally, line the ammo can with a thin layer of cardboard (box inside a box).
This insulation layer ensures that your contents don’t come in contact with the conductive layer. Although the paint is a good buffer, a little insurance is a good thing!
If you want to double up your protection, add a simple cardboard box wrapped in tinfoil (see the cardboard box faraday cage section for instructions) inside the lining.
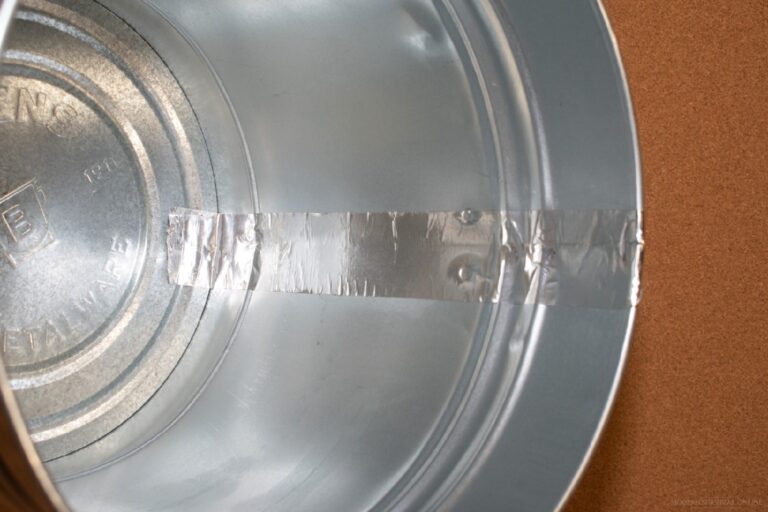
Garbage Can Faraday Cage
It doesn’t get much easier than a pre-made faraday cage. I’m talking about a garbage can.
They are all metal and generally have well-fitting lids. With a few improvements, you can have an inexpensive, large-volume faraday cage.
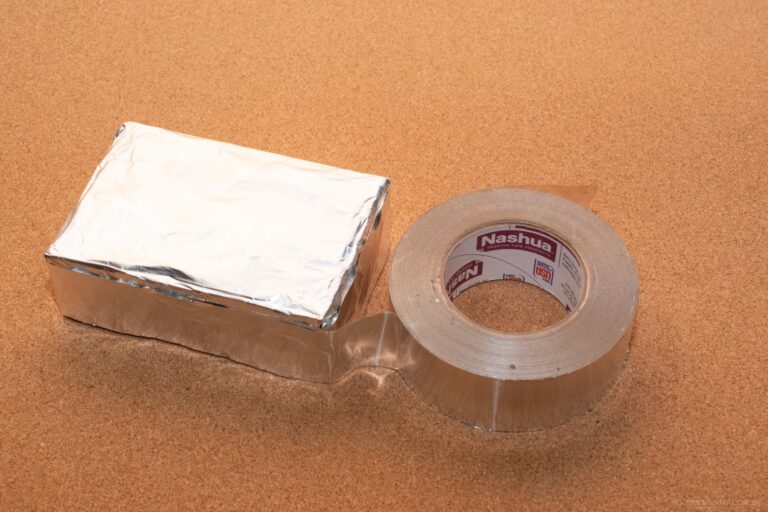
First, get an all-metal garbage can and some metal foil tape. I recommend getting two rolls, and you’ll see why in a few minutes. When working with this tape, please wear gloves. Voice of experience here, it cuts quick and deep.
Next, using your foil tape, add a layer of tape over the two seams in the can. The first is the seam between the can walls and the bottom.
Make sure to have good contact with both surfaces. Next, run the tape up the vertical seam. Again, smooth it out to get good contact.
While you’re in there, place a small piece of tape over the rivets attaching the handles to the can.
If there are rivets on the lid, then add a small piece of foil tape to them as well. You want to block up any holes that may exist.
Now, line the inside of your can with cardboard so that the stored goods can’t come in contact with the metal of the can.
Feel free to duct tape (the real stuff, not your foil tape) the pieces together, as the tape won’t affect the protection. You simply want to keep the insulating layer in place.
Next, place your protected goods inside the case and get ready to seal it up. But first, take that second roll and pop it on the top of the goodies in the can.
You will probably open this can a few times, and you’re about to seal it from the outside. If your life is as (un)organized as mine, this will be the last time you see that roll of foil tape.
Place the second in the can so when you open it, you have some tape ready to go to re-seal it.
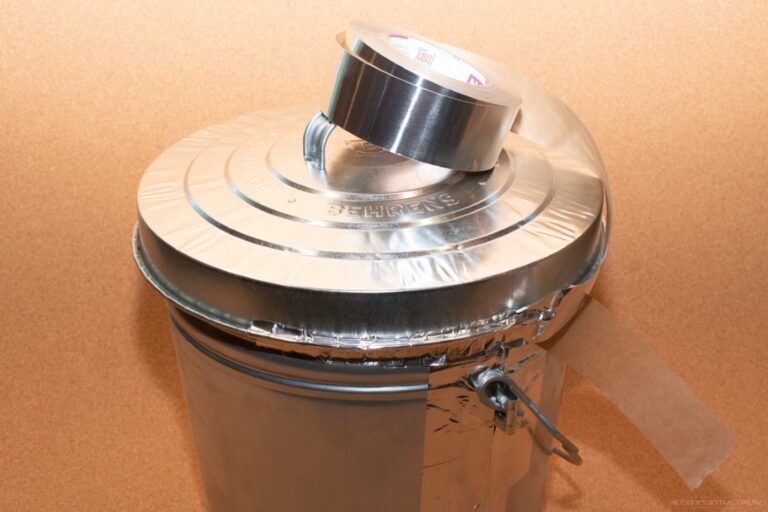
Let’s start the sealing process by taping up the outside of the seams.
I know that this is overkill, but it’s cheap insurance if you have a few dollars in gear in this can (medical diagnostic equipment, HAM walkies, and base-stations, etc.). Spend a few minutes sealing it up and a few dollars on the tape.
Start with the seam between the bottom and the sides, then put a layer on the vertical seam. Make sure to wrap the tape up and over the rim by a little bit.
Now double-check that you have everything you want inside the can, nothing inside is touching the walls of the can, and pop on the lid.
Finally, give the seam between the can and the lid a wrap or two with the foil tape. Smooth it out and you are ready for the long haul.
Here’s a quick video on adding the foil tape to the can. I added the tape along the seams based on the improvement from the tape along the lid.
Will it improve things? I don’t know, but every little bit helps. Again, this is cheap insurance. That’s why I double up cages given the chance.
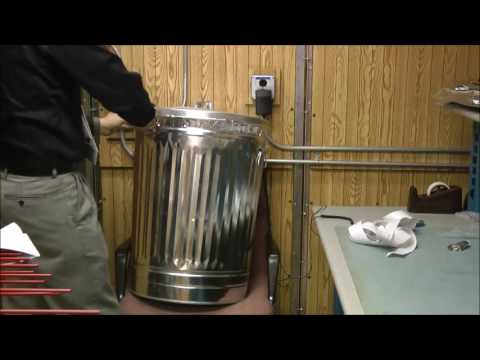 Watch this video on YouTube
Cardboard Box Faraday Cage
For the cheapest and most flexible solution, go with the good ole cardboard box. Tin foil is your friend here! Choose the right size box for your needs and wrap it.
First, select your boxes. I recommend two. One to act as the faraday cage, and a second to act as concealment.
No need to advertise your prepping intentions with a big shiny obvious box in your house.
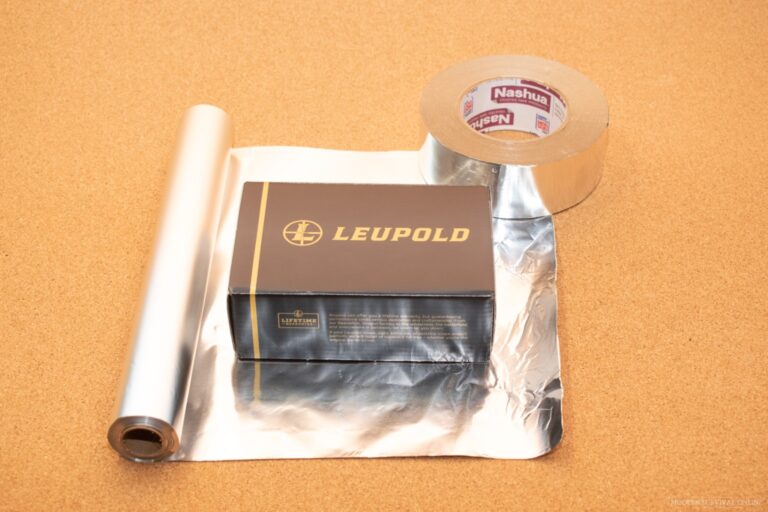
Fill the inner box with whatever you wish to protect and tape it closed. Next, wrap it with two layers of tinfoil.
I recommend heavier-weight foil. Not because it will provide greater protection, but because it’s less apt to tear. For the same reason, I recommend two layers.
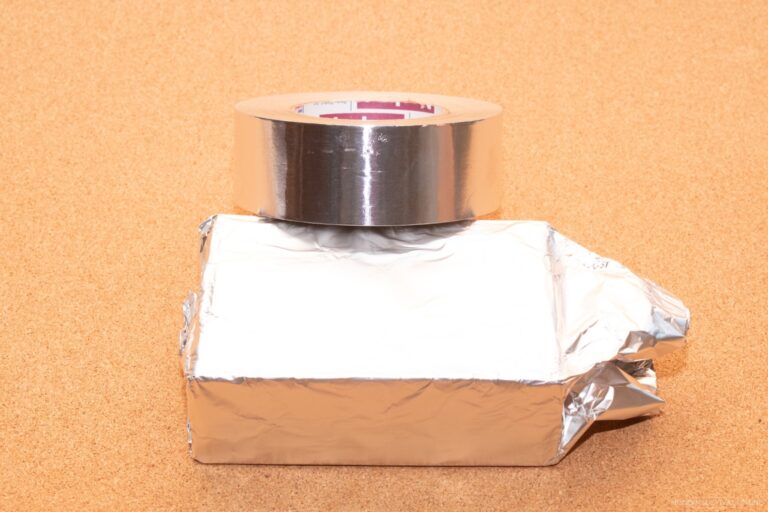
Finally, tape down the seams with your foil tape. If you have it, or regular duct tape if you don’t.
As long as you have a good contact at the edges of the tinfoil, you don’t actually need to tape it down. The tape just ensures good contact and keeps everything in place.
In the event that your box is bigger than can be covered by a single wrap of foil, use your foil tape to secure the seams as you add multiple wraps. This provides good contact between the layers and keeps the tinfoil in place.
As with the other methods, you can add protection by nesting boxes one inside the other. Make sure that there is no contact between the two layers.
If you’re wrapping the outside, then you don’t need to do anything else. Otherwise, a thin layer of cardboard will do the trick.
Faraday Cloth
What about those big items? If you need to protect a generator for power, or a small fridge to hold medications, then Faraday cloth may be for you.
Please note that as you would expect, a draped shielding cloth will not be perfect protection. For that, park your car in a sealed metal box.
The cloth, however, should provide enough protection for your items to survive without permanent damage.
Simply wrap the cloth around, or drape the cloth over your bulky item and you are good to go. Make sure there aren’t any large gaps between the floor and the cloth.
Packaging Your Items
So, you have all the materials you need for your cage, you’ve selected the items to package, and you’re ready to go. How do you want to package up your radios, optics, and medical items?
Start with, if possible, the original packaging. This does several things. It’s built to hold the radio, etc. making an easily stacked box.
Second, the packaging includes instructions. You may store away these items for years and you’ll want the instructions with them.
Finally, if it’s made of cardboard, then you already have an insulating layer. No risk of contacting the conductive walls of your faraday cage.
If the packaging doesn’t include it, add in a fresh desiccant pack. This will keep the environment dry.
If you’re going the extra mile and sealing the package in mylar, then add an oxygen absorber.
Can’t hurt and between that and the desiccant pack, you’ll be cutting down on the two largest sources of corrosion. P.S. a mylar bag also acts as a Faraday cage. Every bit of protection counts.
What Household Electronics Would Survive an EMP?
You’ve packed up the essentials, including radios, optics, a few diagnostic medical devices, but what about the convenience items in your home? How will they be affected by an EMP or a CME? Should you even care?
Those are great questions. Let me answer that from several approaches.
Vulnerability and Complexity
First, what is the vulnerability of your item? The more sensitive and delicate the electronics, the higher probability of damage.
A new computerized smart fridge is much more vulnerable than grandma’s fridge from the 50s that you have in the basement.
The key is complexity. The more complex, the more vulnerable. Computerized electronics, especially anything labeled “smart” is susceptible.
This includes televisions, computers, cell phones, and even your connected refrigerators, ovens, microwaves, and Amazon Echo or Google Home Controller (on this topic… why would you have this in your home???).
Even diagnostic medical devices (PulseOx meter, glucometer, and electronic blood pressure cuff) are sensitive enough to be disrupted.
Don’t forget that washers and dryers have control boards in them these days. These are extremely fragile when considering an EMP and will be on the first list to fry.
The chips and boards in these items are designed for a hundredth of a volt and a thousandth of an amp. Even if the induced charge is a volt, they may not be able to withstand the increase.
Next are less sophisticated electronics. This includes, but is not limited to, radios, flashlights, LED lights, and even rechargeable batteries.
Considering larger electronics, remember that your furnace and thermostats are more solid state today than even 10 years ago. Depending on the strength of the EMP, these may not survive.
The last category is hardy electronics. Old major appliances (oven, refrigerator, washing machine), were built to last.
With sturdy components and heavy gauge wire, these monsters will probably survive everything but the strongest pulse.
Attached to the Power Grid?
Second, what is the appliance’s vulnerability from inbound power grid spikes? Is the household item battery-operated or plugged into wall power.
Unless we are talking about a coordinated EMP attack, the greatest impact will most likely come from spikes in the electrical grid.
If the threat is from a CME then battery-operated items will probably fair better than plugged-in devices.
Your Needs
Third, what are your needs? Are you a diabetic? If so, then glucose monitors and the ability to keep insulin cold are of primary concern.
You may want to invest in backup glucometers, and even consider placing a small dorm fridge or ice maker in a faraday cage along with a small generator.
Do you have asthma or allergies that require a surgically clean home? In that case, a vacuum cleaner, air filter, and a means to wash clothes and bedding may be a priority.
If you have a lower-risk household then you may start with critical items such as electronics for data storage and communications, then move out to convenience items, such as entertainment, lights, and food storage. Even better, purchase and learn to use non-electric tools.
 Watch this video on YouTube
Does an EMP permanently destroy your electronics?
The short answer is we don’t know for sure what will survive and what will be destroyed. We can only speculate.
The best possible scenario is that the electronic item will be temporarily disabled. The US EMP Commission tested 50 vehicles and only one was permanently disabled.
The others had a range of minor effects from temporarily inoperable turn signals, to be shut off. All issues were fixed once the car was restarted. This, however, was testing with a low-voltage EMP.
The next scenario is widespread disruption of most personal devices. From laptops to cell phones, they may become unstable during the event from induced charges.
Likewise, an internal circuit breaker may be tripped by a spike in wall voltage. That is if the pulse moves slow enough to be caught. Some components of an EMP may be too fast to stop effectively.
Finally, in the case of a so-called Super EMP, which is a device designed to generate a significant EMP, no electronic item may be safe.
With a dedicated EMP weapon, it is thought that very few modern devices will survive the attack.
Wrapping up EMP Protection
Is an EMP my number one concern? I’ll be honest, no. Is it on my threat matrix? Definitely! However, it lies somewhere in between cyber/physical attack on the grid and total nuclear annihilation. It’s there, but it doesn’t rule my life.
I try to prepare for the most probable events in a way that allows my preparations to overlap several threats. This includes food, water, safety, and security.
As I have checked each item off the list, I have freed up money for other investments. I’m lucky enough that this includes a few minor investments for EMP protection.
To that end, my preparations include a few small faraday cages with select items in them.
Similarly, it includes wise investments into a “dumb” generator, and manual means for cooking, sourcing and purifying water, and personal hygiene.
Look at the threats that are most probable for your family and your position in life. Next look at the most critical items you will need to survive a grid collapse.
Finally, take steps to protect those items in an easy-to-make faraday cage. It’s a small investment that may pay off big someday.
 Like what you read?
Then you’re gonna love my free PDF, 20 common survival items, 20 uncommon survival uses for each. That’s 400 total uses for these dirt-cheap little items!
Just enter your primary e-mail below to get your link:
We will not spam you.