


One of the best ways to preserve fresh fruit is by air-drying it. This process removes most of the water from the fruit, which helps to prevent spoilage.
It also concentrates the flavor and nutrition of the fruit, making it a valuable addition to your food storage plan.
Whether you’re air drying vegetables, fruits, meat, or other foods, this practice is a great skill to learn for preppers because it is so sustainable and requires basically nothing in the way of equipment, just a little bit of cooperative weather.
But whoever you are, this method will save you a small fortune over buying overpriced dried fruit at the grocery store, which is sold at a considerable markup.
If you want to save money while supplying yourself with plenty of dried fruit for use as snacks, including in other recipes or as a component in trail mix then keep reading.
In this article, we will walk you through the steps of air-drying fruit so that you can do it yourself at home!
People Have Been Air Drying Fruit Pretty Much Forever
It is easy to believe that the dehydration or drying of fruit is a modern practice made possible by countertop gadgetry and factory production.
After all, what do we see in such abundance at the grocery store and the corner gas stations if this wasn’t the case? A reasonable deduction, but just not true!
Air drying fruit is an ancient practice, conducted for millennia by people all around the globe at various times in history.
Our ancestors, wherever they might have been, did it for the exact same reasons that we do it today.
They did it to prevent the loss of hard-earned crops, to make fruit more convenient for storage or transport, and to provide ready-to-eat calories for long journeys or other tasks far from home.
Our ancestors did it all with the power of the sun, warm temperatures, and dry conditions. Nothing more!
Now as then, you can do the exact same thing, without the benefit of any electricity or other modern contrivances.
It is also far easier and less labor intensive than you might be thinking. Keep reading to get the full story.
What sorts of fruits are suitable for air drying?
You can dry out pretty much any fruit as long as you pay attention to the details of the process.
Now, not all fruits are as palatable as others when dried out but you can generally make use of whatever you have on hand.
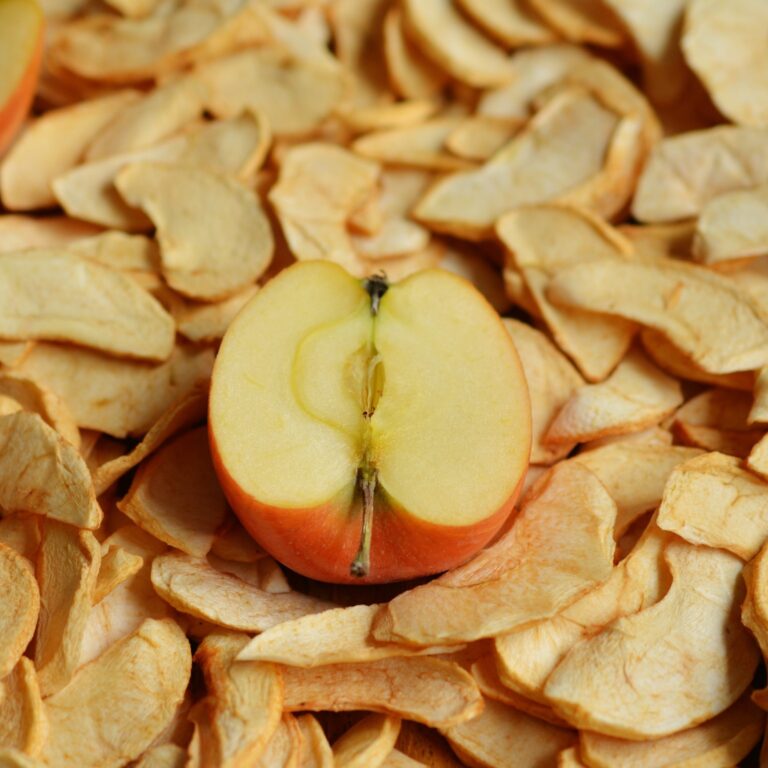
Commonly dried fruits that are delicious and respond well to the process include bananas, apples, pears, apricots, figs, and of course grapes which turn into raisins.
Now, it must be noted that every fruit will exhibit its own unique characteristics in response to the drying process and as a finished product.
Everyone knows that raisins are significantly sweeter and chewier than grapes, but if you don’t pay attention during the drying process and ensure they are handled correctly they might spoil rapidly.
Apricots by comparison dry out more quickly and have a longer shelf life, all things being equal, but they are decidedly not as sweet as some other fruits.
However, both are nutritious and totally Worthy of inclusion into your survival rations, and most other tropical fruits like bananas, pineapples, mangoes and the like will also work just as well.
As always, be prepared to experiment and tweak your process depending on your results.
Now, let us get on to the instructions.
Air Drying Fruit Step by Step
The following technique, which is both easy and effective, reliably and simply air dries fruit of all kinds.
You’ll need some warm weather, a few basic tools and things from your kitchen, and a little bit of care and attention throughout the process, but you can expect this method to succeed every time when conditions are met.
The steps are: Wash, Peel and Slice, Treat, Pat Dry, Cover and Place, Flip, Continue, and Freeze.
Caution: The weather must cooperate if you want to successfully air dry fruit using the process below. You’ll need temps of at least 90F for 5 days continuously in your area, with a humidity level of 30% or less to get the process working as anticipated.
Drying fruit is not going to happen when temperatures are low or humidity is high! If the overall climate in your region won’t allow you to dry fruit for the required time or is totally uncooperative, you’ll have to find another way to do it.
Keep reading to get detailed, step-by-step instructions.
Wash
The first step is to wash your fruit. It is imperative you remove all wax, dirt, grease, and any other contaminants that could reduce the quality of the finished product, or potentially even make you ill.
Do this gently in cool water, taking care not to bruise or break the flesh. You can let soft fruits soak for a few minutes if they’re very dirty before gently brushing them off.
It should be noted that you should never, ever use any serious chemical cleansers during this process, as it is more likely they will be drawn into the flesh of the fruit as moisture is evaporated.
Peel and Slice
Once the fruit is clean, it’s time to peel and slice it. It should be noted that not everyone likes to peel fruits like apples and even bananas.
It is often done to improve the taste and texture of the finished product, but sometimes the skins add an interesting element and vital nutrition when dried.
How you do this will depend on the type of fruit you’re drying. However, if you decide to peel, make sure you preserve as much of the flesh as possible.
Sloppy peeling is wasting fruit that you could be eating! For example, peeling oranges is optional but recommended as it makes them look better and taste better when dried.
After you have peeled the fruits it is time to slice them to size so they will dry efficiently.
Slicing thickness is also a matter of personal preference but generally speaking, thinner slices dry faster than thick ones, but if you should slice them too thinly your fruit will desiccate into nothing.
Make sure you are diligent about keeping the sizes of your slices identical so that your fruit will reliably dry out at the same time.
Treat
This next step is optional but highly recommended, especially if you plan on storing your dried fruit for an extended period of time.
Slicing fruit exposes more surface area to the air which means it will also spoil faster. To prevent this, you can treat your slices with a weak solution of lemon juice or ascorbic acid (vitamin C powder) and water. This will help to preserve the color and flavor of your dried fruit.
You can pick up ascorbic acid at most health food stores or any shops that sell vitamins in abundance.
Pretreating the fruit is the picture of simplicity once you have it peeled, sliced, and prepped.
All you’ll need to do is mix up the solution according to the package directions and then immerse your fruit pieces in it completely for about 5 minutes.
Note that while you can use the same batch of ascorbic acid, vitamin C, or lemon juice for multiple immersions of fruit pieces you’ll only get about three revolutions before the solution has lost its potency so make sure you keep it fresh if you are making a big batch of dried fruit.
It is also worth pointing out that ascorbic acid solution does not last a very long time once it has been prepared, losing potency over time.
Don’t make this stuff up ahead of time if you are planning a big siege of fruit drying over days or weeks as you might lose your crop! Mix it up fresh every time you need it.
Pat Dry
Once you’ve treated your fruit, it’s time to pat it dry with a clean towel or paper towel. This step is important as wet fruit will not dry out properly.
Ultimately you may place it on a wire rack to drip dry or place firm fruits inside a salad spinner to centrifuge most of the moisture off of them.
Be diligent, and gently blot off any remaining surface moisture or vitamin C solution. Take care of that you do not crush or damage your fruit as it is already been through a lot, and the quality of the finished product will be reflected in your prep and prior handling.
Note that while it is possible to omit this step it is definitely going to affect the quality of your drive fruit, and pieces that are significantly wetter than others may not dry evenly or might take considerably longer to dry.
Cover and Place
The next step is to get your fruit pieces on a tray or pan and get them covered so that you can place them outside to dry.
Ideally, you will use some kind of metal baking sheet or any other hard bit of cookware. You can use a cookie sheet, cast iron griddle, large pan; pretty much anything that is food safe.
Simply place your pieces directly on the pan and spread them out so if they aren’t touching.
Note that your pieces will shrink up as they dry, but don’t look into this too much and overload your pan anticipating on recouping real estate as this will only slow the drying process!
Next, cover your drying surface with a layer of cheesecloth, muslin, or other breathable fabric.
This fabric should be thin and airy enough to allow plenty of air and light to get through to the fruit but thick enough that it will prevent birds, insects, dust, and dirt from getting at the fruit pieces.
You don’t need me to tell you that you must keep an eye on your fruit while it is drying on the tray outside! There will be plenty of thieves in the animal world that will be entirely eager to get to them.
Then, place your tray full of fruit pieces, tightly covered, anywhere in a sunny spot outside, and preferably get it up off of the surface using bricks, stones, a tray stand, a trivet, or anything that will allow air and heat to circulate all around the pan.
Placing your pan over a solid and non-porous surface made of metal, stone or concrete is best as this will cut down the amount of moisture in the air around your fruit pieces.
Flip
After 3 to 4 hours, remove the covering cloth and flip your fruit slices over to allow the other side to dry. Simply flip it over in place so the other side can dry evenly.
If you are smart, you will use a gloved hand or some other kitchen utensil that is clean to flip the fruit in order to reduce the number of bacteria and other contamination that will contact it.
It is true that intense direct sunlight, high temperatures, and the drawing process will kill bacteria and other germs, but it is still entirely possible for some to persist or re-contaminate your fruit due to careless handling practices. Don’t do it!
Once you have flipped the fruit over, recover it tightly and leave them in place, adjusting the position to keep them in the sun if possible.
Continue
Continue to do this every 3 to 4 hours while the sun is up until the fruit is completely dry. You should expect the process to take a minimum of two days in ideal conditions with certain fruits.
This process can take anywhere from a few days to a week depending on the type and thickness of the fruit and other factors.
Know that you must bring your fruits inside with you after the sun goes down and the day starts to cool off.
Plummeting temperatures along with an increase in condensation during the nighttime hours will negatively affect your fruit, possibly spoiling it but definitely hampering the process.
When the sun rises and the temperature starts climbing the next day, place your fruit, covered, back outside and repeat the process, flipping it every 3 to 4 hours.
Once you believe the fruit is properly dried, take a piece and cut or tear it open to examine the interior. Once it is adequately dry, you are nearly done!
Freeze
Freezing your fruit for a couple of hours prior to removal for long-term storage ensures any bacteria that might be on the surface perish. This will significantly reduce the risk of food poisoning and also extend the life of your harvest!
Finished
Once the process is complete, you can store your fruit in an airtight container or in the freezer. You can keep it at room temperature for up to a year.
If you want to extend its shelf life even further, you can freeze it in an airtight container for up to two years or even longer.
Air Drying Fruit for Health, Sustainment and Savings
By following the simple process outlined above you can air dry fruit the same way our ancestors did.
Air-drying fruit is a great way to enjoy healthier snacks, sustain yourself through preservation, and save a ton of money over buying overpriced fruit at the grocery store.
Done correctly and paying attention to proper Storage procedures, your dried fruit can last anywhere from a year to two years.
Do you enjoy dried fruit? Have you ever tried for yourself using traditional air drying or modern electric methods? How did the process work out for you? Let us know in the comments below!
 Like what you read?
Then you’re gonna love my free PDF, 20 common survival items, 20 uncommon survival uses for each. That’s 400 total uses for these dirt-cheap little items!
Just enter your primary e-mail below to get your link:
We will not spam you.