


There’s no doubt that every RECOIL OFFGRID reader understands the importance of a well-constructed knife. It’s arguably the most valuable tool in any survival kit. Whether out of love of the blade or an innate desire for self-sufficiency, many have considered putting their own hands to the forge only to be dissuaded by the expensive equipment and technical skills employed by modern-day bladesmiths.
In this step-by-step instructional article, we’ll guide you through the knife-making process from start to finish, using a stock removal method and basic hand tools.
STEP 1: Select A Steel
The foundation of the knifemaking process is steel, so consider your options carefully. Choosing a steel that has the right balance between hardness, durability (toughness), and corrosion resistance can be challenging, especially when you’re working with limited resources and technology. Many of the steels you might find at the local salvage yard or hardware store are mild steels unsuitable for anything more than a prison shank, while the many “super steels” used in high-end cutlery must undergo hardening processes that require specialized equipment and extreme precision. It’s best to stick with basic, high-carbon steels like 1095 or 1075. Some tool steels like O1 are also relatively easy to work with.
Whenever possible, you should purchase your steel from a reputable dealer that specializes in cutlery steels. This is the best way to make sure you’re getting correct and uniform materials. Plus, you can purchase the steel in the width and thickness you wish to work with, which will save you a lot of time and effort.
Mystery steel (any steel with unknown properties) should always be a last resort. In the event of a global meltdown or zombie apocalypse, a car leaf spring would be a fair gamble, especially in older models where 5160 or similar spring steels were commonly used, but with modern cars it’s still a crapshoot. Plus, repurposed steel, if not already flat, will require additional cutting, bending, twisting, and/or grinding to make it flat and usable.
STEP 2: Lay Out The Design
Once you’ve acquired your steel, the next step is to decide on the blade and handle design and then transfer that design onto the metal.
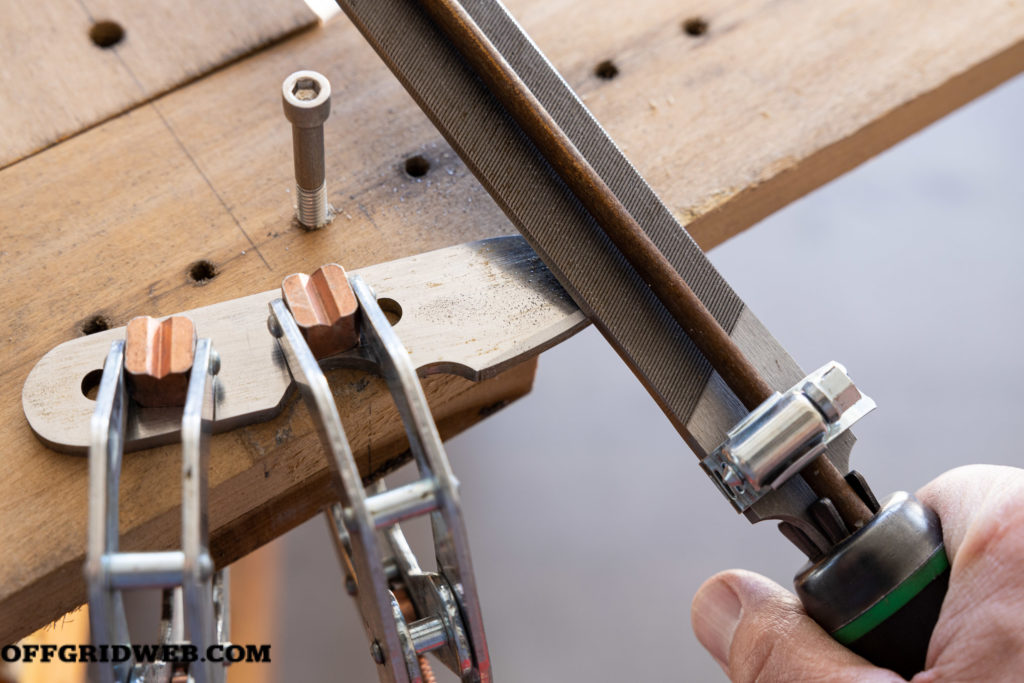
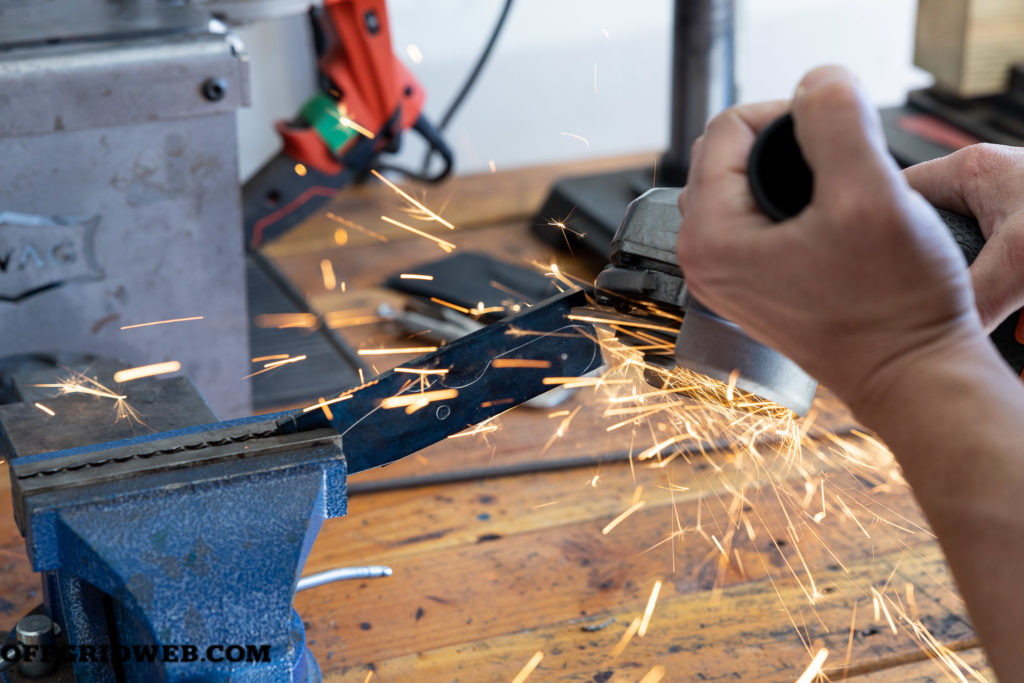 Above: An angle grinder is an inexpensive power tool that can help you make quick work of shaping your knife blank. Use a file to smooth and straighten your cut lines. Different sizes and shapes of files to fit different areas will make this process much easier.
The easiest way to do this is to sketch your design on a piece of cardstock or cardboard with a pencil. Once you’re happy with your design, cut out the design and then trace it onto your steel. You can use a steel layout fluid such as Dykem to coat the surface and trace around the template with a metal scribe, or you can simply use a black marker on the bare steel surface.
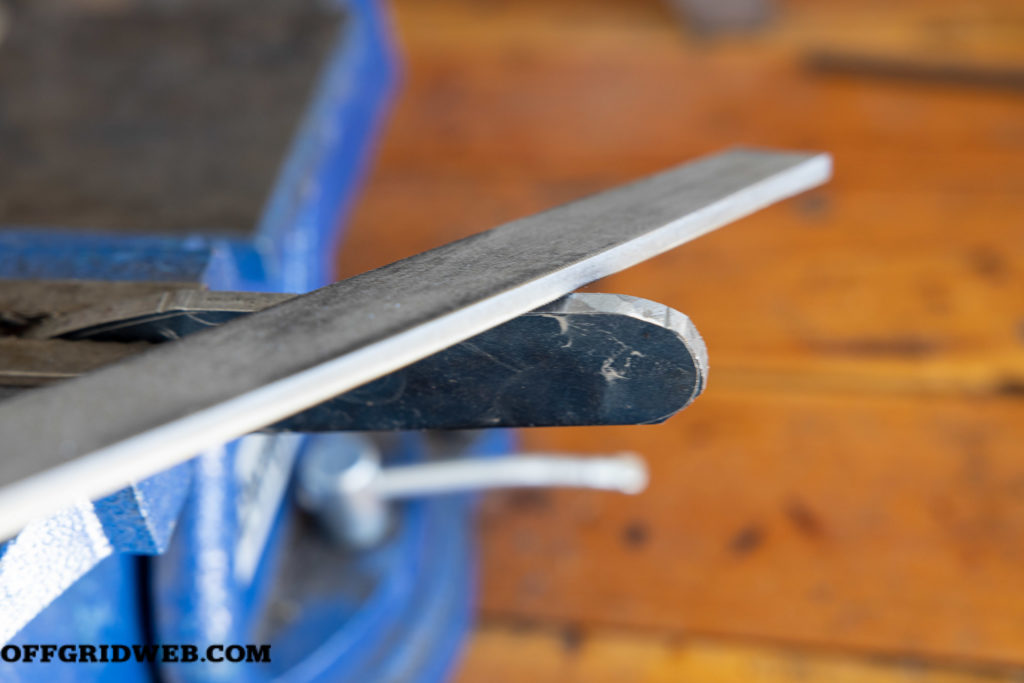
STEP 3: Shape Your Blank
Shaping the knife blank with minimal tools will be the most tedious step in the process. This can be done with nothing more than a hacksaw and a file, but it’ll take time and patience. If you can introduce an angle grinder or metal bandsaw into the mix, it’ll be much faster with less tendonitis.
The process is the same regardless of the tools you’re able to work with. Use a saw or grinder to cut along the lines of your design. Once you get to tight spots like the finger grooves, make a V-shaped cut to remove as much material as possible.
Once you’ve removed as much excess metal as possible, use a file to straighten your lines, round your corners, and remove everything else that isn’t a knife. It’s helpful to have a few different shapes and sizes of files so you can fit into those smaller grooves and odd-shaped crevices.
Don’t forget to drill holes for your handle pins or cord wrap during this step of the process. It’s much easier to drill your holes prior to hardening the steel.
STEP 4: Smooth & Surface
Once you’ve finished shaping your knife blank, you’ll need to smooth everything out and make sure the surface of the knife is even. This can be done using anything from a power sander to a homemade sanding block. The objective here is to make everything nice and even so you can grind your bevels.
Assuming you’re working with minimal tools, a sanding block made out of mild steel with a piece of leather glued to the bottom works very well. Simply cut a sheet of sandpaper a little wider than your knife and fold it over the leather side of the block near the end of the strip. Pinch the sandpaper between you thumbs and index fingers to hold it in place. As the grit wears down, you can slide a fresh portion of sandpaper into place and continue until the entire strip is worn out.
It’s recommended to start with 80-grit sandpaper for this step. Adding some WD-40 onto the sandpaper helps extend the paper’s life and makes hand-sanding much easier and cleaner. You can use a bench vise to hold the knife while working on the outer edges. Once you begin working on the flat surfaces, you can place a long, flat board inside your vise so it extends out from the workbench, then clamp the knife onto the board to hold it in place. The back side of the jig we’ll be discussing in the next section makes a great working surface.
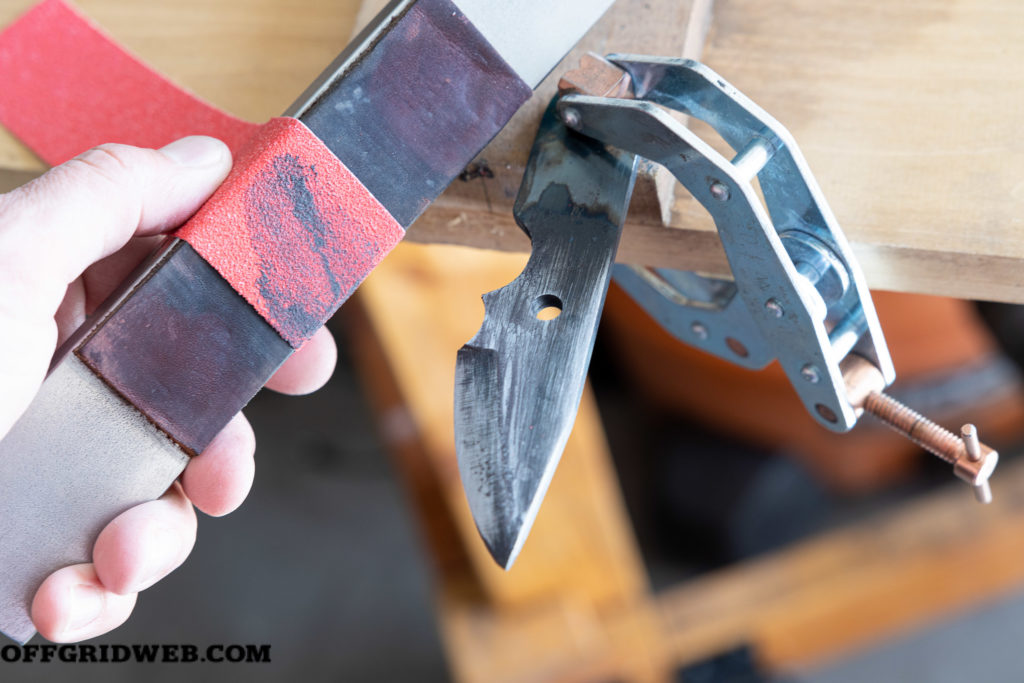
STEP 5: Grind Your Bevels
Grinding the bevels into a knife is the most difficult task every knifemaker faces, whether they’re using a $4,000 knifemaking grinder or the most primitive tools. This author discovered a highly effective way to grind perfectly uniform bevels using a simple homemade jig.
Jig Construction
To build the jig, you’ll need three 2-foot-long ¾-inch by 3½-inch boards, wood glue, four or five eye bolts of different lengths, two nuts for the eye bolts, and a long screw with tight threading to use as a stop screw. You’ll also need a table vise or other method to hold the jig in place when you start using it.
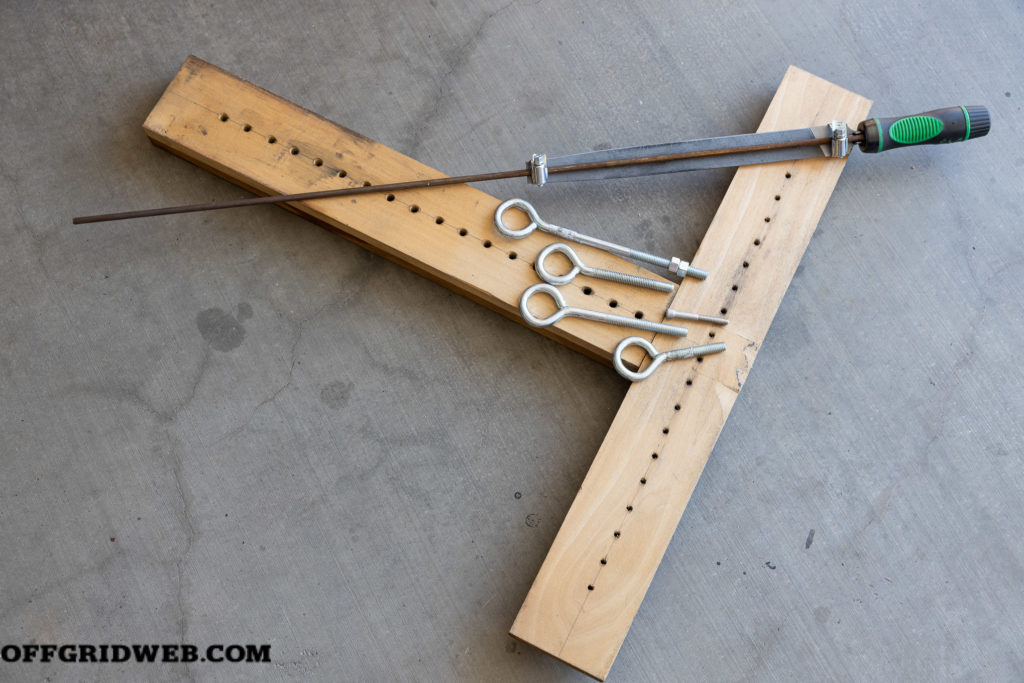
Using one of the boards as a base, glue and clamp the other two boards on top to form a “T” shape. Drill holes the size of your eye bolts down the center of the jig and holes the size of your stop screw down the center of the cross board. Use 1-inch spacing between the holes on both sections.
Using the Jig
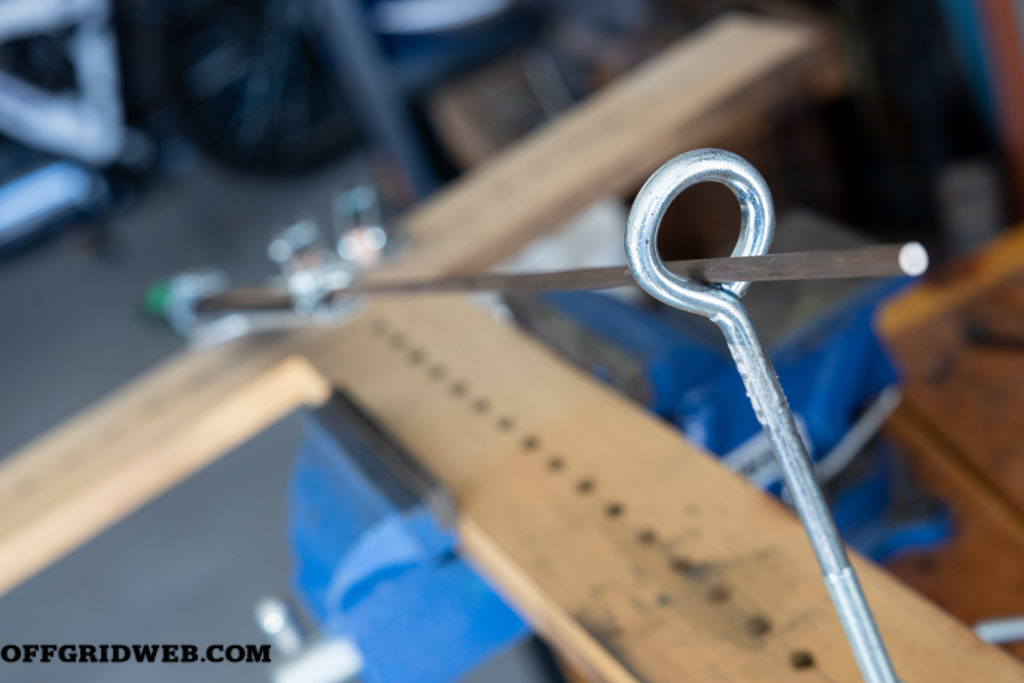
To use the jig, begin by attaching a 2-foot metal rod to the back of a file with hose clamps. Insert a stop screw into one of the pre-drilled holes on the cross portion of the jig. The purpose of this screw is to create a consistent stopping point as you file your primary bevel.
Next, determine where you want to set your plunge line (where the grind stops) and orient the knife so the desired plunge line lines up with the stop screw. Once you have the proper alignment, clamp the knife to the board.
Screw an eye bolt into one of the pre-drilled holes on the jig to set your grinding angle and use the two nuts to lock the bolt in place. The angle should be set steep enough to achieve about a 30-degree bevel. The longer the bolt and the closer it is to the knife, the greater the angle.
Using the eye bolt to guide the file rod, grind down the bevel until you reach the midline of the edge, then repeat the process on the other side. Switch back to the original side and decrease the grind angle. File until the bevel reaches the desired height and blends with the original bevel, then repeat on the other side. You may have to make slight adjustments to your angle along the way until you reach the desired effect.
STEP 6: Heat Treating
This is a multistep process used to change the molecular alignment of steel particles to create a hardened edge that isn’t too brittle. The first step in this process is to heat the steel to a point where it temporarily loses its magnetic properties. The heating process can take place in a coal or gas forge, if available, but you can also make do with a propane or butane torch.
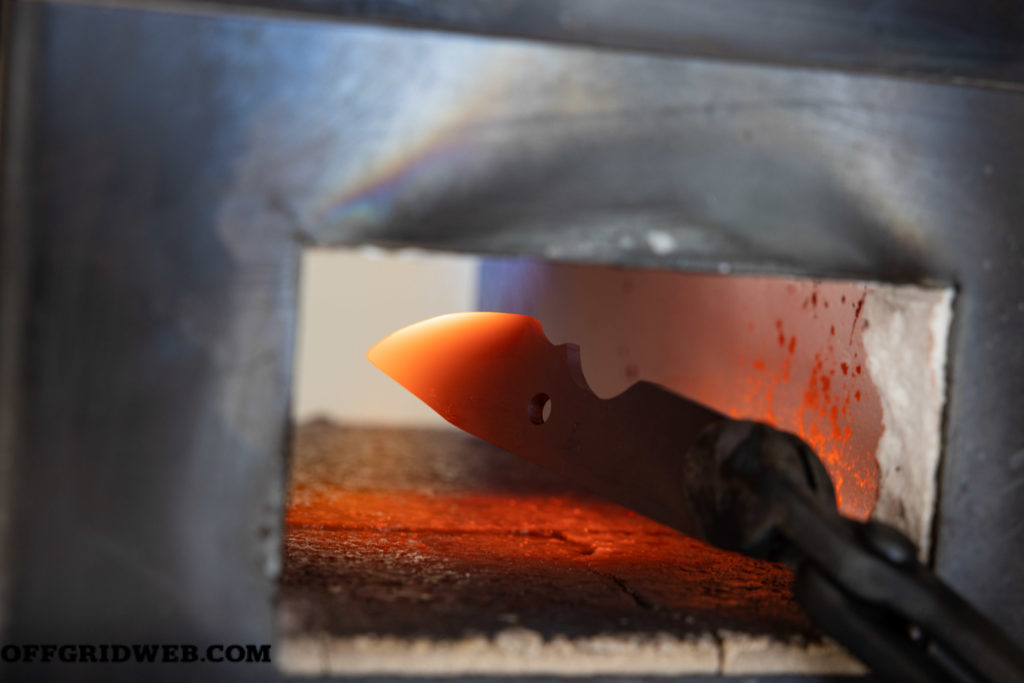
Heat the blade from the cutting edge up to at least the midline of the primary bevel. The heat should be applied until the steel reaches a cherry red color that’s even throughout. The heating point can be confirmed by touching a magnet against the heated portion to check for magnetism. If the heated portion of the steel doesn’t pull toward the magnet, then the critical temperature has been reached and the blade is ready to be cooled using a quenching solution. After performing a magnet check, be sure to apply additional heat to regain the temperature you just lost prior to quenching.
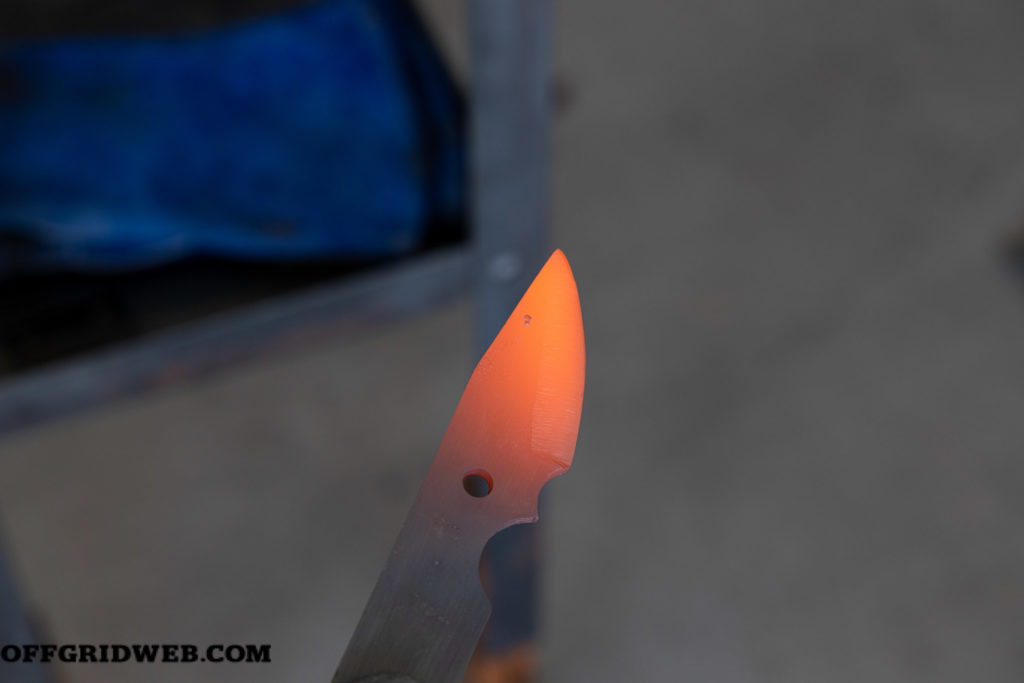
Dip the blade into the quench as rapidly as possible after removing the heat source. Be sure to move the blade back and forth so it cools evenly. Remove the blade and check the hardness with a file to make sure the quench was effective. The file should skate off the edge if the steel is hard.
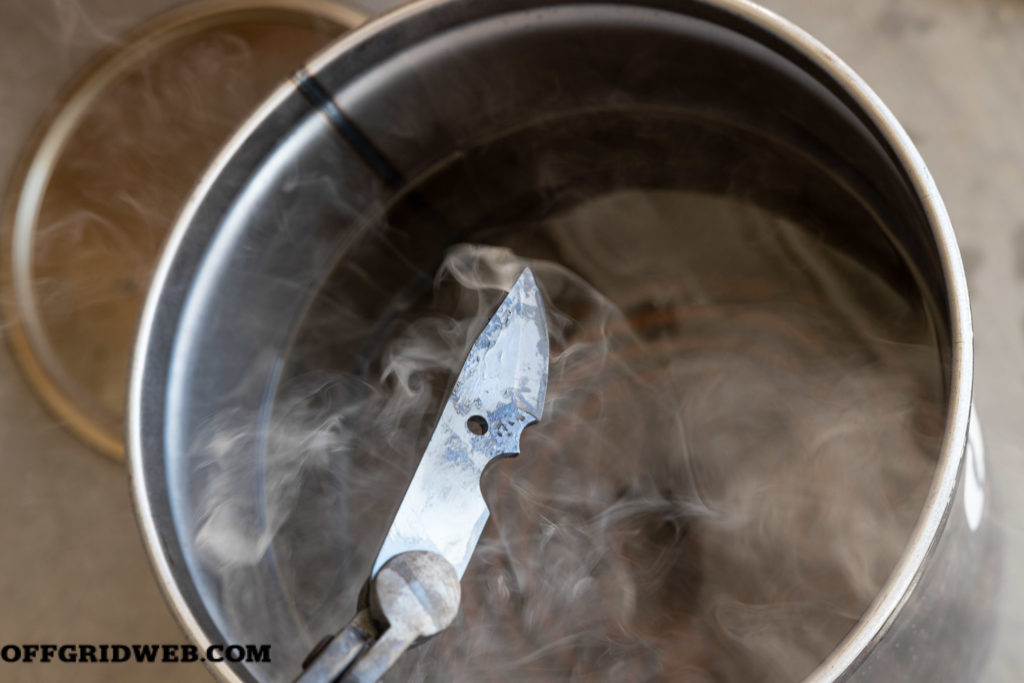
The purpose of the quench is to cool the steel rapidly and force the rearrangement of atomic positions to produce martensite, which is an exceptionally hard phase of steel. Martensite is very brittle, so it’s necessary to modify the mechanical properties by heat treating at a lower temperature range for an extended period of time, a process known as tempering.
Once the metal cools to the touch, place it in the oven for one hour at 400 degrees F (temperature can vary depending on the steel). Remove the knife and allow it to cool, then repeat the process for one additional cycle.
STEP 7: Resurface
After heat treating the blade, you’ll need to remove the fire scale and carbon deposits from the surface. This is basically a repeat of Step 4, so there’s no need to describe the process in detail. The amount of resurfacing you do is based on personal preference and how rough or polished you want the final product to be.
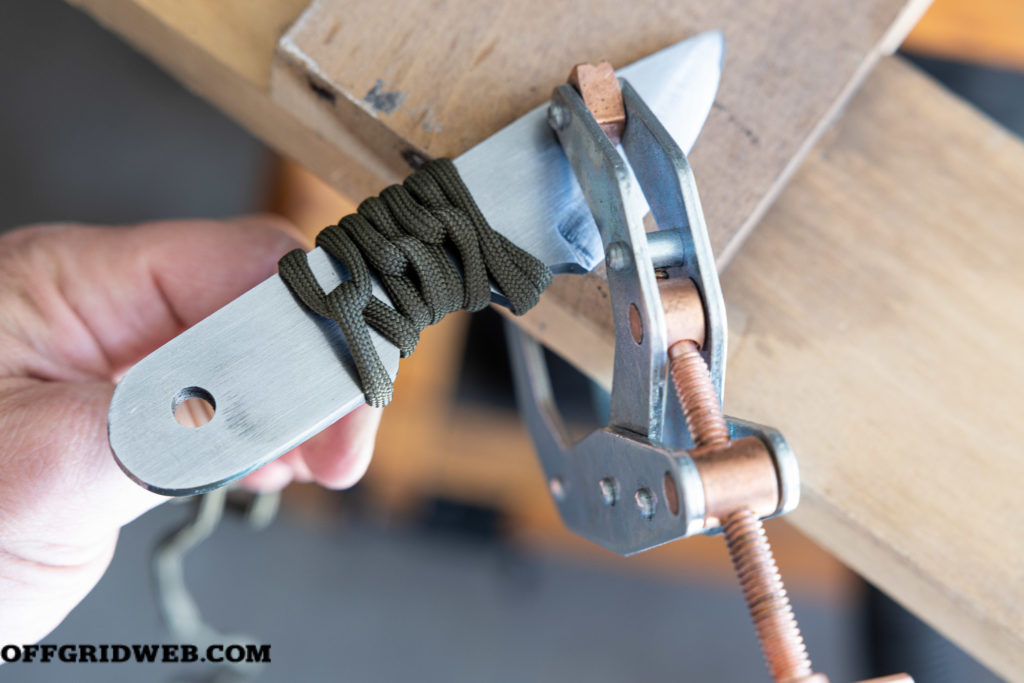
STEP 8: Add Handles/Wrap
Since handle-making and wrapping can itself be an art form, we won’t go into detail here. A simple paracord wrap is the easiest method to start with. Wrap the cord around the top of the handle once, then cross and twist the cord each time the ends meet until the entire tang is covered. When you reach the end, feed the cord through the lanyard hole on the bottom and tie a knot on the other side. Cut and melt the ends of the cord to secure the knot.
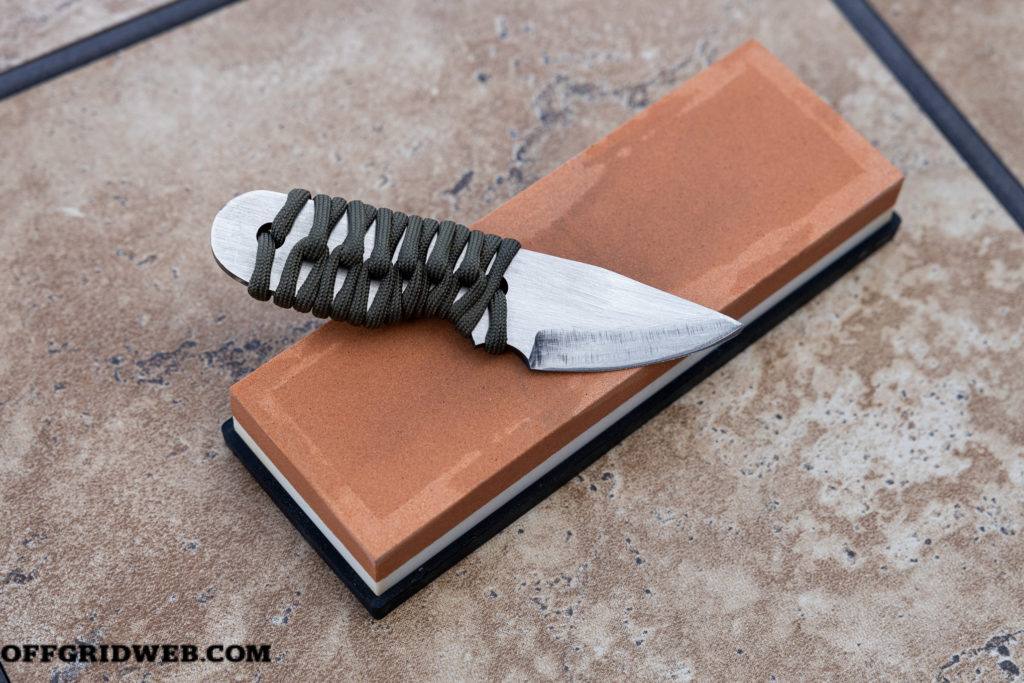
STEP 9: Sharpen
The final step is to sharpen your blade. Depending on the thickness of your primary bevel, it may take some time to form a secondary bevel resulting in a cutting edge. Sharpening can be done using stones or mechanical sharpeners. The more consistent the angle, the finer the edge will be. For a polished, razor-sharp edge, work in stages and finish by running the edge backward along a leather strop. It’s possible to improvise a strop from an old leather belt — look for one with a natural, suede-like inner surface — treated with automotive polishing compound or toothpaste.
Conclusion
The art and science of metalworking can take a lifetime to master, but it doesn’t have to be a difficult arena to enter. No matter if you’re motivated by the survivalist’s code of self-reliance or a desire for artistic expression, the information presented here — though it only scratches the surface — is enough to get you started without breaking the bank.
Check Out the book DIY Guns: RECOIL’s Guide to Homebuilt Suppressors, 80 Percent Lowers, Rifle Mods, and More.
MORE DIY ARTICLES ON RECOIL AND OFFGRID
- DIY Home Security Systems.
- DIY Double Barrel Slam Fire Shotgun.
- Solvent Traps and True DIY Suppressors.
- DIY High-Vis Targets.
- DIY 80 Percent Arms: The Condo Lower.
- DIY Trigger Job on a Springfield Hellcat.
- Walking through the ATF form 1 eFile process: Death and Taxes.
- True Gunsmithing: DIY Bolt Action Build.
- The Anti-G19x: Polymer80’s PF940CL.
- How to Cerakote: a DIY guide.
- DIY Suture Guide
- DIY Knuckle Duster from Spent Brass
- DIY Off-Road Vehicle Recovery
Related Posts
 Slam Fire Shotgun DIY: Building Joe Biden’s BlasterLast year, we built a 410-gauge shotgun from a kit and a lot of pipe fittings for our sister magazine RECOIL OFFGRID. One thing about building that particular piece was that even the parts […]
- How to Suture: DIY Guide to Wound Closure MethodsTraumatic injuries occur in the tens of millions every year in the United States. According to the Centers for Disease Control and Prevention (CDC), close to 2-million victims of trauma […]
- How To Fell a Tree: Summon Your Inner LumberjackModern humans often take for granted the sheer amount of resources we acquire from a forest. If you’re living in a constructed home, chances are it was built out of products acquired from […]
- Keeping Your Finances Afloat Above CovidAmericans face challenging financial times as the coronavirus pandemic continues to wreak havoc on the economy. The definition of how society and the economy works is changing as companies […]
- Book Review: “Choose Adventure: Safe Travels in a Dangerous Place” by Greg EllifritzPremise: Initially living a sedentary life in the United States, Greg Ellifritz got the travel bug late in life and couldn’t get enough of it. When he isn’t working in law enforcement or […]
- OFFGRID 44 Editor’s Letter: How Handy Are You?I ask because I am not. Period. Full-stop. As the editor of a survival magazine, it’s a bit of a skeleton in my closet that I don’t spend Saturday afternoons building my own rainwater […]
- Intro to SDR: Software Defined RadioWhether you’re on-grid or off, information is king. The data traveling around us via radio and microwaves can provide a wealth of intelligence about what’s going on, be it in our […]
- The Secluded Strength ProgramImagine, if you will, there’s an outbreak of a virus threatening the lives of millions of people, and the only way to stop the spread is to stay indoors and not interact with the general […]
- Winning the Germ WarPick your favorite (or least favorite) disaster scenario and ask what your top priorities following that disaster will be. Are a clean body and living space on your list? They should be. […]


The post A Poor Man’s Guide to Knife Making appeared first on RECOIL OFFGRID.